Introduction
There is nothing quite as frustrating as waking up after a heavy storm to find a puddle of dirty water spreading across your garage floor. If you are currently dealing with this messy reality and searching for how to stop rain from coming in under garage door, please know that you are not alone; this is one of the most common homeowner headaches we encounter. The good news is that with the right diagnosis and a few affordable materials, you can permanently seal out moisture and protect your belongings without hiring an expensive contractor.
Why Is Water Getting Under My Garage Door?
Before you buy any products, you must understand why the leak is happening. Water intrusion is rarely just about the door itself; it is usually a symptom of a larger drainage or alignment issue. According to building science principles regarding surface runoff, water always follows the path of least resistance, and if your garage slab has settled or the exterior grading slopes toward the house, no amount of rubber sealing will fully solve the problem.
Common culprits include:
- Worn Bottom Seals: The vinyl or rubber gasket at the bottom of the door becomes brittle over time, losing its flexibility and creating gaps.
- Uneven Concrete Slabs: Frost heave or soil settling can create low spots where water pools directly against the door.
- Clogged Drainage Channels: Dirt and debris block the natural flow of water away from the threshold.
- Improper Door Alignment: If the door tracks are bent or springs are unbalanced, the door may not press evenly against the floor.
- Negative Grading: The driveway or landscaping outside slopes toward the garage rather than away from it.
Expert Insight: “In 80% of service calls for wet garages, the primary issue isn’t the seal itself, but negative grading outside the door. Fixing the slope is often more effective than upgrading the seal.” — Mark Henderson, Certified Garage Door Technician
How Do I Check My Garage Door Seal for Leaks?
You need to perform a simple diagnostic test before purchasing replacement parts. This ensures you address the actual gap size and type.
The Flashlight Test
- Close the garage door completely during daylight hours.
- Turn off all interior garage lights.
- Have a helper shine a bright flashlight along the bottom seam from the outside.
- Stand inside and look for pinpoints of light. Any light equals a water entry point.
The Paper Test
- Place a standard sheet of printer paper on the floor where the door closes.
- Lower the door onto the paper.
- Try to pull the paper out. If it slides freely without resistance, your seal is too loose.
- Repeat this every 12 inches across the entire width of the door.
What Are the Best Solutions to Stop Rain From Coming In Under Garage Door?
Once you have diagnosed the issue, choose the solution that matches your specific problem. Here is a comprehensive comparison of the most effective methods.
| Solution | Best For | Difficulty | Cost Range | Durability |
|---|---|---|---|---|
| Replace Bottom Seal | Worn/cracked gaskets | Easy | $20–$40 | 5–7 Years |
| Install Threshold Seal | Uneven floors/gaps >1/4″ | Medium | $50–$90 | 10+ Years |
| Apply Silicone Caulk | Small corner leaks | Easy | $10–$15 | 2–3 Years |
| Regrade Driveway | Negative slope issues | Hard | $500–$2,000 | Permanent |
| Install Trench Drain | Heavy surface runoff | Expert | $800–$2,500 | 20+ Years |
1. Replace the Bottom Weather Seal (Most Common Fix)
If your existing seal is cracked, flattened, or missing chunks, replacement is mandatory. Most modern doors use either a T-style or U-channel retainer.
Step-by-Step Replacement Guide:
- Measure Accurately: Measure the exact width of your door and the profile of the old seal. Take a photo of the end cap to match the style at the hardware store.
- Remove Old Seal: Open the door halfway and secure it with clamps. Slide the old rubber out of the metal retainer channel. Use pliers if it’s stuck.
- Clean the Channel: Use a wire brush and degreaser to remove rust, dirt, and old adhesive residue. A clean channel ensures smooth installation.
- Lubricate: Spray silicone lubricant (never petroleum-based) inside the retainer channel to reduce friction.
- Install New Seal: Feed the new seal into the channel starting from one end. Work slowly to avoid twisting. Trim excess with a utility knife, leaving 1 inch overhang on each side.
- Test Fit: Close the door and perform the paper test again. Adjust track tension if needed.
2. Install a Garage Door Threshold Seal
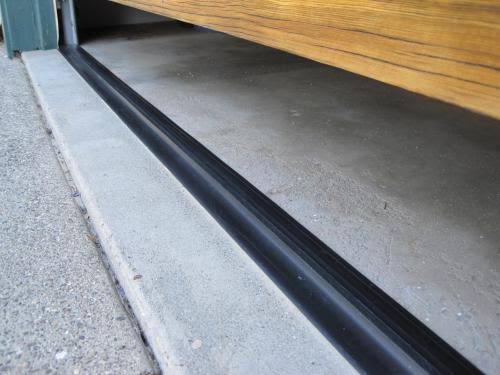
For uneven concrete or gaps larger than ¼ inch, a threshold seal mounted to the floor is superior to a door-mounted seal. These are typically made of durable EPDM rubber and adhere directly to the concrete.
Installation Steps:
- Clean the concrete thoroughly with a pressure washer and let dry for 24 hours. Moisture prevents adhesion.
- Dry-fit the threshold seal to ensure proper length. Mark cut lines with chalk.
- Cut the seal to size using a fine-tooth saw or heavy-duty utility knife.
- Apply high-strength construction adhesive designed for outdoor rubber-to-concrete bonding. Follow manufacturer specs for temperature (usually 50–90°F).
- Press firmly and place weighted objects along the entire length for 24 hours while curing.
- Avoid driving over the seal for 48–72 hours depending on product guidelines.
3. Address Exterior Grading and Drainage
If water actively flows toward your garage during rain, seals are only a temporary bandage. You must manage the water source.
- Extend Downspouts: Ensure roof downspouts discharge at least 4–6 feet away from the garage foundation using extenders or buried drain pipes.
- Build Up Soil: Add compacted clay-rich soil near the garage wall to create a positive slope of at least 1 inch per foot for the first 6 feet.
- Install a French Drain: For chronic pooling, a perforated pipe surrounded by gravel can intercept subsurface water before it reaches the threshold.
- Seal Driveway Cracks: Fill asphalt or concrete cracks with appropriate sealant to prevent water from channeling toward the door through pavement gaps.
Frequently Asked Questions
How often should I replace my garage door bottom seal?
Most quality vinyl or rubber seals last 5 to 7 years under normal conditions. However, extreme UV exposure, salt air, or frequent freezing can reduce lifespan to 3–4 years. Inspect annually each spring and fall.
Can I use regular caulk to seal under my garage door?
No. Standard latex caulk lacks the flexibility and compression strength needed for a moving garage door. Use only polyurethane or silicone-based sealants rated for exterior concrete and dynamic joints. Even then, caulk is a spot fix, not a complete solution.
Will a threshold seal work on an uneven garage floor?
Yes, threshold seals are specifically designed for uneven surfaces. Choose a model with at least ½ inch of compressible height. For severe unevenness (>¾ inch), consider self-leveling concrete compound first, then install the threshold seal after curing.
How much does professional garage door sealing cost?
Professional seal replacement typically costs $150–$300 including labor and materials. Threshold seal installation ranges from $250–$500. Always get three quotes and verify the technician includes warranty coverage on both parts and labor.
Does homeowners insurance cover water damage under garage doors?
Generally, no. Insurance covers sudden, accidental events like burst pipes, not gradual maintenance failures or weather-related seepage due to worn seals or poor grading. Prevention is far cheaper than uncovered repairs.
What temperature is best for installing threshold seals?
Most adhesives require ambient and surface temperatures between 50°F and 90°F (10°C–32°C). Installing below 40°F risks adhesive failure. Check the specific product data sheet, as formulations vary significantly.
Conclusion
Learning how to stop rain from coming in under garage door doesn’t require advanced construction skills—just systematic diagnosis and the right materials. Whether you need a simple $30 seal replacement or a more involved drainage correction, addressing this issue now prevents costly mold remediation, structural rot, and ruined stored items down the road. Your garage should be a dry, functional extension of your home, not a seasonal wading pool.
We’d love to hear from you! Which solution worked best for your situation? Share this guide with fellow homeowners on Facebook, Pinterest, or Nextdoor who might be battling the same rainy-day blues. Together, we can keep garages dry and stress-free! 💧🚪
Leave a Reply