Introduction
There is nothing quite as frustrating as a garage door that slams into the floor or stops inches from closing, leaving your home vulnerable to pests and weather. If you are dealing with this issue, understanding how to set travel limits on Chamberlain garage door opener models is essential for restoring safety and functionality. This guide will walk you through the adjustment process with empathy and precision, ensuring your door operates smoothly without risking damage to your property or injury to your family.
Why Are My Garage Door Travel Limits Incorrect?
Before grabbing a screwdriver, it helps to understand why these settings drift over time. Travel limits dictate exactly where the door stops when opening and closing. When they are miscalibrated, the opener’s motor either pushes too hard against the ground (causing the safety reverse to trigger) or fails to create a proper seal.
According to industry maintenance data, nearly 30% of garage door service calls are related to limit switch adjustments rather than mechanical failure. Factors contributing to this include:
- Seasonal Temperature Shifts: Metal tracks expand in summer and contract in winter, altering the physical distance the door travels.
- Wear and Tear on Rollers: As nylon rollers wear down, the door sits slightly lower, requiring a downward limit adjustment.
- Power Outages: Sudden loss of power can sometimes reset the logic board’s memory on older units.
- Spring Tension Changes: A weakening torsion spring changes the balance, making the factory-set limits inaccurate.
Understanding these variables confirms that needing to adjust your limits is a normal part of homeownership, not necessarily a sign of catastrophic failure.
Safety First: Pre-Adjustment Checklist
Working with garage door openers involves high-tension springs and moving parts. Before learning how to set travel limits on Chamberlain garage door opener, complete this safety protocol:
- Disconnect the Opener: Pull the emergency release cord to disengage the trolley from the opener carriage. Manually lift the door halfway; it should stay in place. If it falls, do not proceed. Your springs are unbalanced and require professional repair first.
- Clear the Area: Remove all vehicles, tools, and debris from the door’s path.
- Identify Your Model: Chamberlain has produced various drive systems (belt, chain, screw) over decades. Locate the model number on the motor housing.
- Unplug Power (For Mechanical Adjustments): If your unit uses physical limit screws, unplug the unit to prevent accidental activation while your hands are near the motor.
Expert Note: The Garage Door Wikipedia entry highlights that modern openers are equipped with photoelectric sensors and auto-reverse mechanisms mandated by federal law. Never bypass these safety features during adjustment.
Identifying Your Adjustment Type: Digital vs. Mechanical
Chamberlain openers generally fall into two categories regarding limit adjustment. Identifying yours correctly saves time and prevents damage.
| Feature | Mechanical Limit Switches | Electronic/Digital Limits |
|---|---|---|
| Era | Older models (pre-2000s) | Newer models (MyQ, Smart Garage) |
| Interface | Two plastic screws on side/back | LED display or Learn button sequence |
| Tool Needed | Flathead screwdriver | Remote/Wall console/Display |
| Precision | Approximate (trial & error) | Exact (measured by encoder) |
| Reset Method | Turn screws physically | Hold buttons to reprogram |
For Units with Physical Screws
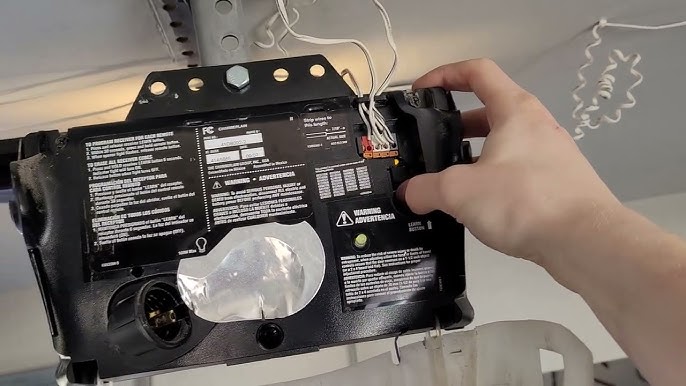
Look for two white or yellow knobs labeled “Up” and “Down” on the side or back panel. Turning these screws moves an internal contact point that physically cuts power to the motor at the set position.
For Units with Digital Programming
Newer Chamberlain/Belt Drive units use an optical encoder. There are no screws. Instead, you enter a programming mode using the wall control or the unit’s display panel to electronically map the top and bottom positions.
Step-by-Step: Adjusting Mechanical Travel Limits
If your unit has physical screws, follow this precise tutorial. Always make small adjustments. One full turn of a limit screw typically equals about 2–3 inches of door travel.
Step 1: Adjust the Down Limit
- Plug the opener back in.
- Close the door using the wall button. Watch carefully.
- If the door reverses before touching the floor, turn the “Down” screw clockwise in quarter-turn increments.
- If the door hits the floor and buckles/reverses, turn the “Down” screw counter-clockwise.
- Test after every quarter turn until the door seals firmly without reversing.
Step 2: Adjust the Up Limit
- Open the door fully.
- If it doesn’t open high enough for your vehicle, turn the “Up” screw clockwise (quarter turns).
- If it opens too far and strains the mechanism, turn counter-clockwise.
- Ensure there is at least 1 inch of clearance between the highest door section and the opener rail when fully open.
Step 3: Verify Force Settings
After setting limits, test the safety reverse. Place a 2×4 piece of wood flat on the floor under the center of the door. Close the door. Upon contacting the wood, the door must automatically reverse within 2 seconds. If it doesn’t, reduce the Down Force setting slightly and retest.
Step-by-Step: Setting Digital Travel Limits
For modern Chamberlain openers with electronic limits, the process is button-driven. While specific sequences vary by model, the general framework below applies to most MyQ-enabled and belt-drive units.
- Enter Programming Mode: Press and hold the Adjustment button (often marked with a gear icon or located near the LED screen) until the display reads “SET OPEN LIMIT” or the up arrow flashes.
- Set Open Position: Use the remote or wall button to jog the door to the desired fully-open height. Press the Adjustment button again to confirm.
- Set Close Position: The display will prompt for the close limit. Jog the door down until it rests evenly on the floor with a proper seal. Confirm with the Adjustment button.
- Test Cycle: The opener will typically perform one complete open-close cycle automatically to verify the new parameters. Stand clear during this test.
- Exit Mode: Press the Learn button or wait for the timeout to save settings.
Consult your specific manual for exact button combinations, as firmware updates occasionally change sequences.
Troubleshooting Common Adjustment Failures
Even after following the steps above, issues may persist. Here are solutions to frequent problems:
- Door Reverses Immediately After Hitting Floor: The down limit is set too low. The motor is pushing against the ground, interpreting it as an obstruction. Back off the down limit by half a turn.
- Door Doesn’t Fully Seal: Check weatherstripping condition first. If stripping is intact, increase the down limit slightly. Also inspect track alignment; bent tracks prevent full closure regardless of limit settings.
- Limits Reset Themselves: This often indicates a failing logic board or capacitor. If digital limits won’t hold after multiple attempts, professional diagnosis is recommended.
- Excessive Noise During Travel: Misaligned tracks or dry rollers can cause binding that mimics limit problems. Lubricate rollers and check track bolts before adjusting limits again.
Frequently Asked Questions (FAQ)
How often should I check my Chamberlain garage door travel limits?
You should test your travel limits and safety reverse system monthly. However, actual adjustments are typically only needed seasonally (spring and fall) when temperature extremes affect metal components, or after any repair work involving springs, cables, or rollers.
Can incorrect travel limits damage my garage door opener?
Yes. If the down limit is set too far, the motor continues pushing against the closed door, causing overheating, premature gear wear, and potential burnout. Consistently running against a hard stop also stresses the chain/belt and trolley assembly, significantly shortening the opener’s lifespan.
Do I need to reprogram my remote after adjusting travel limits?
No. Travel limit adjustments only affect the motor’s internal positioning memory. Your remotes, keypads, and MyQ smart controls retain their pairing and do not require reprogramming after limit changes.
What if my Chamberlain opener doesn’t have visible limit screws or a digital display?
Some mid-era models use a combination approach or have limit switches hidden behind the light lens cover. Refer to your model number and search Chamberlain’s official support library. If documentation is unavailable, a certified technician can identify the adjustment method safely.
Is it safe to adjust travel limits myself, or should I hire a pro?
Adjusting travel limits is considered basic homeowner maintenance and is safe if you follow safety protocols and your door is properly balanced. However, if you discover spring issues, cable fraying, or track damage during inspection, stop immediately and hire a licensed garage door technician. Spring work is extremely dangerous and requires specialized tools.
Why does my door close fine but won’t open completely after adjustment?
The up limit may be set too conservatively, or the door may be binding on the upward stroke due to track misalignment. First, verify the up limit setting. If correct, manually operate the door (disconnected from opener) to feel for resistance points that indicate track or roller issues needing mechanical repair before further limit adjustment.
Conclusion
Mastering how to set travel limits on Chamberlain garage door opener empowers you to maintain a safe, secure, and reliable garage entryway without unnecessary service calls. Whether your unit uses traditional screws or modern digital programming, the key is patience—small incremental adjustments always outperform drastic changes. Remember to prioritize safety checks, respect seasonal shifts, and never force a door that resists movement.
A properly calibrated garage door protects your home, extends your opener’s life, and provides peace of mind every time you press that button.
Found this guide helpful? Share it with fellow homeowners on Facebook, Pinterest, or your neighborhood Nextdoor group! Someone in your community is probably wrestling with a misbehaving garage door right now—and your share could save them hours of frustration. Safe lifting! 🏠🔧
Leave a Reply