Introduction
There are few things more frustrating than pressing your garage remote only to watch the door reverse halfway down or stop inches above the driveway. If you are dealing with this issue, understanding how to set travel limits on a garage door opener is the essential first step toward restoring safety and convenience to your home. This common problem usually stems from misaligned limit switches rather than a broken motor, and with the right guidance, most homeowners can resolve it in under thirty minutes without calling a professional.
What Are Garage Door Travel Limits and Why Do They Matter?
Before grabbing a screwdriver, it is vital to understand what you are actually adjusting. Travel limits are the electronic or mechanical parameters that tell your opener exactly when to stop moving up (the “open” limit) and when to stop moving down (the “close” limit).
According to industry safety standards, these limits are not just about convenience; they are critical safety features. If the close limit is set too high, the door leaves a gap that compromises security and energy efficiency. If set too low, the opener exerts excessive force against the floor, which can damage the door panels, burn out the motor, or trigger the auto-reverse safety mechanism unnecessarily. Properly calibrated limits ensure the door seals tightly against the weather stripping without crushing it, extending the lifespan of both the opener and the door itself.
Expert Insight: “Most service calls for ‘broken’ openers are actually just limit adjustments. The motor thinks the door is hitting an obstacle because the travel distance has shifted due to seasonal temperature changes or spring tension variations,” notes certified garage door technicians in field reports.
Safety First: Pre-Adjustment Checklist
Working with garage doors involves high-tension springs and heavy moving parts. Before attempting any adjustment, complete this safety protocol:
- Disconnect Power: Unplug the opener or turn off the circuit breaker to prevent accidental activation while working near the rail.
- Test Manual Operation: Disengage the emergency release cord and lift the door by hand. It should move smoothly with minimal resistance. If the door is heavy or sticks, do not adjust limits. You likely have a spring or track issue that requires professional attention.
- Clear the Area: Ensure no people, pets, or objects are in the door’s path during testing.
- Inspect Hardware: Check rollers, hinges, and tracks for wear. Loose hardware can cause inconsistent travel that mimics limit problems.
For a deeper understanding of the mechanical systems involved, refer to the comprehensive overview of Garage Door Openers on Wikipedia, which details the evolution of safety mechanisms and drive types.
Step-by-Step: How To Set Travel Limits On A Garage Door Opener
The exact process varies slightly depending on whether your unit uses physical limit screws (common in older chain/belt drives) or electronic digital programming (common in newer smart openers). Below is the universal workflow applicable to most residential units.
Step 1: Locate Your Limit Adjustment Controls
Identify your opener type:
| Opener Type | Limit Control Location | Adjustment Method |
|---|---|---|
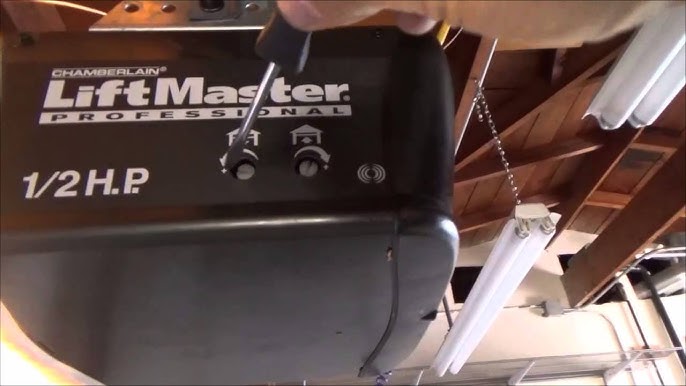
| Older Chain/Belt Drive | Side panel of motor unit | Two plastic screws labeled “Up” and “Down” |
| Screw Drive | Motor housing end cap | Recessed knobs or dials |
| Newer Smart/Wall-Mount | Logic board or LED display | Button sequence or app interface |
| Direct Drive | Internal logic board | Digital programming via learn button |
Step 2: Adjust the Close (Down) Limit
This is typically the most problematic setting. Follow these precise steps:
- Reconnect power and use the wall button (not the remote) to close the door completely.
- Observe where the door stops. If it reverses before touching the floor, the down limit is set too short. If it presses hard into the floor and bends the bottom seal, it is set too long.
- For screw-type adjustments: Turn the “Down” limit screw clockwise to increase travel distance or counter-clockwise to decrease it. Make small adjustments—usually one full turn equals approximately 2–3 inches of travel.
- For digital models: Press and hold the “Set” or “Program” button until the indicator light blinks, then use the up/down buttons to position the door precisely at the floor level, then confirm per manufacturer instructions.
- Test again using the wall button. Repeat micro-adjustments until the door rests firmly on the floor without buckling.
Step 3: Adjust the Open (Up) Limit
- Activate the opener to raise the door fully.
- The door should stop approximately 6–8 inches below the ceiling or header bracket, allowing clearance for vehicles while preventing the trolley from slamming into the motor housing.
- Adjust the “Up” limit screw or digital parameter incrementally. Clockwise typically increases upward travel.
- Cycle the door three times to verify consistency. Temperature fluctuations can affect metal components, so multiple test cycles ensure reliability.
Step 4: Verify Force Settings After Limit Adjustment
Critical: Changing travel limits often necessitates rechecking force settings. If the door now travels further but encounters resistance, the opener may falsely detect an obstruction.
- Place a 2×4 piece of wood flat on the floor under the center of the door.
- Close the door. Upon contacting the wood, the door must automatically reverse within two seconds.
- If it does not reverse, reduce the closing force setting incrementally and retest. Never increase force to compensate for poor limit settings.
Common Mistakes to Avoid During Adjustment
Even experienced DIYers make errors that compromise safety or equipment longevity:
- Adjusting Limits to Fix Mechanical Problems: If the door binds, squeaks, or feels heavy manually, adjusting limits will only mask symptoms and accelerate wear. Address track alignment and lubrication first.
- Making Large Adjustments at Once: Turning limit screws multiple rotations between tests leads to overshooting and potential damage. Always adjust in quarter-turn increments.
- Ignoring Seasonal Changes: Metal rails expand in summer and contract in winter. Limits perfect in July may need slight tweaking in January. Schedule biannual checks.
- Skipping the Auto-Reverse Test: This is non-negotiable. A door that fails to reverse on obstruction poses serious injury risk, especially to children and pets.
FAQ: Frequently Asked Questions About Garage Door Travel Limits
H2: FAQ Section
Q1: How often should I check my garage door travel limits? You should inspect and test travel limits at least twice yearly—typically during spring and fall maintenance routines. Additionally, check them immediately if you notice the door reversing unexpectedly, leaving gaps, or making unusual grinding noises during operation. Seasonal temperature shifts and normal wear can gradually alter calibration.
Q2: My door still reverses after adjusting the down limit. What’s wrong? If limits are correctly set but reversal persists, the issue is likely excessive closing force sensitivity, obstructed safety sensors, or binding in the tracks. First, clean and realign the photo-eye sensors near the floor. Next, verify the door moves freely by hand. Only after confirming mechanical smoothness should you adjust the force setting downward in small increments.
Q3: Can I set travel limits using my smartphone app? Many modern smart openers (e.g., Chamberlain MyQ, LiftMaster Wi-Fi) allow limit adjustments through their companion apps. However, always perform initial calibration using the physical wall console for precision, then fine-tune via the app. App-based adjustments rely on accurate baseline settings; starting with incorrect physical limits will propagate errors digitally.
Q4: Is it safe to adjust travel limits myself, or should I hire a professional? Setting travel limits is generally safe for homeowners who follow proper precautions and whose doors operate smoothly manually. However, if your door has torsion springs, shows signs of cable fraying, or exhibits uneven movement, hire a certified technician. Spring-related work carries significant injury risk and should never be attempted as part of limit adjustment.
Q5: Why did my travel limits change suddenly without any adjustments? Sudden limit drift typically indicates underlying mechanical issues: worn sprockets on chain drives, stripped gears in screw drives, loose mounting brackets allowing the motor to shift, or stretched cables on belt systems. Inspect these components thoroughly. Persistent drifting despite repeated adjustments signals that component replacement—not recalibration—is needed.
Q6: Does adjusting travel limits void my opener warranty? Normal user adjustments to travel limits as described in your owner’s manual do not void warranties. However, damage caused by improper adjustment (e.g., burning out motors by forcing excessive travel, bending rails) typically is not covered. Always document your settings before changing them and retain your manual for model-specific procedures.
Conclusion
Mastering how to set travel limits on a garage door opener empowers you to maintain a safer, quieter, and more reliable entry point to your home. By following systematic adjustments, prioritizing safety verification, and addressing root mechanical causes rather than symptoms, you extend equipment life and avoid costly service calls. Remember that patience and incremental testing yield better results than rushed, large-scale changes.
If this guide helped you restore smooth garage door operation, please share it on social media to help fellow homeowners tackle this common maintenance task confidently. Tag us with your success stories—we love seeing DIY wins! Safe adjusting, and may your door always close perfectly.
Leave a Reply