Introduction
Does a cold draft sneak into your garage every time the wind blows? Are you noticing mice or insects finding their way in through that stubborn gap at the bottom of your door? You are not alone. Many older homes and even new constructions suffer from concrete slabs that aren’t perfectly level, making standard sealing methods ineffective.
If you are wondering how to seal a garage door with uneven floor, you have come to the right place. This guide will walk you through practical, cost-effective solutions that actually work, ensuring your garage stays dry, warm, and pest-free regardless of the terrain beneath your door.
Why Standard Seals Fail on Uneven Concrete
Before we dive into the fixes, it is crucial to understand why off-the-shelf rubber seals often fail. Most standard garage door bottoms are designed for flat, level surfaces. When your concrete floor has dips, humps, or slopes, a rigid seal creates gaps.
According to the U.S. Department of Energy, air leakage can account for 25–40% of heating and cooling costs in typical homes. While a garage might not be conditioned space, sealing it prevents moisture intrusion, which protects your stored items and your home’s interior if the garage is attached.
Common Floor Issues
- Settling: Over time, soil beneath the slab shifts, causing low spots.
- Poor Pouring: Original construction may have left high ridges or waves.
- Cracking: Structural cracks create irregular channels for air and water.
Step 1: Assess the Gap and Clean the Area
You cannot fix what you do not measure. Before buying materials, you need to know exactly what you are dealing with.
Tools You Will Need:
- Tape measure
- Flashlight
- Wire brush
- Degreaser or mild detergent
- Shop vacuum
The Inspection Process
- Close the garage door completely.
- Shine a flashlight from inside the garage toward the bottom seal. Look for light escaping through gaps.
- Measure the variance. Use a ruler to check the gap height at the left, center, and right of the door. Note the largest gap.
- Clean thoroughly. Remove all dirt, oil, and debris from the bottom of the door and the concrete threshold. A clean surface is vital for any adhesive to bond properly.
Pro Tip: If the gap varies by more than 1 inch across the width of the door, simple weatherstripping may not be enough. You might need a combination of methods discussed below.
Step 2: Choose the Right Sealing Method
There is no “one size fits all” solution. Here are the three most effective methods for uneven floors, ranked by difficulty and effectiveness.
Option A: Flexible Bottom Seal Replacement (Best for Minor Unevenness)
If your floor is slightly wavy but not drastically sloped, replacing the existing bulb seal with a high-quality, flexible rubber seal is the first step.
- Material: Look for EPDM rubber seals. They remain flexible in extreme temperatures (-40°F to 200°F).
- Installation: Remove the old retainer bracket, slide out the old seal, and insert the new one. Ensure it hangs down about 1/2 inch below the door bottom when closed.
Option B: Install a Garage Door Threshold Seal (Best for Moderate Gaps)
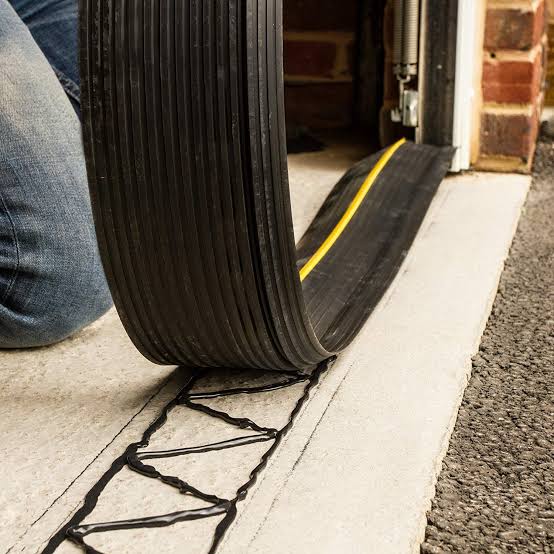
This is often the best answer to how to seal a garage door with uneven floor. A threshold seal is a heavy-duty rubber strip that adheres directly to the concrete floor, creating a ramp-like barrier that the door closes against.
Why It Works:
Unlike door-mounted seals that hang down, threshold seals sit on the ground. High-quality thresholds are made from pliable vinyl or rubber that compresses under the weight of the door, filling in small dips and holes.
Installation Steps:
- Dry Fit: Place the threshold seal along the door line. Mark where it needs to be cut for width.
- Cut to Size: Use a utility knife to trim the seal to the exact width of your garage door.
- Apply Adhesive: Most thresholds come with industrial-grade adhesive. Apply it to the bottom of the seal.
- Position Carefully: Align the seal so the door will close directly onto it. For uneven floors, ensure the seal bridges the low spots.
- Weight It Down: Close the garage door and leave it closed for 24 hours to allow the adhesive to cure fully.
Option C: Use Expanding Foam Backer Rods + Silicone (Best for Irregular Cracks)
If your floor has deep, irregular cracks rather than general unevenness, standard strips won’t work.
- Insert Backer Rod: Push foam backer rods into deep cracks. This provides a base for the sealant.
- Apply Silicone: Use a high-grade, exterior-rated silicone sealant over the rod. Smooth it out to create a flat surface.
- Install Threshold: Once cured, install a threshold seal over this newly leveled area.
Comparison: Which Method Is Right for You?
| Feature | Flexible Bottom Seal | Threshold Seal | Foam & Silicone Patch |
|---|---|---|---|
| Cost | Low ($15–$30) | Medium ($30–$60) | Low ($10–$20) |
| Difficulty | Easy | Moderate | Moderate |
| Best For | Flat/Slightly Wavy Floors | Moderate Unevenness | Deep Cracks/Holes |
| Durability | 2–5 Years | 5–10 Years | 3–7 Years |
| Water Proofing | Good | Excellent | Good |
Step 3: Fine-Tuning the Door Alignment
Sometimes, the issue isn’t just the floor—it’s the door itself. If the door is twisted or misaligned, it will never seal evenly, no matter what you put on the floor.
Check the Tracks
Ensure the vertical tracks are plumb (perfectly vertical). If they are leaning, the door will hang at an angle, creating larger gaps on one side.
Adjust the Limit Switches
Modern garage door openers have “down limit” settings. If the door stops too high, it won’t compress the seal. Consult your opener’s manual to adjust the down travel limit so the door presses firmly against the new threshold.
Warning: Do not force the door down excessively. This can damage the opener motor or bend the door sections. Adjust in small increments (1/8 inch at a time).
Advanced Tip: The “Double Seal” Technique
For extreme cases where the floor is severely uneven, consider a dual-layer approach:
- Layer 1: Install a threshold seal on the concrete to bridge the major dips.
- Layer 2: Replace the door’s bottom bulb seal with a wider, softer rubber gasket.
When the door closes, the soft bulb compresses against the threshold, creating a double barrier against air and water. This method is highly effective for garages in flood-prone areas or regions with heavy snow.
FAQ: Common Questions About Sealing Uneven Garage Floors
1. Can I use concrete patch to level the floor instead?
Yes, but it is labor-intensive. You would need to use a self-leveling concrete compound. However, this requires precise preparation and may crack over time if the underlying soil shifts. A flexible threshold seal is usually easier and more forgiving of future movement.
2. Will sealing the garage door trap moisture inside?
If your garage is well-ventilated, no. However, ensure you have adequate airflow. Sealing the bottom prevents external water from entering, but internal humidity (from washing cars or wet tools) needs to escape. Consider installing a vent or using a dehumidifier.
3. How often should I replace the threshold seal?
Inspect it annually. Most high-quality vinyl or rubber thresholds last 5–10 years. Replace it if you notice cracking, brittleness, or if it no longer springs back after being compressed.
4. Can I install a threshold seal myself?
Absolutely. It is a beginner-friendly DIY project. The most critical step is cleaning the concrete thoroughly before applying the adhesive. No special tools are required beyond a utility knife and a tape measure.
5. What if my garage door has a large gap on only one side?
This usually indicates a track alignment issue rather than a floor problem. Check if the vertical track on that side is bent or loose. Tighten the brackets and realign the track before attempting to seal the floor.
Conclusion
Learning how to seal a garage door with uneven floor doesn’t require a professional contractor or a complete concrete overhaul. By choosing the right materials—specifically flexible threshold seals—and ensuring your door is properly aligned, you can create a tight, weather-resistant barrier.
Not only will this keep out pests and drafts, but it also adds value to your home by improving energy efficiency and protecting your belongings from water damage.
Ready to get started? Grab your tape measure and head to the hardware store this weekend. Your garage (and your wallet) will thank you!
Did you find this guide helpful? Share it with your neighbors on Facebook or Pinterest who might be battling the same drafty garage issues!
Leave a Reply