Introduction
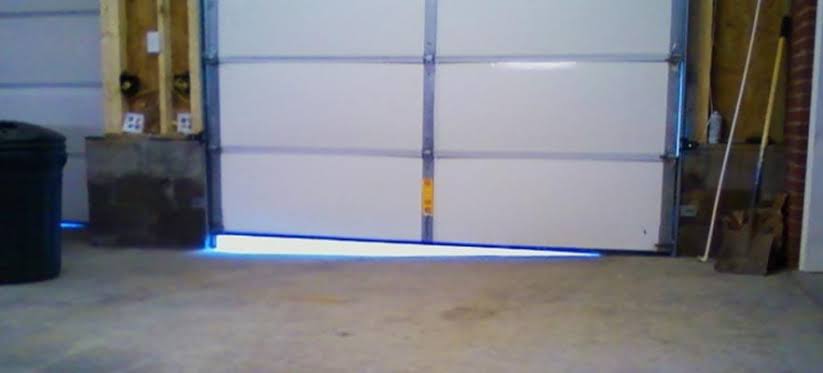
Is cold air, dust, or pesky rodents sneaking into your garage through gaps under the door? You are not alone. Many homeowners struggle with this issue because concrete slabs rarely cure perfectly flat. Learning how to seal a garage door with an uneven floor is essential for maintaining energy efficiency and protecting your stored items from moisture and pests.
In this guide, we will walk you through practical, cost-effective solutions that work regardless of how wavy your concrete might be. Whether you have a slight dip or a significant slope, there is a sealing method tailored to your specific situation.
Why Is My Garage Floor Uneven?
Before jumping into the fix, it helps to understand the root cause. Most garage floors are made of poured concrete. During the curing process, concrete can shrink, settle, or warp due to temperature changes and soil movement beneath the slab.
According to the American Concrete Institute, minor variations in floor flatness are common and often within acceptable construction tolerances. However, even a quarter-inch gap can compromise your garage’s thermal envelope. Understanding that this is a structural norm rather than a defect can help you choose the right flexible sealing solution rather than trying to “fix” the concrete itself.
Assessing the Gap: Measure Before You Buy
Not all uneven floors require the same solution. The severity of the unevenness dictates the type of weatherstrip you need.
Step 1: Check the Gap Size
Close your garage door completely. Use a ruler or a tape measure to check the distance between the bottom of the door and the highest point of the floor. Then, check the lowest point (the deepest gap).
- Minor Unevenness (0–1/4 inch): Standard rubber weatherstripping will suffice.
- Moderate Unevenness (1/4–1/2 inch): You need a heavy-duty bulb seal or a double-layer threshold seal.
- Severe Unevenness (1/2 inch+): You may need a combination of a threshold ramp and a flexible vinyl seal.
Step 2: Identify the Pattern
Is the floor uneven across the entire width, or is it just low in the center?
- Center Dip: Common in older garages. Requires a seal that compresses significantly in the middle.
- Side Slope: Often caused by poor drainage grading. Requires a tapered seal or adjustable threshold.
Method 1: Installing a Heavy-Duty Bulb Seal (Best for Minor to Moderate Gaps)
The most popular and effective way to handle uneven floors is replacing the standard flat strip with a bulb-style weatherstrip. The hollow “bulb” at the bottom compresses to fill irregularities.
Tools You Will Need:
- New bulb-style garage door bottom seal (vinyl or rubber)
- Utility knife
- Screwdriver or drill
- Soapy water (in a spray bottle)
- Ladder
Step-by-Step Installation:
- Remove the Old Seal: Open the garage door halfway. Locate the retainer channel at the bottom of the door. Unscrew or pull out the old weatherstrip. If it is glued, use a putty knife to scrape it off gently.
- Clean the Channel: Wipe down the metal channel with a damp cloth to remove dirt and rust. This ensures the new seal slides in smoothly.
- Measure and Cut: Measure the width of your garage door. Cut the new bulb seal to length using a utility knife. Pro Tip: Cut it 1/2 inch longer than needed; you can trim the excess later.
- Lubricate the Seal: Spray soapy water inside the retainer channel and on the edges of the new seal. This acts as a lubricant, making installation much easier.
- Insert the Seal: Start from one end and push the seal into the channel. Work your way across the door. Ensure the bulb faces downward toward the floor.
- Secure the Ends: If your seal uses screws, tighten them evenly. Do not overtighten, as this can distort the bulb shape.
- Test the Closure: Close the door. Inspect the seal from the inside. The bulb should be compressed slightly but not flattened completely. If there are still gaps, you may need a thicker bulb size.
Method 2: Using a Garage Door Threshold Seal (Best for Severe Unevenness)
If the gap is too large for a bulb seal alone, a threshold seal is the next best option. This is a rubber strip that adheres directly to the concrete floor, creating a ramp-like barrier that the door closes against.
Advantages vs. Disadvantages
| Feature | Bulb Seal (Door-Mounted) | Threshold Seal (Floor-Mounted) |
|---|---|---|
| Installation Difficulty | Easy (DIY friendly) | Moderate (Requires precise alignment) |
| Durability | High (Protected from foot traffic) | Medium (Subject to vehicle tires) |
| Effectiveness on Uneven Floors | Good for < 1/2 inch gaps | Excellent for > 1/2 inch gaps |
| Aesthetics | Invisible when closed | Visible black strip on floor |
Installation Steps:
- Clean the Concrete: Sweep and vacuum the area where the door closes. Use a degreaser if there are oil stains. The surface must be completely dry.
- Dry Fit the Seal: Place the threshold seal on the floor without removing the adhesive backing. Close the door to see if it aligns correctly with the bottom of the door.
- Mark the Position: Use chalk or painter’s tape to mark the exact position of the seal.
- Apply Adhesive: Peel back a small section of the adhesive backing. Align the seal with your marks. Press firmly onto the concrete.
- Work in Sections: Peel back more backing and press down as you go. Use a roller or your foot to ensure strong adhesion.
- Let it Cure: Wait at least 24 hours before closing the garage door on the seal to allow the adhesive to set fully.
Method 3: The Hybrid Approach (For Extreme Cases)
For garages with both significant slopes and large gaps, consider combining methods. Install a flexible vinyl threshold on the floor to bridge the major height difference, and add a brush seal or bulb seal to the door for fine-tuning.
Brush seals are particularly effective for uneven surfaces because the bristles can bend and adapt to irregular contours better than solid rubber. They are also excellent at keeping out leaves and debris.
Maintenance Tips for Long-Lasting Seals
Even the best seal will fail if not maintained. Here is how to keep your garage draft-free year-round:
- Clean Regularly: Dirt and grit can prevent the seal from compressing fully. Sweep under the door monthly.
- Inspect for Cracks: Rubber degrades over time due to UV exposure and temperature fluctuations. Check for brittleness or cracks every six months.
- Lubricate Moving Parts: Ensure your garage door tracks and springs are lubricated so the door closes evenly. An misaligned door will leave gaps regardless of the seal quality.
- Replace When Necessary: Most garage door seals last 3–5 years. If you notice persistent drafts, it is time for a replacement.
FAQ Section
Q1: Can I use expanding foam to seal the gap under my garage door?
A: No, expanding foam is not recommended for garage door bottoms. It is rigid and will crack under the pressure of the door closing. It also prevents the door from opening and closing smoothly. Always use flexible rubber or vinyl materials designed for dynamic movement.
Q2: How do I know if my garage door is aligned correctly?
A: If the gap is consistent on one side but large on the other, your door may be misaligned. Check the tracks for bends or loose bolts. If the door hangs crooked, adjust the track brackets or call a professional technician before installing a new seal.
Q3: Will a threshold seal damage my car tires?
A: High-quality threshold seals are made from durable rubber designed to withstand vehicle weight. However, driving over it repeatedly at high speeds may cause wear over time. It is generally safe for standard passenger vehicles. Avoid sharp turns while the tire is on the seal to prevent tearing.
Q4: What is the best material for garage door seals in cold climates?
A: In cold climates, look for seals made from EPDM rubber or high-grade vinyl. These materials remain flexible in sub-zero temperatures. Cheap rubber can become brittle and crack in winter, leading to leaks.
Q5: Can I install a seal myself, or do I need a professional?
A: Installing a garage door seal is a straightforward DIY project that typically takes less than an hour. You only need basic tools like a screwdriver and a utility knife. Professional help is only necessary if the door itself is misaligned or damaged.
Q6: Does sealing the garage door improve energy efficiency?
A: Yes, significantly. A sealed garage door prevents conditioned air from escaping and outside air from entering. This is especially important if your garage is attached to your home or used as a workspace. It can help reduce heating and cooling costs by maintaining a more stable temperature.
Conclusion
Learning how to seal a garage door with an uneven floor doesn’t have to be a frustrating experience. By choosing the right type of seal—whether it’s a flexible bulb strip, a robust threshold, or a hybrid solution—you can effectively block out drafts, water, and pests.
Remember, the key is flexibility. Your seal needs to compress and adapt to the contours of your concrete. With regular maintenance and the right materials, your garage will remain a clean, dry, and energy-efficient space for years to come.
Did you find this guide helpful? Share it with your neighbors on Facebook or Pinterest who might be struggling with their own drafty garages! Let’s help everyone keep their homes comfortable and pest-free.
Leave a Reply