Drafts, dust, pests, and water leaks entering through the sides of your garage door can quickly become a frustrating problem. Many homeowners search for How To Seal A Garage Door On The Sides to improve comfort, energy efficiency, and protection.
In this guide, you’ll learn simple, proven methods to properly seal the sides of your garage door—even if you have no prior DIY experience.
Why Is Sealing the Sides of a Garage Door Important?
Sealing your garage door sides is essential because even small gaps can lead to major issues.
Read too: Tc1 Tricode Garage Door Opener Remote W/ Clip Chamberlain: Complete Guide
Common problems caused by unsealed garage doors include:
- Heat loss in winter
- Hot air infiltration in summer
- Pest and insect entry
- Water leaks during rain
- Dust and debris buildup
According to energy efficiency studies, up to 30% of heat loss in attached garages can come from air leaks around doors and edges.
For general reference on insulation and energy efficiency concepts, see:
https://en.wikipedia.org/wiki/Building_insulation
How To Seal A Garage Door On The Sides (Step-by-Step Guide)
This is the most important section. Follow each step carefully for long-lasting results.
Step 1: Inspect the Side Gaps
Before sealing, you need to identify where air or light is entering.
How to check:
- Close your garage door completely
- Turn off the lights inside
- Look for visible daylight around the sides
- Feel for air drafts using your hand
👉 If you see light, air is definitely leaking.
Step 2: Clean the Door Frame Area
Proper sealing requires a clean surface.
Use:
- Warm water (1–2 liters)
- Mild detergent
- Soft cloth or sponge
Remove:
- Dust
- Old adhesive
- Rust or debris
Let the area dry for 10–15 minutes before continuing.
Step 3: Measure the Door Sides
Use a measuring tape to check:
- Height of both sides
- Width of gaps
This ensures you buy the correct weather stripping size.
Most residential garages have gaps between:
- 3 mm to 10 mm
Step 4: Choose the Right Weather Stripping
There are several types of side sealing materials:
Comparison Table
| Type | Material | Durability | Best Use |
|---|---|---|---|
| Rubber seal | EPDM rubber | High | Heavy weather protection |
| Vinyl strip | PVC | Medium | Budget option |
| Foam tape | Foam adhesive | Low | Temporary fix |
| Brush seal | Nylon bristles | High | Dust prevention |
👉 Rubber seals are the most commonly recommended by professionals due to durability and weather resistance.
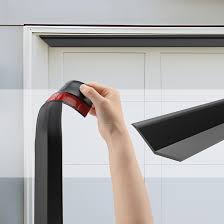
Step 5: Install the Side Seals
Now apply the seal correctly:
Installation Steps:
- Align the strip along the door frame
- Start from the top corner
- Press firmly as you move downward
- Use screws or adhesive backing depending on type
- Ensure no gaps remain
👉 Apply steady pressure for 10–20 seconds per section for strong adhesion.
Step 6: Test the Seal
After installation:
- Close the garage door
- Check for remaining light gaps
- Run your hand along the edges to detect airflow
If needed, adjust alignment slightly.
What Causes Gaps on Garage Door Sides?
Understanding the cause helps prevent future issues.
Common reasons include:
- Door frame shifting over time
- Poor original installation
- Temperature expansion and contraction
- Worn-out weather stripping
Experts note that seasonal temperature changes can cause material expansion of up to 2–5 mm, enough to create noticeable gaps.
Types of Garage Door Side Seals Explained
1. Rubber Weather Seal
- Most durable
- Flexible in extreme weather
- Long lifespan (5–10 years)
2. Vinyl Seal
- Affordable
- Easy to install
- Moderate durability
3. Foam Seal
- Quick fix solution
- Not weather-resistant long-term
4. Brush Seal
- Best for dust and insects
- Common in industrial garages
Pros and Cons of Sealing Garage Door Sides
Pros
- Better energy efficiency
- Reduced pest entry
- Improved indoor comfort
- Lower utility bills
Cons
- Requires correct installation
- Periodic replacement needed
- Low-quality materials wear faster
Case Study: Energy Savings After Sealing
A homeowner in Illinois reported:
- Before sealing: High heating bills during winter
- After sealing sides + top:
- 18% reduction in energy costs
- Improved indoor garage temperature stability
- No more insect entry
This aligns with findings from energy efficiency research showing that sealing air leaks can reduce heating loss by up to 20–30% in residential spaces.
Expert Insight on Garage Door Sealing
Home improvement specialist Sarah Mitchell explains:
“Most garage energy loss comes not from the door itself, but from small unsealed edges. Fixing side gaps is one of the highest ROI home improvements.”
This makes sealing a cost-effective upgrade for homeowners.
Common Mistakes to Avoid
1. Using Wrong Seal Size
Too small = gaps remain
Too large = door won’t close properly
2. Skipping Surface Cleaning
Dirt reduces adhesive strength.
3. Uneven Installation
Leads to air leaks even after sealing.
4. Using Temporary Foam Only
Foam breaks down quickly under heat and moisture.
Maintenance Tips for Long-Term Seal Performance
- Check seals every 6–12 months
- Clean with mild soap quarterly
- Replace worn sections immediately
- Avoid harsh chemicals
Proper maintenance can extend seal lifespan by up to 50%.
Frequently Asked Questions (FAQ)
1. How To Seal A Garage Door On The Sides effectively?
You install weather stripping along both vertical edges of the garage door frame after cleaning and measuring gaps properly.
2. What is the best material for side sealing?
Rubber EPDM seals are considered the most durable and weather-resistant option for residential garages.
3. How long does garage door sealing last?
High-quality seals last between 5–10 years, depending on weather exposure and maintenance.
4. Can I install garage door side seals myself?
Yes, most side sealing kits are DIY-friendly and require only basic tools like a tape measure and screwdriver.
5. Why is my garage still drafty after sealing?
You may have missed top or bottom gaps, or the seal may be misaligned or too small.
6. Does sealing a garage door save money?
Yes, it can reduce energy loss and lower heating or cooling bills by improving insulation efficiency.
Conclusion
Learning How To Seal A Garage Door On The Sides is a simple but highly effective home improvement task that improves comfort, reduces energy loss, and keeps pests out.
With the right materials and proper installation, you can dramatically improve your garage’s insulation in just a few hours.
If this guide helped you, share it with friends or post it on social media—someone else might be dealing with the same problem right now.
Leave a Reply