Introduction
There is nothing quite as frustrating as pulling the emergency release cord during a power outage or malfunction, only to realize later that your automatic opener refuses to engage. If you are currently staring at a disconnected system and wondering how to reset your garage door after manually opening it, you are not alone; this is one of the most common homeowner maintenance issues. This guide provides a safe, empathetic, and precise walkthrough to help you reconnect your trolley and restore peace of mind without risking injury or damage to your equipment.
Understanding Why Your Garage Door Disconnected
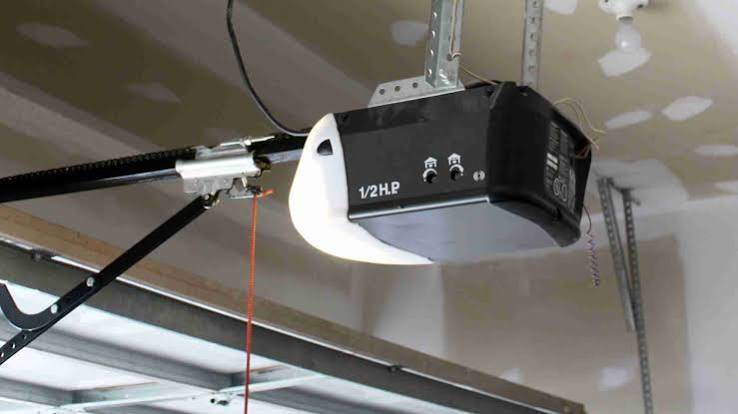
Before diving into the reset process, it is vital to understand the mechanics behind the disconnection. Most modern garage door openers utilize a trolley system that rides along a rail. When you pull the red emergency release cord, you physically disengage the trolley from the opener’s carriage, allowing you to lift the door by hand.
According to mechanical engineering principles documented on Wikipedia, these systems are designed with safety releases to prevent entrapment during power failures. However, once power is restored or the manual task is complete, the mechanical link does not automatically re-engage. The system remains in “manual mode” until a specific physical reset sequence is performed. Understanding this distinction prevents users from repeatedly pressing the remote button in frustration, which can overheat the motor.
Safety First: Critical Precautions Before Resetting
Garage doors are heavy mechanical objects under high tension. Before attempting any reset procedure, adhere to these non-negotiable safety protocols:
- Disconnect Power (Optional but Recommended): While many resets can be done with power on, unplugging the unit eliminates the risk of accidental activation while your hands are near moving parts.
- Clear the Area: Ensure no children, pets, or obstacles are within 10 feet of the door’s path.
- Check Spring Tension: If the door feels excessively heavy (over 50 lbs) when lifting manually, do not proceed. This indicates a broken spring, and resetting the opener will not fix the underlying danger.
- Use Proper Footing: Wear closed-toe shoes with grip. Never attempt this in socks or sandals.
- Keep Fingers Clear: Pinch points exist where the trolley meets the carriage. Always use tools or designated handles, never bare fingers, to push components together.
Expert Note: According to the U.S. Consumer Product Safety Commission (CPSC), garage door-related injuries often occur during DIY maintenance. If you feel uncertain at any point, pause and consult a certified technician. Safety always trumps convenience.
Step-by-Step: How To Reset Your Garage Door After Manually Opening It
Follow this precise tutorial to re-engage your opener. This process applies to most chain-drive and belt-drive systems (LiftMaster, Chamberlain, Genie, Craftsman).
Step 1: Close the Door Completely
You cannot reset the trolley if the door is open. The carriage and trolley must align at the same position on the rail.
- Manually lower the door until it sits flush against the floor.
- Ensure the tracks are clear of debris that might prevent full closure.
- Measurement Check: The gap between the bottom seal and concrete should be less than 0.25 inches for proper alignment.
Step 2: Locate the Emergency Release Cord and Lever
Find the red cord hanging from the trolley assembly on the rail. Near the cord’s attachment point, you will see a spring-loaded lever or latch mechanism.
- On chain drives, this is typically a metal latch that pivots.
- On belt drives, it may be a sliding collar or a hinged arm.
- Identify the direction of movement required to re-engage (usually pushing toward the motor unit).
Step 3: Re-engage the Trolley Mechanism
This is the core action of learning how to reset your garage door after manually opening it.
- Stand securely beside the rail (not directly under it).
- Pull the emergency release cord slightly toward the door to relieve tension on the latch.
- Simultaneously, push the release lever/arm firmly toward the motor unit until you hear or feel a distinct “click.”
- Visually confirm that the latch has locked back into the carriage slot. There should be no visible gap between the trolley and the drive mechanism.
Step 4: Test the Manual Lock Position
Before applying power, verify the connection mechanically.
- Attempt to lift the door manually by 1–2 inches.
- Success Indicator: The entire trolley assembly moves with the door, and the chain/belt engages.
- Failure Indicator: The door lifts freely while the trolley stays stationary. Repeat Step 3 if this occurs.
Step 5: Restore Power and Test Automatic Operation
- Plug the opener back in (if disconnected).
- Press the wall button or remote.
- Observe the first cycle closely. The door should move smoothly without grinding, jerking, or reversing unexpectedly.
- Travel Limit Adjustment: If the door stops short or tries to push past the floor, consult your manual for travel limit recalibration. Manual operation sometimes shifts sensor alignment by 0.5–1 inch.
Troubleshooting: What If the Door Won’t Reset?
Even with perfect technique, issues can arise. Use this diagnostic table to identify solutions:
| Symptom | Probable Cause | Solution |
|---|---|---|
| No “click” when pushing lever | Bent latch or debris in track | Inspect latch for damage; clean rail with dry cloth |
| Door reverses immediately upon closing | Misaligned safety sensors | Realign photo-eye sensors; ensure lenses are clean |
| Motor hums but door doesn’t move | Trolley not fully engaged | Repeat Step 3 with firmer pressure; check for worn carriage |
| Remote works but wall button fails | Wiring issue or lock mode | Check wall console wiring; disable vacation/lock mode |
| Door opens partially then stops | Travel limits shifted post-reset | Adjust up/down limit screws per manufacturer specs |
Secondary Keyword Integration: If you are also experiencing garage door opener troubleshooting issues beyond the reset, consider checking the capacitor and gear assembly, as repeated manual disconnections can accelerate wear on these components.
Pros and Cons of Manual Reset vs. Professional Service
Deciding whether to handle this yourself involves weighing practical factors:
DIY Reset Advantages:
- Cost Savings: Zero expense versus $85–$150 service call fee.
- Time Efficiency: Completed in 5–10 minutes versus scheduling delays.
- Skill Building: Increases familiarity with your home’s mechanical systems.
- Immediate Resolution: No waiting for appointments during emergencies.
Professional Service Advantages:
- Comprehensive Inspection: Technicians check springs, cables, and rollers simultaneously.
- Warranty Protection: Some manufacturers require certified service for coverage.
- Safety Assurance: Eliminates personal injury risk entirely.
- Diagnostic Expertise: Identifies hidden issues (e.g., failing logic board) before they cause total failure.
Recommendation: For standard re-engagement after a known manual release, DIY is appropriate. If the disconnection occurred unexpectedly (without you pulling the cord), hire a professional—this signals mechanical failure.
Frequently Asked Questions (FAQ)
Q1: Can I reset my garage door opener without pulling the emergency cord again?
No. You should never pull the emergency release cord to reset the system. The cord is solely for disengagement. Resetting requires pushing the latch lever back into the locked position. Pulling the cord again will simply re-disconnect the trolley, restarting the problem.
Q2: How often should I test the emergency release and reset function?
Test this system twice annually, ideally during spring and fall maintenance cycles. Regular testing ensures the latch hasn’t seized due to dust or corrosion and confirms you remember the reset procedure before an actual emergency occurs. Document the date of each test in your home maintenance log.
Q3: Will resetting the garage door erase my programmed remotes and keypads?
Generally, no. Mechanical re-engagement of the trolley does not affect the opener’s electronic memory. Remotes, keypads, and smart home integrations should remain programmed. However, if you had to perform a hard electrical reset (holding the learn button) due to a separate issue, reprogramming would be necessary.
Q4: My door resets but makes loud grinding noises afterward—is this normal?
No. Grinding indicates misalignment or damage. Possible causes include a bent trolley arm, stripped carriage teeth, or insufficient lubrication on the rail. Stop using the opener immediately. Apply white lithium grease to the rail and chain; if noise persists, the carriage assembly likely needs replacement ($40–$70 part cost).
Q5: Is there a difference between resetting after manual opening versus after a power outage?
Yes. After a power outage alone (where the emergency cord was never pulled), simply restoring power is sufficient—the trolley remains engaged. Resetting is only required if the emergency release cord was physically activated. Confusing these scenarios leads to unnecessary manipulation of the latch mechanism.
Q6: Can smart garage door openers auto-reset after manual operation?
Most current smart openers (MyQ, Aladdin Connect, Tailwind) cannot auto-reset a mechanical disconnection. They can detect and alert you that the door is disconnected via status notifications, but physical re-engagement still requires manual intervention. Always verify physical connection even if the app shows “closed.”
Conclusion
Mastering how to reset your garage door after manually opening it empowers you to handle one of homeownership’s most frequent inconveniences safely and confidently. By following the precise steps outlined above—closing the door fully, re-engaging the trolley latch with proper technique, and verifying operation before regular use—you protect both your equipment and your household’s safety. Remember, this skill is about more than convenience; it’s about maintaining a critical safety system that protects your home daily.
Found this guide helpful? Share it on Facebook, Pinterest, or Nextdoor to help fellow homeowners avoid garage door frustration! Tag a friend who just moved into a new home—they’ll thank you later. Safe lifting, and may your garage door always open smoothly! 🏡🔧
Leave a Reply