Introduction
Have you recently moved into a new home, lost your remote, or simply noticed that your garage door isn’t responding like it used to? Knowing how to reset the code on a garage door opener is an essential skill for every homeowner to maintain security and convenience. Whether you are trying to erase old access codes or sync a new keypad, this guide will walk you through the process safely and efficiently.
Why You Should Reset Your Garage Door Code
Before we dive into the technical steps, it is important to understand why this task matters. According to the FBI’s Uniform Crime Reporting statistics, there are over 1.2 million burglaries annually in the United States, and a significant portion of these occur through unsecured garage entry points.
When you move into a house, you never know who else has the code: the previous owners, their neighbors, or even old contractors. Resetting the code is the digital equivalent of changing the locks on your front door.
Expert Insight: “A garage door opener is essentially a large exterior door. If the code hasn’t been changed in over five years, or if you’ve just moved in, resetting it should be your first priority for home security.” — Mark Thompson, Certified Locksmith & Security Consultant.
How To Reset The Code On A Garage Door Opener
The process varies slightly depending on the age and brand of your opener (e.g., Chamberlain, LiftMaster, Genie). However, most modern systems use a “Learn” button.
Step 1: Identify Your Opener Type
Look at the motor unit hanging from your garage ceiling. You need to find the Learn Button.
- Modern Units (1993–Present): Usually have a colored button (Purple, Orange, Red, Green, or Yellow) near the antenna wire.
- Older Units (Pre-1993): May use DIP switches (small toggle switches) inside the motor housing.
Step 2: Clear the Memory (The “Hard Reset”)
To ensure no old codes remain, you must clear the opener’s memory first.
- Locate the Learn Button on the back or side of the motor unit.
- Press and hold the button for 6 to 10 seconds (until the LED light next to it turns off or blinks).
- Release the button. The opener has now forgotten all previously paired remotes and keypads.
Note: You will need to reprogram all your car visor remotes and wall consoles after this step.
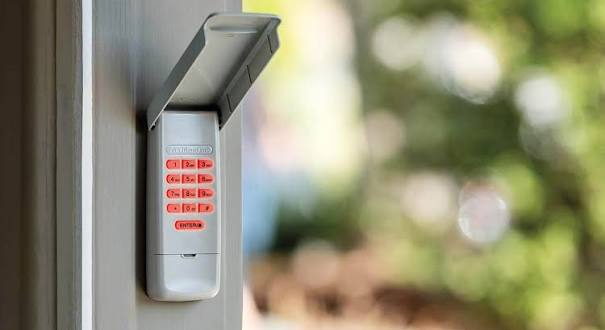
Step 3: Reprogramming the External Keypad
Now that the memory is clear, you can set a new code.
For Chamberlain / LiftMaster / Craftsman (Security+ 2.0):
- Enter your desired 4-digit PIN into the keypad.
- Immediately press and hold the “Program” or “Learn” button on the motor unit.
- While holding the button, return to the keypad and press and hold the “Enter” (or “Arrow”) button.
- Wait for the motor unit lights to flash or the LED to blink. This confirms the new code is saved.
For Genie Intellicode:
- Press the “Program” button on the motor unit (the round button). The red light will illuminate.
- Within 30 seconds, enter your desired PIN on the keypad followed by “Press/Enter”.
- The red light on the motor will turn off, indicating success.
Comparison: Common Opener Brands & Learn Button Colors
To help you identify your specific model, refer to this quick guide based on the Learn Button color found on the motor head.
| Brand | Learn Button Color | Technology Type | Reset Method |
|---|---|---|---|
| Chamberlain / LiftMaster | Purple | Security+ (Rolling Code) | Hold Learn button 6 sec. |
| Chamberlain / LiftMaster | Yellow | Security+ 2.0 (MyQ) | Hold Learn button 6 sec. |
| Chamberlain / LiftMaster | Red/Orange | Security+ (Older) | Hold Learn button 6 sec. |
| Genie | Red/Green | Intellicode | Press “Program” button. |
| Older Models | N/A | DIP Switches | Match toggle switches. |
Source: For more technical details on the evolution of garage door security systems, you can visit the Garage Door Opener Wikipedia Page.
Troubleshooting Common Issues
Even with the right steps, technology can be finicky. Here are solutions to common problems:
- The Light Blinks but Doesn’t Save: You likely waited too long between pressing the Learn button and entering the code on the keypad. You usually have a 30-second window. Try again quickly.
- Keypad Lights Don’t Turn On: Check the batteries. Most keypads use a 9V battery or AAA batteries. Replace them if they are older than a year.
- Door Opens but Won’t Close: This is usually not a code issue but a safety sensor alignment issue. Check the “eyes” near the floor; if the light is blinking, ensure nothing is blocking the beam.
Frequently Asked Questions (FAQ)
1. How often should I reset my garage door code? It is recommended to reset your code every 12 to 18 months or immediately if you lose a remote, break up with a partner who had access, or move into a new home.
2. Can I reset the code without a ladder? Generally, no. You need physical access to the motor unit to press the “Learn” or “Program” button to sync a new keypad. However, some smart openers (like MyQ) allow you to manage access via a smartphone app.
3. What is a “Rolling Code” and why does it matter? Modern openers use Rolling Code technology, which changes the access code every time the remote is used. This prevents “code grabbing” by thieves. If you have an older fixed-code system, upgrading to a rolling code opener is highly recommended for security.
4. My keypad has a lock button. What does it do? The “Lock” button on the motor unit or wall console disables all wireless remotes and keypads from opening the door. If your code isn’t working, check if the Lock feature was accidentally activated.
5. Will resetting the opener affect my wall-mounted button? Usually, no. The wired wall button inside the garage is hardwired directly to the motor and does not rely on the digital memory. It should continue to work after a reset.
Conclusion
Learning how to reset the code on a garage door opener is a simple yet powerful way to protect your home and family. By following these steps, you ensure that only authorized individuals have access to your property.
Did this guide help you secure your garage? Please share this article on Facebook or Pinterest to help your friends and neighbors improve their home security too! If you have a specific model not listed here, leave a comment below, and we will help you find the solution.
Leave a Reply