Noticing cold air, water, or even pests sneaking into your garage? A worn-out seal is usually the culprit. Learning How To Replace Weatherstripping On Bottom Of Garage Door is a simple DIY fix that can improve insulation, protect your space, and save energy.
What Is Garage Door Weatherstripping and Why Is It Important?
Weatherstripping is the rubber or vinyl seal attached to the bottom of your garage door. It creates a tight barrier between the door and the ground.
Why It Matters:
- Prevents water leaks during rain
- Blocks dust, dirt, and insects
- Improves energy efficiency
- Reduces drafts and temperature fluctuations
📊 According to energy efficiency studies, sealing gaps like garage doors can reduce energy loss by up to 10–20% in some homes.
Read too: How Do You Change Code On Garage Door Keypad Fast?
How To Replace Weatherstripping On Bottom Of Garage Door (Step-by-Step)
This is the exact process you need. Follow carefully for the best results.
Step 1: Gather Tools and Materials
You’ll need:
- Replacement weatherstripping (correct size)
- Measuring tape
- Flathead screwdriver
- Utility knife
- Lubricant (silicone-based recommended)
💡 Choose a seal that matches your door’s track type (T-style or bead-style).
Step 2: Measure the Garage Door Width
- Measure the full width of the door
- Add an extra 1–2 inches (2.5–5 cm) for trimming
✔️ Accurate measurement ensures a snug fit.
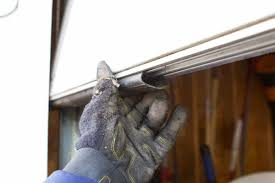
Step 3: Remove the Old Weatherstripping
- Open the garage door fully
- Slide the old seal out of the track
- Use pliers if it’s stuck
- Clean debris from the track
⚠️ Old seals may crack or break—this is normal.
Step 4: Clean and Inspect the Track
- Remove dirt, rust, or buildup
- Wipe with a dry cloth
- Apply light lubricant to help installation
✔️ A clean track makes installation smoother.
Step 5: Install the New Weatherstripping
- Insert one end into the track
- Slide the seal across slowly
- Pull evenly to avoid stretching
🔧 Work carefully to prevent twisting.
Step 6: Trim Excess Material
- Use a utility knife
- Cut cleanly at both ends
📏 Leave a slight overhang for a tight seal.
Step 7: Test the Seal
- Close the garage door
- Check for gaps or uneven contact
- Ensure the seal compresses evenly
✔️ A proper seal should block light completely.
What Types of Weatherstripping Are Available?
Choosing the right type is crucial.
Common Types:
| Type | Material | Best For |
|---|---|---|
| T-style | Rubber | Most modern doors |
| Bead-style | Vinyl | Specific track systems |
| Bulb seal | Flexible rubber | Uneven floors |
| Brush seal | Nylon | Dust protection |
How Do You Know If Weatherstripping Needs Replacement?
Watch for these signs:
- Cracks or brittleness
- Visible gaps under the door
- Water entering during rain
- Increased energy bills
💡 Most seals last 2–5 years, depending on climate.
Advantages vs Disadvantages of Replacing Weatherstripping
Pros and Cons
| Advantages | Disadvantages |
|---|---|
| Improves insulation | Requires proper sizing |
| Blocks pests and debris | May need periodic replacement |
| Easy DIY project | Can be tricky on older doors |
How Much Does It Cost to Replace Weatherstripping?
- DIY cost: $15–$50
- Professional service: $100–$200
👉 Doing it yourself can save up to 70%.
Common Mistakes to Avoid
Avoid these common errors:
❌ Mistakes:
- Buying the wrong seal type
- Not cleaning the track
- Stretching the seal during installation
- Cutting too short
Expert Insight: Why Proper Sealing Matters
Home improvement experts emphasize that garage sealing is one of the easiest ways to improve energy efficiency. A tight seal reduces strain on HVAC systems and protects stored items from environmental damage.
Maintenance Tips After Installation
Keep your new weatherstripping in top condition:
- Inspect every 6 months
- Clean regularly
- Avoid harsh chemicals
- Replace when signs of wear appear
What If the Seal Doesn’t Fit Properly?
If you notice issues:
Solutions:
- Recheck measurements
- Adjust track alignment
- Use lubricant for smoother installation
- Replace with correct type
How Weatherstripping Improves Home Efficiency
Sealing your garage helps maintain indoor temperature, especially if your garage is attached to your home.
To learn more about sealing and insulation concepts, visit:
https://en.wikipedia.org/wiki/Weatherstripping
FAQ: How To Replace Weatherstripping On Bottom Of Garage Door
Q1: Can I replace garage door weatherstripping myself?
Answer: Yes, it’s a simple DIY project that most homeowners can complete in under an hour.
Q2: How long does weatherstripping last?
Answer: Typically 2–5 years, depending on usage and weather conditions.
Q3: What type of seal should I buy?
Answer: Match the seal type (T-style or bead-style) to your garage door track.
Q4: Why is my new seal not sealing properly?
Answer: It may be the wrong size or incorrectly installed.
Q5: Do I need glue or adhesive?
Answer: No, most seals slide into tracks and don’t require adhesive.
Q6: Can weatherstripping help with pests?
Answer: Yes, it blocks small gaps that insects and rodents use to enter.
Conclusion
Learning How To Replace Weatherstripping On Bottom Of Garage Door is one of the easiest and most cost-effective ways to improve your garage. With just a few tools and simple steps, you can block drafts, prevent water leaks, and keep pests out.
This small upgrade delivers big benefits in comfort, energy savings, and protection. If this guide helped you, share it on social media so others can improve their homes too!
Leave a Reply