If you’re searching “How To Replace Weather Stripping On Bottom Of Garage Door”, chances are you’ve noticed drafts, water leaks, or pests sneaking in. A worn-out bottom seal can reduce energy efficiency and damage your garage over time.
The good news? Replacing it is a simple DIY task that most homeowners can complete in under an hour.
Read too: Tc1 Tricode Garage Door Opener Remote W/ Clip Chamberlain: Complete Guide
How To Replace Weather Stripping On Bottom Of Garage Door (Step-by-Step)
Let’s start with the exact process to fix your garage door seal.
Tools and Materials You’ll Need
Before starting, gather these items:
- New weather stripping (correct size)
- Measuring tape
- Flathead screwdriver
- Utility knife
- Lubricant (silicone-based)
- Gloves
Step 1: Measure the Garage Door Width
Measure the full width of your garage door.
📏 Example:
- Standard single door: ~8–9 feet
- Double door: ~16 feet
Always buy a seal slightly longer and trim it later.
Step 2: Remove the Old Weather Stripping
- Open the garage door fully
- Locate the bottom seal track
- Slide the old seal out from one side
Tip:
If it’s stuck, use a flathead screwdriver to loosen it.
Step 3: Clean the Track
Before installing the new seal:
- Remove dirt and debris
- Wipe with a dry cloth
- Apply light lubricant
This helps the new seal slide in smoothly.
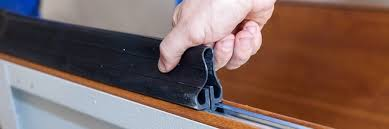
Step 4: Insert the New Weather Stripping
- Align the seal with the track grooves
- Slide it from one end
- Pull evenly across the entire door
Important:
Make sure the seal is centered and not twisted.
Step 5: Trim Excess Material
Use a utility knife to cut off extra length.
✂️ Leave about 0.5–1 inch (1–2 cm) on each side for proper sealing.
Step 6: Test the Door
Close the garage door and check:
- No visible gaps
- Seal touches the floor evenly
- Door closes smoothly
✅ If everything looks good, you’re done!
What Type of Weather Stripping Should You Use?
Choosing the right seal is crucial.
Common Types:
| Type | Best For | Features |
|---|---|---|
| T-style | Most modern doors | Easy to install |
| Bulb seal | Uneven floors | Flexible |
| Beaded seal | Older doors | Secure fit |
👉 Pro Tip:
Check your track design before buying.
Why Is Bottom Weather Stripping Important?
A good seal does more than just block air.
Key Benefits:
- Keeps out rain and moisture
- Prevents pests and insects
- Improves energy efficiency
- Reduces dust and debris
Energy Insight:
Proper sealing can reduce energy loss by up to 20% in attached garages.
Signs You Need to Replace Weather Stripping
Look for these warning signs:
- Cracks or brittleness
- Visible gaps under the door
- Water entering garage
- Increased dust or pests
If you notice any of these, it’s time for a replacement.
Common Mistakes to Avoid
1. Buying the Wrong Size
Always measure before purchasing.
2. Skipping Track Cleaning
Dirty tracks make installation harder and reduce lifespan.
3. Cutting Too Short
Leave a small margin to ensure a tight seal.
4. Ignoring Floor Unevenness
Use a bulb seal if your floor isn’t level.
DIY vs Professional Replacement
| Factor | DIY | Professional |
|---|---|---|
| Cost | Low | Higher |
| Time | 30–60 mins | 1–2 hours |
| Skill Level | Beginner | Expert |
| Tools Required | Basic | Advanced |
👉 Recommendation:
DIY is ideal for most homeowners.
Maintenance Tips for Long-Lasting Seals
Keep your new weather stripping in great condition:
- Clean every 3–6 months
- Inspect for cracks annually
- Avoid harsh chemicals
- Replace every 2–5 years
Expert Insight: Why Seals Wear Out
Weather stripping is usually made from rubber or vinyl, which degrades over time due to temperature changes and UV exposure.
Learn more about how sealing materials work here:
https://en.wikipedia.org/wiki/Weatherstripping
Real-Life Example
Situation:
A homeowner noticed water entering during heavy rain.
Solution:
- Replaced bottom seal
- Installed bulb-type weather stripping
Result:
No more leaks and improved insulation within 1 hour.
FAQ: How To Replace Weather Stripping On Bottom Of Garage Door
1. How often should I replace garage door weather stripping?
Typically every 2–5 years, depending on climate and usage.
2. Can I replace the seal without removing the door?
Yes, you only need to open the door fully.
3. What if the seal won’t slide into the track?
Clean the track and apply lubricant for easier installation.
4. How much does it cost to replace weather stripping?
DIY costs range from $10–$40, depending on material.
5. What type of seal is best for uneven floors?
A bulb seal works best for uneven surfaces.
6. Can weather stripping improve insulation?
Yes, it helps reduce air leaks and improves energy efficiency.
Conclusion
Now you know exactly how to replace weather stripping on bottom of garage door—and it’s one of the easiest upgrades you can make to your home. With just a few tools and simple steps, you can block drafts, prevent water leaks, and improve insulation.
This small fix delivers big benefits in comfort and protection.
If this guide helped you, feel free to share it on social media—someone else might need this quick home improvement tip today! 🚪
Leave a Reply