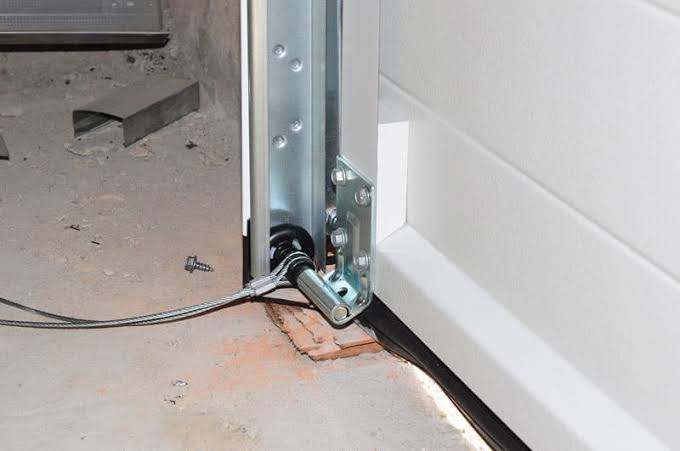
Is your garage door stuck, uneven, or making strange noises? A broken or frayed cable is often the culprit, and ignoring it can lead to costly damage or serious injury. Knowing how to replace the cables on a garage door can save you hundreds of dollars in service fees, but it requires precision, patience, and strict adherence to safety protocols. This guide will walk you through the process safely and effectively.
Why Do Garage Door Cables Break?
Before diving into the repair, it is essential to understand why cables fail. Garage door cables are under immense tension, supporting the weight of the door as it moves up and down. Over time, wear and tear, lack of lubrication, or rust can weaken the steel strands.
According to industry data, the average lifespan of garage door cables is between 7 to 10 years, depending on usage frequency. However, environmental factors like humidity and salt air can accelerate corrosion. When one cable snaps, the entire system becomes unbalanced, putting extra stress on the opener, springs, and rollers.
Safety Warning: Garage door springs store a significant amount of potential energy. If handled incorrectly, they can cause severe injury or death. If you are uncomfortable working with high-tension systems, please hire a professional.
Tools and Materials You Will Need
Gathering the right tools before starting ensures a smooth process. Here is a checklist of essentials:
- New Garage Door Cables: Ensure they match the length and thickness of your old ones.
- Winding Bars: Two solid steel bars (usually 1/2 inch diameter) for torsion spring systems.
- Vise Grips or Locking Pliers: To secure the door track.
- Socket Set and Wrenches: For loosening bolts on the drum and bottom bracket.
- Ladder: A sturdy stepladder to reach the top of the door.
- Safety Glasses and Gloves: Essential for eye and hand protection.
- Lubricant: Silicone-based spray for post-repair maintenance.
Step-by-Step Guide: How to Replace the Cables on a Garage Door
Replacing garage door cables varies slightly depending on whether you have a torsion spring system (spring above the door) or an extension spring system (springs on the sides). This guide focuses on the more common torsion spring setup, which is generally safer for DIYers if proper precautions are taken.
Step 1: Disconnect the Opener and Secure the Door
First, pull the red emergency release cord to disconnect the garage door opener. Manually close the door completely. Use vise grips to clamp the door tracks just below the bottom rollers. This prevents the door from moving unexpectedly while you work.
Step 2: Release Tension from the Springs
This is the most critical step. Never attempt to remove a cable while the spring is under tension.
- Insert a winding bar into one of the holes on the winding cone of the torsion spring.
- Slowly unwind the spring by turning the bar counterclockwise (for right-wound springs) or clockwise (for left-wound springs). Check your specific model’s manual for direction.
- Keep a firm grip on the bar. Move it to the next hole and repeat until all tension is released.
- Repeat for the second spring if your system has two.
Step 3: Remove the Old Cables
Once the springs are relaxed, you can safely access the cables.
- Locate the cable drum at the end of the torsion spring shaft.
- Loosen the set screws holding the cable in place using a socket wrench.
- Unwind the old cable from the drum.
- Go to the bottom of the door and detach the cable from the bottom bracket. You may need to remove a pin or bolt.
- Pull the old cable out completely.
Step 4: Install the New Cables
- Thread the new cable through the pulley system at the top of the door frame.
- Attach the bottom end of the cable to the bottom bracket on the door. Secure it tightly with the pin or bolt.
- Go back to the top and wind the cable onto the drum. Ensure it sits neatly in the grooves without overlapping.
- Tighten the set screws on the drum to hold the cable in place. Leave a small amount of slack for now.
Step 5: Re-tension the Springs
Now, you must restore the tension to lift the door.
- Insert the winding bar into the winding cone.
- Turn the bar to wind the spring. The general rule is quarter turns. For every quarter turn, the door gains enough lift to rise about 2–3 inches.
- Count the number of turns required. A standard 7-foot door usually requires 7–8 full turns (28–32 quarter turns). Refer to your door’s manual for exact specifications.
- Ensure both springs have equal tension. Uneven tension can cause the door to operate unevenly.
Step 6: Test and Adjust
Remove the vise grips from the tracks. Manually lift the door halfway. It should stay in place without falling or rising. If it falls, the springs need more tension. If it rises, they are too tight.
Once balanced, reconnect the opener and test the automatic cycle. Listen for smooth operation and check that the cables remain seated in the drums.
Common Mistakes to Avoid
| Mistake | Consequence | Solution |
|---|---|---|
| Ignoring Safety Gear | Eye or hand injury from snapping cables | Always wear glasses and gloves |
| Uneven Spring Tension | Door operates crookedly | Count quarter turns precisely |
| Wrong Cable Size | Premature failure or jamming | Measure old cables exactly |
| Skipping Lubrication | Increased friction and wear | Apply silicone spray after repair |
For more detailed technical specifications on garage door components, you can refer to Wikipedia’s article on Garage Doors.
FAQ: Frequently Asked Questions
Q1: Can I replace just one garage door cable?
A: No. It is highly recommended to replace both cables simultaneously. If one has broken due to wear, the other is likely near failure. Replacing both ensures balanced operation and prevents future immediate repairs.
Q2: How much does it cost to replace garage door cables professionally?
A: Professional replacement typically costs between $150 and $350, including parts and labor. Doing it yourself can reduce this cost to under $50 for high-quality cables and basic tools.
Q3: How do I know if my garage door cables are bad?
A: Look for visible fraying, rust, or broken strands. Other signs include the door hanging unevenly, making grinding noises, or failing to open fully. Regular monthly inspections can catch these issues early.
Q4: Is it dangerous to replace garage door cables myself?
A: Yes, it carries risks due to the high tension in the springs. If you are not confident in your ability to safely release and re-tension the springs, hire a certified technician. Safety should always be your top priority.
Q5: How often should I maintain my garage door cables?
A: Inspect cables every six months. Clean and lubricate them with a silicone-based spray annually to prevent rust and reduce friction. Replace them immediately if any damage is detected.
Conclusion
Learning how to replace the cables on a garage door empowers you to handle common home maintenance tasks efficiently. By following this step-by-step guide, prioritizing safety, and using the right tools, you can restore your garage door’s functionality without breaking the bank. Remember, a well-maintained garage door not only looks better but also lasts longer.
If you found this guide helpful, please share it with friends or family who might be facing similar garage door issues. Your share could help someone avoid a costly repair bill!
Leave a Reply