Introduction
Is your garage letting in cold drafts, rainwater, or unwanted pests? A worn-out bottom seal is often the culprit, compromising your home’s energy efficiency and security. Learning how to replace the bottom weatherstrip on a garage door is a straightforward DIY project that can save you hundreds of dollars in professional service fees while instantly improving your garage’s comfort. In this comprehensive guide, we will walk you through every step of the process, ensuring you achieve a professional-grade seal that protects your home for years to come.
Why Is My Garage Door Bottom Seal Failing?
Before diving into the replacement process, it is crucial to understand why seals fail. According to industry data from the International Door Association, garage door components typically endure over 10,000 cycles of operation. This constant friction against concrete, combined with UV exposure and temperature fluctuations, causes rubber and vinyl to become brittle, crack, or tear.
Common signs of failure include:
- Visible gaps between the door and the floor when closed.
- Water pooling inside the garage after rain.
- Increased dust or debris accumulation.
- Noticeable temperature differences between the garage and living spaces.
Addressing these issues promptly prevents long-term structural damage to your garage floor and stored items.
What Tools and Materials Do I Need?
Preparation is half the battle. Gathering the right supplies before starting ensures a smooth workflow without frustrating interruptions.
Essential Tool List
- Cordless Drill/Driver: For removing old retainer bolts.
- Socket Set or Wrench: Typically 7/16” or 1/2” depending on your hardware.
- Pliers: Needle-nose pliers are best for extracting stuck rubber.
- Utility Knife: For trimming the new seal to length.
- Tape Measure: Accurate measurement prevents waste.
- Silicone Spray or Soapy Water: Lubricant to ease installation.
- Safety Glasses and Gloves: Always prioritize safety when working with metal tracks and heavy doors.
Choosing the Right Replacement Seal
Not all weatherstrips are created equal. Selecting the correct profile is vital for a proper fit.
| Seal Type | Best For | Durability | Cost Estimate |
|---|---|---|---|
| T-Style | Standard steel doors with single-channel retainers | High | $25–$40 |
| Beaded/U-Channel | Doors with double-channel aluminum retainers | Very High | $35–$60 |
| Bulb Seal | Uneven floors or driveways | Medium | $20–$35 |
| Threshold Seal | Floor-mounted (supplements door seal) | High | $40–$80 |
Expert Tip: Always measure the width of the door, not just the old seal. Most residential doors are 8, 9, or 16 feet wide. Purchase a seal slightly longer than needed; you can always trim excess, but you cannot add length.
Step-by-Step: How To Replace The Bottom Weatherstrip On A Garage Door
Follow this detailed tutorial to ensure a safe and effective installation. Always disconnect your garage door opener before beginning manual work to prevent accidental activation.
Step 1: Remove the Old Weatherstrip
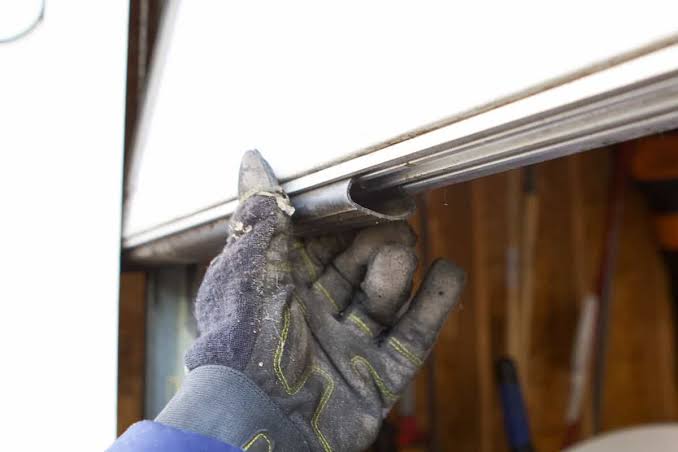
Open the garage door fully and secure it in place using locking pliers on the track below the bottom roller. This prevents the door from crashing down. Locate the retainer bolts at each end of the bottom panel. Using your socket wrench, loosen and remove these bolts. Once the retainer is free, grip the old rubber with pliers and pull it firmly toward the center. If the rubber is stuck, apply a small amount of silicone spray to lubricate the channel.
Step 2: Clean the Retainer Channel
This step is often skipped but is critical for longevity. Use a wire brush or rag to remove rust, dirt, and old adhesive from the metal channel. Inspect the retainer itself for bends or corrosion. If the metal retainer is severely damaged, replace it simultaneously; a new seal cannot function correctly in a compromised housing. For more information on garage door mechanics and component standards, refer to the Garage Door Wikipedia page, which provides excellent foundational knowledge on door systems.
Step 3: Measure and Cut the New Seal
Lay the new weatherstrip flat on a clean surface. Measure the exact width of your garage door panel. Mark the cut line clearly. Using a sharp utility knife and a straight edge, make a clean, perpendicular cut. Do not stretch the rubber while measuring, as this will result in a seal that is too short once it relaxes.
Step 4: Lubricate the Channel
Friction is the enemy of installation. Generously spray silicone lubricant or apply soapy water inside the retainer channel and along the edges of the new seal’s T-bead or barbs. This reduces drag by up to 70%, making insertion significantly easier and preventing the rubber from bunching or tearing during installation.
Step 5: Insert the New Weatherstrip
Start at one end of the door. Align the T-bead or barbs with the channel opening. Push firmly while sliding the seal horizontally across the door. Work slowly and evenly. If you encounter resistance, stop and re-lubricate rather than forcing it, which can deform the seal. For two-person jobs, have one person feed the seal while the other pulls gently from the opposite end.
Step 6: Secure the Retainer and Trim
Once the seal is fully seated, reinstall the retainer bolts at both ends. Tighten them securely but avoid overtightening, which can strip threads or warp the retainer. Close the garage door manually to check alignment. If the seal extends beyond the door edges, mark and trim the excess with your utility knife. The seal should sit flush against the floor without excessive compression.
Step 7: Test the Seal
Reconnect your garage door opener and cycle the door 2–3 times. Observe the seal’s contact with the floor throughout the entire travel path. Perform the “light test”: close the door and have someone shine a flashlight along the bottom seam from outside. Any visible light indicates a gap requiring adjustment. Also, verify that the door reverses properly if it encounters an obstruction, as a thicker new seal may alter the force settings.
Common Mistakes to Avoid During Replacement
Even experienced DIYers can stumble. Avoid these pitfalls:
- Ignoring Floor Irregularities: If your driveway has settled or cracked, a standard seal may not suffice. Consider adding a floor threshold seal or using an oversized bulb seal to compensate for unevenness.
- Using Petroleum-Based Lubricants: WD-40 or grease can degrade rubber over time. Always use silicone-based lubricants specifically designed for weatherstripping.
- Skipping Safety Locks: Never trust the opener alone to hold the door open. Mechanical locking pliers on the track are non-negotiable for safety.
- Forcing the Seal: Excessive force damages the retainer channel. If insertion is difficult, the seal type may be incorrect or the channel may be bent.
Frequently Asked Questions (FAQ)
How often should I replace my garage door bottom weatherstrip?
Most experts recommend inspecting your seal annually and replacing it every 3–5 years, depending on climate and usage frequency. Harsh winters, intense sun exposure, and heavy daily use accelerate wear. If you notice cracks, brittleness, or gaps during inspection, replace it immediately regardless of age.
Can I replace the weatherstrip without removing the garage door?
Yes, absolutely. The bottom weatherstrip is designed for field replacement without door removal. You only need to open the door fully and secure it safely. Removing the entire door is unnecessary and adds significant risk and labor.
What is the difference between T-style and beaded weatherstrips?
T-style seals feature a flat T-shaped top that slides into a single-channel retainer, common on older or basic steel doors. Beaded (or U-channel) seals have round barbs that snap into a double-channel aluminum retainer, offering superior retention and durability. Always match the replacement type to your existing retainer; they are not interchangeable.
Will a new weatherstrip fix water leaking under my garage door?
A new seal addresses gaps caused by worn rubber, but persistent leaks may indicate floor settlement, improper door alignment, or inadequate drainage. If water continues entering after seal replacement, inspect your driveway slope and consider installing a complementary threshold seal or addressing grading issues around the garage foundation.
How much does professional weatherstrip replacement cost?
Professional service typically ranges from $150 to $300, including parts and labor. DIY replacement costs only $25–$60 for materials. Given the simplicity of the task and potential savings, most homeowners find DIY highly worthwhile. However, if your door has mechanical issues beyond the seal, professional assessment is recommended.
Can I install a weatherstrip in freezing temperatures?
Cold makes rubber stiff and difficult to manipulate. If possible, perform installation when temperatures are above 40°F (4°C). If you must work in cold conditions, store the new seal indoors until ready to install, and use warm soapy water as lubricant to improve flexibility. Allow extra time for the seal to settle and conform to the floor shape.
Conclusion
Mastering how to replace the bottom weatherstrip on a garage door empowers you to protect your home from the elements, reduce energy costs, and extend your garage door’s lifespan. This manageable weekend project delivers immediate returns in comfort and peace of mind. Remember to prioritize safety, choose the correct seal type, and take your time during installation for lasting results.
Found this guide helpful? Share it with fellow homeowners on Facebook, Pinterest, or Nextdoor who might be battling drafty garages! Tag us in your before-and-after photos — we’d love to celebrate your DIY success. Together, we can build safer, more efficient homes one seal at a time. 🔧🏡
Leave a Reply