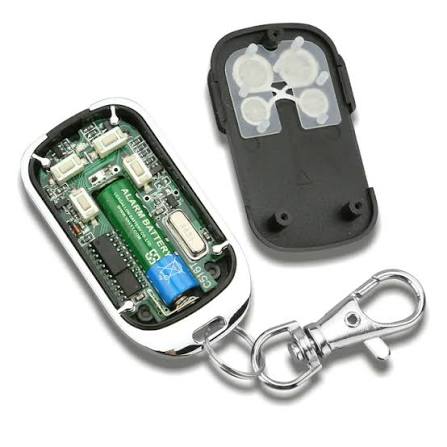
Introduction
There are few things more frustrating than pressing your garage door remote and hearing nothing but silence, especially when you are rushing to work or returning home in bad weather. If your opener is unresponsive, learning how to replace the battery in a garage door opener is often the quickest, most cost-effective solution before calling a professional. This guide will walk you through the process safely and efficiently, ensuring you regain secure access to your home without unnecessary downtime or expensive service calls.
Why Is My Garage Door Opener Not Working?
Before grabbing a screwdriver, it is vital to confirm that the battery is actually the culprit. Misdiagnosing the issue can lead to wasted time and money. According to industry service data, approximately 70% of “broken” garage door openers are simply suffering from power-related issues, ranging from dead batteries to tripped GFCI outlets.
Signs Your Battery Needs Replacing
- No LED Light: The remote or wall console shows no illumination when pressed.
- Intermittent Operation: The door works only when you are standing directly next to the motor unit.
- Weak Signal: You have to press the button multiple times or hold it down for several seconds.
- Age of Battery: Most garage door opener backup batteries last between 1–3 years depending on usage cycles and temperature fluctuations.
Expert Insight: “Many homeowners confuse a dead remote battery with a failed logic board. Always test with a fresh battery first; it’s the cheapest diagnostic step you can take,” notes certified garage door technician Mark Henderson.
What Tools Do I Need to Replace a Garage Door Opener Battery?
Preparation is key to a smooth repair. Gathering the right tools prevents mid-project trips to the hardware store and reduces safety risks.
| Tool / Item | Purpose | Estimated Cost |
|---|---|---|
| Phillips Head Screwdriver | Removing battery compartment covers | $2–$5 |
| Flathead Screwdriver | Prying open sealed compartments | $2–$5 |
| Replacement Battery | Power source (CR2032, 9V, or 12V SLA) | $5–$40 |
| Multimeter (Optional) | Testing voltage of old/new batteries | $15–$30 |
| Safety Gloves | Protecting hands from acid/corrosion | $5–$10 |
| Microfiber Cloth | Cleaning terminal corrosion | Household item |
Note: Always check your specific model’s manual or the label on the existing battery. Using the wrong voltage or chemistry type can permanently damage the opener’s circuit board. For comprehensive technical specifications on battery types used in residential automation, refer to Wikipedia’s article on Electric Batteries.
How To Replace The Battery In A Garage Door Opener: Step-by-Step Guide
This tutorial covers the three most common battery locations. Identify which applies to your system before proceeding.
Scenario A: Replacing the Remote Control Battery
This is the most frequent maintenance task and takes less than two minutes.
- Locate the Compartment: Flip the remote over. Look for a sliding cover, a small screw, or a coin-slot twist mechanism.
- Open the Housing: Slide the cover off or use a flathead screwdriver to gently pry it open. Do not force it, as plastic tabs break easily.
- Remove Old Battery: Note the orientation (+/-). Use a non-metallic tool if the battery is stuck to avoid short-circuiting.
- Clean Terminals: Wipe contacts with a dry microfiber cloth. If you see white/green corrosion, use a cotton swab dipped in vinegar, then dry thoroughly.
- Insert New Battery: Match the polarity exactly. Press down firmly until it clicks into place.
- Test Immediately: Stand within 5 feet of the door and press the button. The LED should light up brightly, and the door should respond instantly.
Scenario B: Replacing the Wall Console Backup Battery
Some smart openers have a secondary battery in the wall-mounted control panel to retain memory during outages.
- Disconnect Power: Unplug the main opener unit or turn off the circuit breaker to prevent accidental activation.
- Remove Cover: Unscrew the wall console faceplate. Some models require removing the entire unit from the wall bracket.
- Identify Battery Type: These are typically 9V alkaline or CR2032 lithium coins.
- Swap and Reassemble: Replace the battery, ensuring wires aren’t pinched. Reattach the faceplate securely.
- Restore Power: Plug the unit back in and reprogram the console if necessary (consult your manual).
Scenario C: Replacing the Main Unit Backup Battery (Battery Backup Systems)
Modern openers with battery backup systems use larger 12V Sealed Lead Acid (SLA) batteries. Exercise extreme caution.
- Safety First: Wear gloves and eye protection. SLA batteries contain sulfuric acid and can deliver high current.
- Disconnect AC Power: Unplug the opener and disconnect the battery harness before touching terminals.
- Access Battery Bay: Remove the motor housing cover (usually 4–6 screws). Locate the black rectangular battery.
- Disconnect Wires: Remove red (+) and black (-) spade connectors. Always remove negative first, positive second.
- Install New Battery: Place the new SLA battery in the tray. Connect positive (red) first, then negative (black).
- Secure and Test: Replace the housing cover. Restore AC power. Run a full cycle test and verify the backup system indicator light is green/solid.
Critical Safety Precautions You Must Follow
Garage door openers combine high-voltage electricity with heavy mechanical components. Never skip these safeguards:
- Always Disconnect Power: Treat every wire as live until verified otherwise.
- Never Bypass Safety Sensors: Disabling photo-eye sensors to “test” the door creates severe crush hazards.
- Dispose of Batteries Properly: Lead-acid and lithium batteries are hazardous waste. Take them to AutoZone, Home Depot, or your local recycling center—never trash them.
- Check Spring Tension: If your door feels unusually heavy after a battery change, the torsion springs may be failing. Do not attempt spring repair yourself; this requires specialized tools and training.
Frequently Asked Questions (FAQ)
How often should I replace my garage door opener battery?
Remote batteries typically last 12–24 months with normal use. Backup system batteries (SLA) should be tested annually and replaced every 2–3 years, or sooner if you experience frequent power outages. Extreme temperatures in unheated garages can reduce lifespan by up to 40%.
Can I use rechargeable batteries in my garage door remote?
Generally, no. Most remotes are designed for specific voltage curves of alkaline or lithium primaries. Rechargeables (NiMH) operate at 1.2V vs. 1.5V, which can cause weak signals or failure to trigger. Always use the chemistry specified in your owner’s manual.
Why does my new battery drain so quickly?
Rapid drain usually indicates an underlying problem: corroded terminals causing parasitic draw, a failing capacitor in the remote, or excessive button presses due to signal interference. Test the remote’s current draw with a multimeter; anything above 5µA in standby suggests a fault.
Will replacing the battery reset my opener’s programming?
For remotes and wall consoles, no—programming is stored in non-volatile memory. However, some older backup systems may lose settings if the battery was completely dead for an extended period. Keep your manual handy just in case re-syncing is needed.
What if the door still doesn’t work after a new battery?
Systematically check: (1) GFCI outlet hasn’t tripped, (2) safety sensors are aligned and clean, (3) travel limits haven’t shifted, (4) logic board isn’t damaged. If all else fails, contact a licensed technician—forcing a malfunctioning door risks property damage or injury.
Conclusion
Knowing how to replace the battery in a garage door opener empowers you to handle one of the most common household annoyances with confidence and safety. Whether it’s a simple remote swap or a backup system refresh, regular battery maintenance ensures reliable access, enhances home security, and extends the life of your opener. Don’t wait until you’re stranded outside—check your batteries today as part of your seasonal home maintenance routine.
Found this guide helpful? Share it on Facebook, X (Twitter), or Pinterest to help fellow homeowners avoid garage door headaches! Tag a friend who’s been battling a stubborn opener—they’ll thank you later. 🔧🏡
Leave a Reply