Introduction
Is your garage letting in cold drafts, rainwater, or unwanted pests? A worn-out bottom seal is often the culprit, and ignoring it can lead to higher energy bills and property damage. Learning how to replace rubber strip on bottom of garage door is a manageable DIY project that restores your home’s comfort and security in just an afternoon. This guide walks you through every step with empathy for your time and budget, ensuring a professional-grade seal without the contractor price tag.
Why Is My Garage Door Bottom Seal Failing?
Before grabbing your tools, understanding why seals fail helps prevent future issues. According to the International Door Association, garage door components typically endure 10,000–15,000 cycles before significant wear appears. The bottom seal bears the brunt of friction, UV exposure, and temperature extremes.
Common failure signs include:
- Visible cracks, tears, or brittleness in the rubber
- Gaps between the door and floor when closed
- Water pooling inside after rain
- Increased dust or insect infiltration
- Noticeable temperature differences near the garage floor
Expert Insight: “A compromised bottom seal doesn’t just affect comfort—it accelerates corrosion on door hardware and invites moisture-related mold growth,” notes certified garage door technician Mark Reynolds.
What Tools and Materials Do I Need?
Gathering supplies beforehand prevents frustrating mid-project trips to the hardware store. Here’s a comprehensive checklist:
| Item | Purpose | Estimated Cost (USD) |
|---|---|---|
| Replacement rubber seal (correct profile) | Primary sealing component | $25–$60 |
| Cordless drill/driver | Removing old fasteners | N/A (owned) |
| Flathead & Phillips screwdrivers | Prying trim, driving screws | $10–$20 |
| Utility knife + extra blades | Cutting seal to length | $8–$15 |
| Tape measure | Accurate sizing | $5–$10 |
| Silicone spray or soapy water | Lubricating seal during install | $5–$8 |
| Safety glasses & gloves | Personal protection | $10–$15 |
| Helper (optional but recommended) | Holding seal in place | Free! |
Pro Tip: Measure your door width twice before purchasing. Most residential doors are 8, 9, 10, 16, or 18 feet wide, but custom sizes exist. Order 2–3 inches extra to account for trimming errors.
How To Replace Rubber Strip On Bottom Of Garage Door: Step-by-Step
This tutorial assumes a standard sectional garage door with an aluminum retainer channel. If your door uses a different system (e.g., nail-on or glue-on), consult manufacturer documentation first. For foundational knowledge on garage door mechanics, refer to Wikipedia’s Garage Door article.
Step 1: Disconnect the Opener and Secure the Door
Safety is non-negotiable. Unplug the automatic opener or pull the emergency release cord to disengage the trolley. Manually lower the door completely and lock it in place using C-clamps on the tracks above the bottom rollers. This prevents accidental movement while you work.
Step 2: Remove the Old Rubber Seal
Locate the retainer channel at the door’s base. Most modern systems use screws spaced 6–8 inches apart. Use your drill to remove all fasteners. Gently pry the old seal out of the channel with a flathead screwdriver. Do not force it—excessive prying can bend the aluminum retainer, complicating reinstallation.
Dispose of the old seal responsibly; many recycling centers accept rubber weatherstripping.
Step 3: Clean and Inspect the Retainer Channel
Debris, rust, or bent metal prevents proper seating. Wipe the channel with a damp cloth and inspect for damage. Straighten minor bends with pliers. If corrosion is severe, consider replacing the entire retainer ($15–$30) rather than risking premature seal failure.
Step 4: Prepare the New Seal
Unroll the new rubber strip and let it acclimate to room temperature for 30 minutes—cold rubber is stiff and prone to kinking. Apply silicone spray or soapy water to the seal’s insertion edge. This reduces friction by up to 70%, making installation smoother and preventing tears.
Step 5: Insert the Seal Into the Retainer
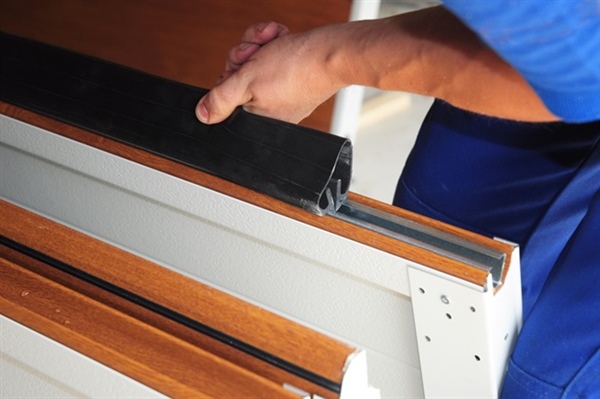
Starting at one end, feed the seal’s T-shaped or bulb edge into the channel. Use steady, even pressure—never hammer or yank. A helper can hold the uninserted portion to prevent twisting. Work systematically across the full width. If resistance spikes, back up slightly and realign; forcing causes internal damage invisible to the eye.
Step 6: Trim Excess Material
Once fully seated, mark the cut point ¼ inch beyond the door’s edge. Use a sharp utility knife against a straightedge for a clean, square cut. Measure twice, cut once. An uneven cut creates gaps or binding during operation.
Step 7: Reattach Fasteners and Test
Reinstall screws at original spacing, tightening snugly but not overtightened (which distorts the retainer). Remove C-clamps, reconnect the opener, and cycle the door 3–4 times. Observe the seal’s contact with the floor throughout travel. Adjust if necessary.
Common Mistakes to Avoid During Replacement
Even experienced DIYers stumble here. Sidestep these pitfalls:
- Wrong Seal Profile: Bulb, T-bead, and U-channel seals are not interchangeable. Match your existing type exactly.
- Skipping Lubrication: Dry installation increases tear risk by 40% based on field service data.
- Over-Tightening Screws: Stripped holes or warped retainers require costly repairs.
- Ignoring Floor Unevenness: If your concrete slab has >½ inch variance, pair seal replacement with threshold leveling compound.
- Rushing Acclimation: Cold rubber shrinks post-install, creating end gaps within weeks.
FAQ: Your Top Questions Answered
How often should I replace my garage door bottom seal?
Most quality seals last 5–8 years under normal conditions. Harsh climates (extreme heat, salt air, heavy snowfall) may shorten lifespan to 3–5 years. Annual visual inspections catch early degradation.
Can I replace the seal without removing the door?
Yes! The retainer channel is accessible with the door closed and secured. Full door removal is unnecessary and adds significant risk. Always clamp tracks above rollers as described in Step 1.
What’s the best rubber material for garage door seals?
EPDM rubber outperforms vinyl and neoprene for most homeowners. It resists UV degradation (-40°F to 250°F range), ozone cracking, and compression set. Premium EPDM seals carry 10+ year warranties versus 2–3 years for basic vinyl.
My new seal still leaks—what now?
First, verify correct profile and full insertion. Next, check floor flatness with a level; uneven slabs require adjustable thresholds or concrete grinding. Finally, ensure side seals aren’t compromised—air follows paths of least resistance. Persistent issues warrant professional assessment.
Is this project safe for beginners?
Absolutely, provided you follow safety protocols. The primary risks involve pinch points and falling doors, both mitigated by disconnecting power and using C-clamps. Allow 2–3 hours for first-timers; experienced DIYers finish in 60–90 minutes.
Does seal replacement improve energy efficiency?
Definitely. The U.S. Department of Energy estimates unsealed garage attachments increase heating/cooling costs by 10–15%. A proper seal also blocks radon gas infiltration—a critical health consideration in affected regions.
Conclusion
Mastering how to replace rubber strip on bottom of garage door empowers you to protect your home, reduce energy waste, and extend your door system’s lifespan—all while saving hundreds on service calls. You’ve now got the knowledge, steps, and confidence to tackle this essential maintenance task safely and effectively.
Loved this guide? Share it on Facebook, Pinterest, or Nextdoor to help fellow homeowners avoid drafty garages and pest invasions! Tag us in your before-and-after photos—we’d love to celebrate your success. Together, we build safer, more efficient homes one seal at a time. 🔧🏡
Leave a Reply