Introduction
Is your garage door struggling to open or close smoothly? Worn-out extension springs might be the culprit, leaving you frustrated and potentially unsafe. Learning how to replace extension springs on a garage door can save you hundreds of dollars in professional service fees while restoring your door’s proper functionality. In this comprehensive guide, we’ll walk you through every step of the replacement process, ensuring you understand the safety precautions, tools needed, and exact procedures to complete this task confidently and correctly.
Garage door extension springs are critical components that counterbalance the weight of your door, making it easy to operate manually or with an automatic opener. When these springs wear out, break, or lose tension, your garage door becomes difficult to manage and potentially dangerous. According to the International Door Association, garage door-related injuries send thousands of Americans to emergency rooms annually, with spring-related incidents being among the most common causes. This underscores why understanding proper replacement techniques is essential for homeowner safety.
Understanding Extension Springs and Their Importance
What Are Extension Springs?
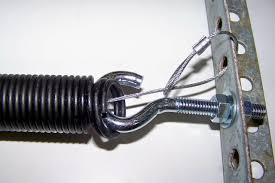
Extension springs are located on either side of your garage door track system. Unlike torsion springs mounted above the door, extension springs stretch and contract as the door moves up and down. These springs typically have a safety cable running through their center, which prevents dangerous snapping if the spring breaks.
Extension springs work by storing energy when stretched during door closure and releasing that energy to help lift the door. Most residential garage doors use two extension springs, one on each side, working together to balance the door’s weight evenly.
Signs Your Extension Springs Need Replacement
Before diving into the replacement process, it’s crucial to recognize when your springs need attention:
- Visible gaps or separation in the spring coils
- Rust or corrosion that weakens the metal structure
- Loud banging noises during door operation
- Door feels heavier than usual when lifting manually
- Uneven movement where one side lags behind the other
- Spring appears stretched out or has lost its original shape
The average lifespan of extension springs ranges from 7,000 to 10,000 cycles (one cycle equals one opening and closing). For typical household use, this translates to approximately 7-10 years before replacement becomes necessary.
Safety First: Essential Precautions Before You Begin
Why Safety Matters
Replacing garage door springs involves significant tension and potential energy release. The Consumer Product Safety Commission reports that improper spring handling can result in serious injuries, including broken bones, cuts, and even fatalities. Taking proper safety precautions isn’t optional—it’s essential.
Required Safety Equipment
- Safety glasses to protect eyes from flying debris
- Heavy-duty work gloves to prevent cuts and improve grip
- Steel-toed boots for foot protection
- Clamps or locking pliers to secure the door in place
- Assistant to help stabilize the door during the process
Critical Safety Steps
- Disconnect the garage door opener from power to prevent accidental activation
- Close the door completely and secure it with clamps on both sides of the track
- Release all tension from the old springs before removal
- Work methodically and never rush through any step
- Never stand directly under the door or springs during work
Tools and Materials You’ll Need
Gathering the right tools before starting ensures a smooth replacement process:
Essential Tools
- Socket wrench set (typically 9/16″ and 1/2″)
- Adjustable wrench
- Pliers (needle-nose and regular)
- Screwdrivers (flathead and Phillips)
- Ladder (stable and appropriate height)
- Tape measure
- Marker or chalk
Replacement Parts
- New extension springs (matched to your door’s weight and size)
- Safety cables (if not included with springs)
- Pulleys and brackets (if worn)
- Lubricant specifically designed for garage door components
Pro Tip: Measure your existing springs carefully before purchasing replacements. Note the wire diameter, outside diameter, length, and number of coils. Many hardware stores offer spring measurement guides, or you can consult manufacturer specifications for your specific garage door model.
Step-by-Step Replacement Process
Step 1: Prepare the Work Area
Begin by clearing the area around your garage door. Remove any vehicles, bicycles, or stored items that might obstruct your workspace. Ensure adequate lighting and ventilation. Place your ladder securely and have all tools within easy reach.
Step 2: Secure the Garage Door
With the door fully closed, use C-clamps or locking pliers to secure the door to the tracks on both sides. Position these clamps just below the bottom rollers to prevent any upward movement. Double-check that the door opener remains disconnected from power.
Step 3: Release Spring Tension
This is the most critical safety step. Extension springs store considerable energy when stretched. To safely release tension:
- Locate the pulley system at the end of each spring
- Using pliers, carefully unhook the spring from the pulley bracket
- Allow the spring to slowly contract to its relaxed state
- Repeat for the second spring
Important: Never cut or forcibly break a tensioned spring. Always allow controlled, gradual release of tension.
Step 4: Remove Old Springs and Hardware
Once tension is fully released:
- Unbolt the spring brackets from the wall or ceiling
- Remove the pulleys and any associated hardware
- Take out the safety cables (save if reusable)
- Inspect all brackets, bolts, and pulleys for wear or damage
Replace any worn components before installing new springs. Using damaged hardware with new springs compromises safety and performance.
Step 5: Install New Springs
Installation follows the reverse order of removal:
- Attach new pulleys and brackets securely
- Thread safety cables through the new springs
- Connect one end of each spring to the stationary bracket
- Stretch the springs carefully to connect to the moving bracket
- Ensure safety cables are properly secured at both ends
Critical Measurement: Extension springs must be installed with proper initial tension. Most manufacturers specify that springs should stretch to 1.5-2 times their relaxed length when the door is closed. Consult your spring manufacturer’s specifications for exact requirements.
Step 6: Test and Adjust
After installation:
- Remove the securing clamps carefully
- Manually lift the door halfway and release—it should stay in place
- Open and close the door several times manually
- Check for smooth, balanced operation
- Reconnect the garage door opener and test automatic operation
If the door doesn’t balance properly, you may need to adjust spring tension or verify that both springs have identical specifications and installation.
Common Mistakes to Avoid
| Mistake | Consequence | Solution |
|---|---|---|
| Skipping safety cables | Dangerous spring failure | Always install safety cables |
| Mismatched spring pairs | Uneven door operation | Replace both springs simultaneously |
| Incorrect spring size | Poor performance or damage | Measure carefully before purchasing |
| Rushing tension release | Injury risk | Work slowly and methodically |
| Ignoring worn hardware | Premature spring failure | Replace all worn components |
When to Call a Professional
While many homeowners successfully replace extension springs themselves, certain situations warrant professional assistance:
- Torsion spring systems (different mechanism requiring specialized tools)
- Heavier commercial doors exceeding residential specifications
- Complex track alignment issues discovered during inspection
- Uncertainty about spring specifications or door weight calculations
- Previous unsuccessful DIY attempts
According to Wikipedia’s comprehensive guide on garage doors, professional installation ensures proper calibration and reduces liability concerns, particularly for complex systems.
Maintenance Tips for Extended Spring Life
Maximize your new springs’ lifespan with regular maintenance:
- Lubricate springs quarterly with silicone-based lubricant
- Inspect monthly for signs of wear, rust, or damage
- Keep tracks clean and properly aligned
- Balance door annually to ensure even spring loading
- Address minor issues promptly before they become major problems
Properly maintained extension springs can last 10-15 years, providing reliable service and peace of mind.
FAQ Section
How much does it cost to replace extension springs professionally?
Professional replacement typically costs between $150-$350, including parts and labor. DIY replacement costs $50-$150 for quality springs and necessary hardware, offering significant savings for those comfortable with the task.
Can I replace just one extension spring?
No, always replace both springs simultaneously. Even if only one appears damaged, the other has experienced similar wear and will likely fail soon. Mismatched springs cause uneven door operation and premature failure.
How do I know what size extension springs to buy?
Measure your existing springs’ wire diameter, outside diameter, relaxed length, and count the coils. Alternatively, check your garage door’s weight rating and consult manufacturer specifications. Many spring retailers provide sizing charts based on door dimensions and weight.
Is it dangerous to replace garage door springs myself?
Yes, there are inherent risks due to high tension in the springs. However, with proper safety equipment, careful preparation, and methodical execution, many homeowners complete this task safely. If you’re uncertain about any step, hire a professional.
How long does replacement take?
For experienced DIYers, replacement typically takes 2-3 hours. First-timers should allocate 4-5 hours to work carefully and safely. Rushing increases accident risk and may compromise installation quality.
Do extension springs need regular lubrication?
Yes, lubricate extension springs every 3-4 months with silicone-based or lithium-based garage door lubricant. Avoid WD-40 or penetrating oils, which attract dirt and don’t provide lasting lubrication. Proper lubrication reduces friction, noise, and wear.
Conclusion
Learning how to replace extension springs on a garage door empowers you to maintain your home safely while saving substantial money on professional services. By following proper safety protocols, using correct tools, and working methodically through each step, you can successfully complete this important maintenance task. Remember that patience and attention to detail matter more than speed when dealing with high-tension components.
Your newly replaced extension springs will restore smooth, quiet garage door operation and provide years of reliable service with proper maintenance. Don’t forget to share this guide with friends and family who might benefit from learning this valuable home maintenance skill. Bookmark this page for future reference, and consider subscribing to our newsletter for more practical DIY home improvement tips.
Stay safe, work smart, and enjoy the satisfaction of a job well done!
Leave a Reply