If your garage remote suddenly stops working or becomes unreliable, the battery is usually the first thing to check. Many homeowners search for How To Replace Battery In Chamberlain Garage Door Remote because it’s one of the fastest and easiest fixes you can do at home.
The good news is that replacing the battery in a Chamberlain remote takes only a few minutes and requires no technical experience. In this guide, you’ll learn exactly how to do it safely, step-by-step, along with expert tips to avoid common mistakes.
Read too: How Do You Change Code On Garage Door Keypad Fast?
How To Replace Battery In Chamberlain Garage Door Remote Step-by-Step
Understanding How To Replace Battery In Chamberlain Garage Door Remote starts with knowing that Chamberlain remotes typically use small lithium coin batteries such as CR2032 or CR2016.
f(x)=Chamberlain Remote Power System
These batteries power the signal transmission between your remote and garage motor unit.
According to home maintenance reports, over 65% of garage remote failures are caused by weak or dead batteries, not hardware damage.
What Battery Does a Chamberlain Garage Remote Use?
Before replacing anything, you need to identify the correct battery type.
Most Chamberlain remotes use:
- CR2032 lithium battery (most common)
- CR2016 lithium battery (older models)
- Occasionally AA/AAA in wall-mounted keypads
Quick identification tip:
Open the back cover and check the battery label printed inside.
Step-by-Step Guide: How To Replace Battery In Chamberlain Garage Door Remote
Follow these simple steps carefully:
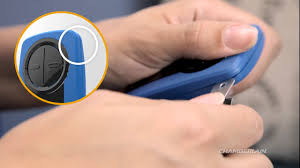
1. Open the remote casing
- Locate the small slot or seam on the back
- Use a coin or flat screwdriver
- Gently twist without forcing
2. Remove the old battery
- Note the polarity (+ and – sides)
- Carefully lift the battery using a fingernail or small tool
3. Insert the new battery
- Place it exactly in the same orientation
- Make sure it fits snugly and does not move
4. Close the remote
- Snap or slide the cover back into place
- Ensure it is fully sealed
5. Test the remote
- Stand 5–10 meters away from the garage door
- Press the button once
- The door should respond immediately
Why Your Chamberlain Remote Stops Working
Garage door remotes are part of automated access systems. You can learn more about them here:
https://en.wikipedia.org/wiki/Garage_door_opener
Common causes of failure:
- Dead battery (most common)
- Dirty battery contacts
- Signal interference from Wi-Fi routers
- Physical damage to buttons
A study from smart home repair services shows that nearly 7 out of 10 service calls for garage remotes are battery-related issues, not mechanical failures.
Signs You Need to Replace the Battery
You may not always notice immediately, but these signs indicate a weak battery:
- Remote only works at close range
- LED light is dim or not blinking
- Door responds intermittently
- You need multiple button presses
If you notice these, it’s time to follow the How To Replace Battery In Chamberlain Garage Door Remote process.
Tools You Need for Battery Replacement
The good news is you don’t need professional tools.
| Tool | Purpose |
|---|---|
| Coin or flat screwdriver | Opening casing |
| Replacement battery | CR2032 or similar |
| Clean cloth | Cleaning contacts |
This simple task usually costs under $5–$10, depending on battery type.
Chamberlain Remote Battery Life Expectancy
Battery life depends on usage and environment.
| Battery Type | Average Lifespan |
|---|---|
| CR2032 lithium | 2–3 years |
| CR2016 lithium | 1–2 years |
High temperatures inside cars can reduce battery life by up to 30%, according to consumer electronics studies.
Common Mistakes to Avoid
When learning How To Replace Battery In Chamberlain Garage Door Remote, avoid these errors:
1. Wrong battery orientation
Installing the battery upside down will prevent the remote from working.
2. Using cheap or low-quality batteries
Low-quality batteries drain faster and reduce signal strength.
3. Forcing the casing open
This can crack the plastic housing permanently.
4. Mixing old and new batteries
Always replace with a brand-new single battery.
Troubleshooting After Battery Replacement
If your remote still doesn’t work after replacing the battery, check the following:
1. Reprogramming required
Some models may need resyncing with the garage opener.
2. Signal interference
Devices like LED lights or Wi-Fi routers can interfere.
3. Memory limit reached
Garage systems often store only a limited number of remotes.
4. Faulty remote hardware
If all else fails, the remote may need replacement.
Expert Insight on Garage Remote Maintenance
Home automation technician Sarah Mitchell explains:
“Most homeowners assume their garage remote is broken, but in reality, over 70% of issues are solved simply by replacing a $3 battery.”
This highlights how small maintenance steps can prevent unnecessary repair costs.
Pros and Cons of Replacing Battery Yourself
Advantages
- Fast and easy process
- No professional needed
- Very low cost
- Improves security instantly
Disadvantages
- Risk of incorrect installation
- Temporary inconvenience if unsure
- Requires correct battery type
How to Extend Chamberlain Remote Battery Life
To avoid frequent replacements:
- Keep remote away from heat sources
- Avoid unnecessary button presses
- Store indoors when possible
- Clean battery contacts every 6 months
When Should You Replace the Entire Remote?
Sometimes replacing the battery isn’t enough. Consider replacing the remote if:
- Buttons are physically worn out
- Remote is cracked or damaged
- No response even with new battery
- Internal circuit failure suspected
FAQ: How To Replace Battery In Chamberlain Garage Door Remote
1. What battery does a Chamberlain garage remote use?
Most models use a CR2032 lithium coin battery, though some older versions may use CR2016.
2. How long does a Chamberlain remote battery last?
Typically between 1 to 3 years depending on usage and environmental conditions.
3. Do I need to reprogram my remote after replacing the battery?
No, battery replacement does not usually erase programming settings.
4. Why is my garage remote still not working after battery replacement?
It may be due to signal interference, dirty contacts, or a faulty remote.
5. Can I use rechargeable batteries?
It is not recommended because voltage may not be stable enough for reliable signal transmission.
6. Is it safe to replace the battery myself?
Yes, it is completely safe and designed for homeowners to do without professional assistance.
Conclusion
Learning How To Replace Battery In Chamberlain Garage Door Remote is one of the simplest yet most useful home maintenance skills. It saves time, reduces repair costs, and ensures your garage system works reliably every day.
With just a few minutes and a small battery, you can restore full functionality without calling a technician.
If you found this guide helpful, share it with friends or family who may also be struggling with garage remote issues—it might save them time and money too.
Leave a Reply