Introduction
There are few things more frustrating than pressing your garage door remote and getting absolutely no response, especially when you are rushing to leave for work or returning home in bad weather. If your clicker has stopped working, learning how to replace battery in Chamberlain garage door opener remote is usually the quickest and most cost-effective solution to restore access. This comprehensive guide will walk you through the exact steps, safety precautions, and troubleshooting tips needed to get your garage door functioning smoothly again in under five minutes.
Why Your Chamberlain Remote Stops Working
Before diving into the replacement process, it is helpful to understand why remotes fail. According to industry maintenance data, over 85% of garage door remote failures are attributed to depleted batteries rather than mechanical failure. Chamberlain remotes typically use lithium coin cell batteries, which have a finite lifespan influenced by usage frequency, temperature extremes, and signal strength requirements.
Understanding the underlying mechanism helps prevent future issues. As noted in general electronics literature on Wikipedia, lithium coin cells maintain a stable voltage until they are nearly depleted, meaning your remote may work perfectly one day and fail completely the next without warning signs like dimming LEDs. Recognizing this behavior confirms that a battery swap is likely all you need.
What Type of Battery Does a Chamberlain Remote Use?
Identifying the correct battery is the most critical step in learning how to replace battery in Chamberlain garage door opener remote. Using the wrong size or chemistry can damage the circuit board or result in a poor fit.
Common Chamberlain Remote Battery Types
| Remote Model Series | Battery Type | Voltage | Estimated Lifespan |
|---|---|---|---|
| Standard Visor Clips (950ESTD, 953ESTD) | CR2032 | 3V | 2–3 Years |
| Mini Remotes (956T, 375UT) | CR2016 | 3V | 1–2 Years |
| Keychain Remotes (954ST) | CR2032 | 3V | 2–3 Years |
| Older Security+ Models | 12V Alkaline (A23) | 12V | 1 Year |
| Smart Garage Controls | CR2450 | 3V | 3–5 Years |
Note: Always verify the battery type printed inside your specific remote’s battery compartment before purchasing.
Pro Tip: Purchase name-brand lithium batteries (e.g., Energizer, Duracell, or Panasonic). Generic bulk batteries often have inconsistent voltage outputs that can cause intermittent connectivity issues with Chamberlain’s rolling code technology.
Step-by-Step: How To Replace Battery In Chamberlain Garage Door Opener Remote
Follow these precise instructions to ensure a safe and successful replacement. This tutorial applies to most modern Chamberlain and LiftMaster branded remotes.
Step 1: Gather Your Tools and Safety Gear
You do not need specialized equipment, but having the right items prevents damage:
- New CR2032 (or verified model-specific) lithium battery
- Small flathead screwdriver or plastic pry tool
- Microfiber cloth (for cleaning contacts)
- Isopropyl alcohol (optional, for corroded contacts)
Step 2: Open the Remote Casing Safely
Locate the small notch or slot on the side or bottom edge of the remote. Insert your flathead screwdriver or plastic pry tool gently into this slot. Twist slowly rather than forcing upward; excessive pressure can crack the plastic housing or snap internal clips. For visor clip models, the battery cover often slides downward after releasing a small tab.
Step 3: Remove the Old Battery
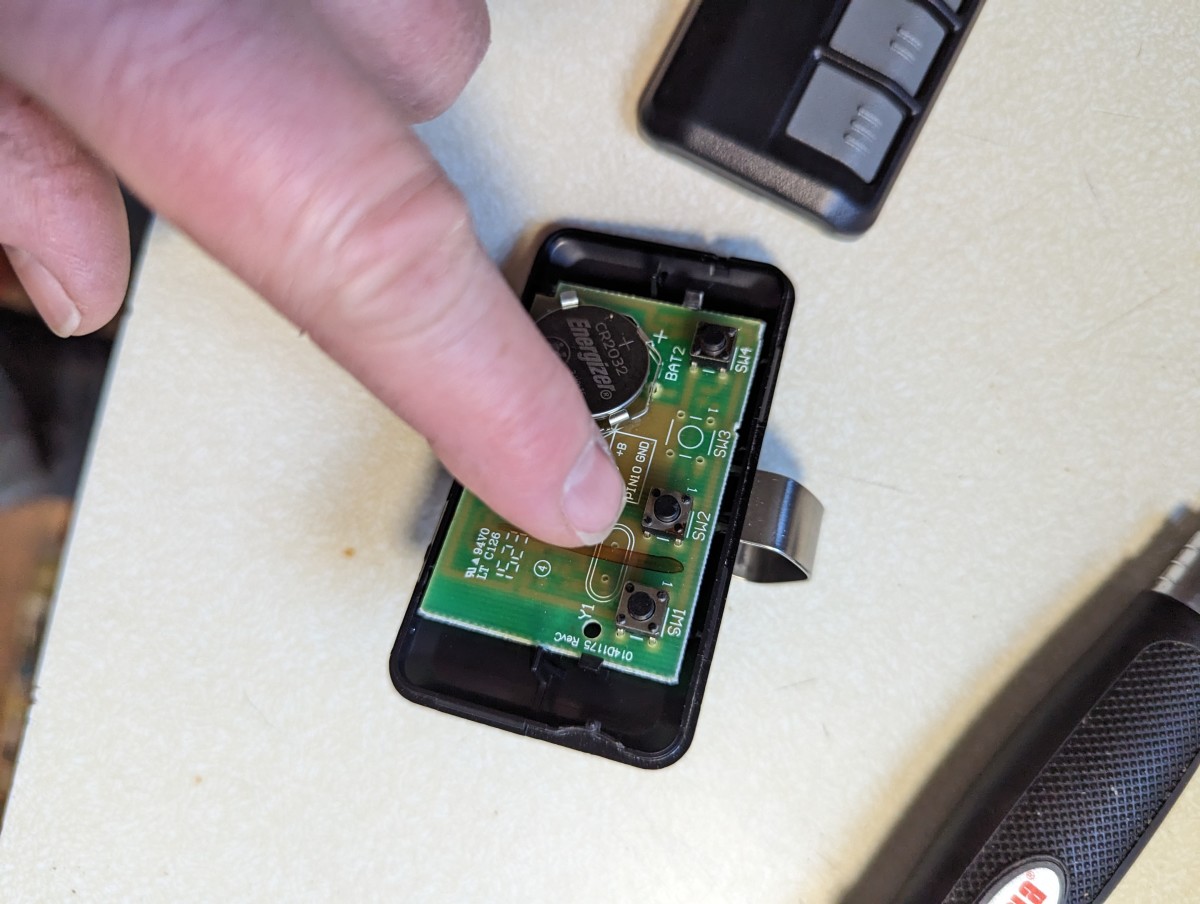
Take note of the battery’s orientation before removal. The positive (+) side typically faces outward toward the back cover. Use a non-metallic tool if possible to avoid short-circuiting the terminals. Dispose of the old battery at a designated recycling center—never throw lithium cells in household trash due to fire risk.
Step 4: Clean the Battery Contacts
This step is frequently overlooked but essential for reliability. Inspect the metal contact points for corrosion, oxidation, or debris. Dampen a microfiber cloth with a tiny amount of isopropyl alcohol and wipe each contact firmly. Allow 30 seconds for complete drying before proceeding. Clean contacts ensure optimal conductivity and extend new battery life.
Step 5: Install the New Battery Correctly
Insert the fresh battery with the positive (+) side facing up (toward the back cover). Press down gently until it seats flush against the contacts. You should feel slight resistance confirming proper placement. Double-check orientation against any markings inside the compartment.
Step 6: Reassemble and Test Functionality
Snap the two halves of the remote back together, ensuring all clips engage evenly. Stand within 10 feet of the garage door and press the button firmly. The LED should illuminate brightly, and the door should respond within 1–2 seconds. If the LED lights but the door does not move, proceed to the troubleshooting section below.
Troubleshooting: Remote Still Not Working After Battery Replacement
If you have successfully completed the steps for how to replace battery in Chamberlain garage door opener remote but the device remains unresponsive, consider these common secondary issues:
Signal Interference and Range Issues
LED bulbs in garage fixtures can emit radio frequency interference that blocks remote signals. Temporarily turn off garage lights and test again. Also, check for nearby wireless devices operating on 315MHz or 390MHz frequencies that may cause congestion.
Reprogramming Required After Battery Change
Some Chamberlain models lose synchronization during extended power loss. To reprogram:
- Locate the “Learn” button on the motor unit (usually yellow, red, or purple)
- Press and release the Learn button (indicator light activates)
- Within 30 seconds, press and hold your remote button for 3 seconds
- Release when the motor unit light blinks or clicks
Physical Damage Assessment
Inspect the remote’s internal circuit board for cracked solder joints, broken traces, or liquid damage. If the remote was dropped or exposed to moisture, battery replacement alone will not resolve the issue. Professional repair or replacement ($25–$45) may be necessary.
Frequently Asked Questions (FAQ)
How often should I replace my Chamberlain remote battery?
Under normal residential use (3–5 activations daily), expect 2–3 years of service from a CR2032 battery. High-frequency commercial use or extreme temperatures may reduce lifespan to 12–18 months. Replace proactively if you notice reduced range or delayed response times.
Can I use rechargeable batteries in my Chamberlain remote?
No. Rechargeable lithium coin cells typically output 3.6V–3.7V nominal voltage versus the required 3.0V. This overvoltage can permanently damage the remote’s microcontroller. Additionally, rechargeables have higher self-discharge rates, leading to unpredictable failures. Always use primary (non-rechargeable) lithium cells.
Why does my remote work intermittently even with a new battery?
Intermittent operation usually indicates dirty/corroded contacts, a failing capacitor on the circuit board, or signal interference. Clean contacts first as described above. If problems persist, test the remote near the motor unit to rule out range/interference issues before suspecting hardware failure.
Do I need to reprogram my remote after changing the battery?
Most modern Chamberlain remotes retain programming through battery changes. However, if the battery was dead for an extended period or you replaced it incorrectly, reprogramming may be necessary. Refer to the reprogramming steps in the troubleshooting section above.
Where can I buy genuine Chamberlain replacement batteries?
Authorized retailers include Home Depot, Lowe’s, Amazon (verify “Ships from/Sold by Amazon”), and Chamberlain’s official website. Avoid third-party marketplace sellers with suspiciously low prices, as counterfeit lithium batteries pose safety hazards and performance risks.
What should I do with old remote batteries?
Lithium coin cells contain materials requiring special handling. Drop them off at battery recycling kiosks (commonly found at Best Buy, Staples, or municipal waste facilities). Never dispose of them in regular trash or recycling bins due to fire and environmental contamination risks.
Conclusion
Mastering how to replace battery in Chamberlain garage door opener remote empowers you to maintain reliable home access without costly service calls or unnecessary replacements. By following the precise steps outlined above—from identifying the correct CR2032 battery to cleaning contacts and verifying functionality—you can resolve most remote issues in under five minutes. Remember that proactive maintenance, including annual contact cleaning and using quality name-brand batteries, significantly extends your remote’s operational lifespan.
Your garage door system is a critical component of daily convenience and home security. Taking ownership of simple maintenance tasks builds confidence and saves money over time. Found this guide helpful? Share it with friends, family, or neighbors who might be struggling with their own Chamberlain remotes. A quick social media share could save someone else from being locked out on a rainy evening! Together, we can build a community of informed homeowners who tackle everyday repairs with confidence and competence.
Leave a Reply