Introduction
Is your garage door stuck, noisy, or refusing to open? You’re not alone. One of the most common culprits is a broken torsion spring, and knowing how to replace a torsion spring on a garage door can save you hundreds in repair costs. In this guide, we’ll walk you through the process safely and effectively, so you can get your garage door back in working order without calling a professional—unless necessary.
Why Torsion Springs Break and When to Replace Them
Torsion springs are under immense tension and are designed to last between 10,000 to 20,000 cycles (one cycle = one open and close). However, factors like temperature fluctuations, lack of lubrication, and general wear and tear can cause them to snap prematurely.
Signs Your Torsion Spring Needs Replacement:
- The garage door won’t open or closes unevenly
- You hear a loud “bang” from the garage
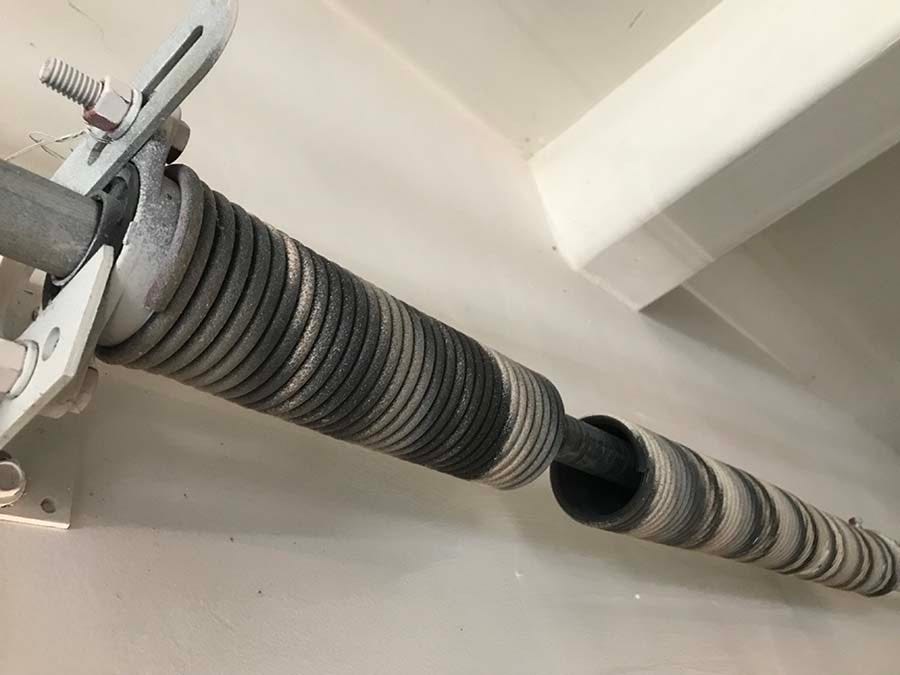
- Visible gaps or breaks in the spring coils
- The door feels heavier than usual
If you notice any of these signs, it’s time to consider replacing the torsion spring.
Tools and Safety Gear You’ll Need
Before diving into the replacement process, gather the right tools and safety equipment. This job involves high-tension components, so safety is paramount.
Essential Tools:
- Winding bars (two steel rods, typically 18–24 inches long)
- Socket wrench set
- Vice grips or locking pliers
- Ladder
- Tape measure
- Lubricant (silicone-based recommended)
Safety Gear:
- Safety glasses
- Work gloves
- Steel-toed boots (optional but recommended)
⚠️ Warning: Torsion springs store a significant amount of energy. Improper handling can result in serious injury. If you’re unsure, consult a licensed technician.
Step-by-Step Guide: How To Replace A Torsion Spring On A Garage Door
Step 1: Disconnect the Garage Door Opener
Start by unplugging the garage door opener or pulling the emergency release cord. This ensures the door doesn’t move unexpectedly during the repair.
Step 2: Secure the Garage Door
Use vice grips or C-clamps to secure the garage door tracks just below the bottom roller brackets. This prevents the door from falling when the spring tension is released.
Step 3: Release Tension from the Old Spring
Insert a winding bar into one of the holes on the winding cone. Slowly unwind the spring by rotating the bar counterclockwise. Use a second winding bar for stability. Repeat until all tension is released.
💡 Tip: Always keep one winding bar inserted while adjusting the other to prevent sudden release of tension.
Step 4: Remove the Old Torsion Spring
Once the tension is fully released, remove the bolts securing the spring to the center bracket. Carefully slide the old spring off the torsion tube.
Step 5: Install the New Torsion Spring
Slide the new spring onto the torsion tube, ensuring it’s oriented correctly (left-wind vs. right-wind matters). Reattach the spring to the center bracket using the original bolts.
Step 6: Wind the New Spring
Using the winding bars, wind the new spring according to the manufacturer’s specifications. Most residential doors require 7–8 full turns per spring. Refer to your door’s manual or consult Wikipedia’s garage door spring guide for general reference.
Step 7: Test the Door
Remove the clamps securing the door and reconnect the opener. Test the door manually first, then with the opener. It should open and close smoothly and stay balanced halfway up.
Common Mistakes to Avoid
Even experienced DIYers can make errors when replacing torsion springs. Here are some pitfalls to watch out for:
| Mistake | Consequence | Solution |
|---|---|---|
| Not releasing tension properly | Spring can snap violently | Use two winding bars and go slowly |
| Installing the wrong spring size | Door imbalance or damage | Measure old spring or consult specs |
| Skipping safety gear | Risk of eye or hand injury | Always wear glasses and gloves |
| Over-winding the spring | Premature failure | Follow manufacturer turn counts |
When to Call a Professional
While DIY replacement is possible, certain situations warrant professional help:
- You’re uncomfortable working with high-tension systems
- The door is severely misaligned or damaged
- You don’t have the proper tools
- The spring broke while the door was in motion
A licensed technician can ensure safe and correct installation, often completing the job in under an hour.
FAQ Section
Q1: How long does it take to replace a torsion spring?
A: With the right tools and experience, it typically takes 1–2 hours. First-timers may take longer due to caution and learning curve.
Q2: Can I replace just one torsion spring?
A: It’s recommended to replace both springs even if only one is broken. This ensures balanced operation and prevents premature failure of the remaining spring.
Q3: What’s the difference between torsion and extension springs?
A: Torsion springs are mounted above the door and use rotational force, while extension springs stretch along the sides. Torsion springs are generally safer and more durable.
Q4: How much does a new torsion spring cost?
A: Prices range from $30 to $100 per spring, depending on size and quality. Professional installation adds $150–$300.
Q5: Is it dangerous to replace a torsion spring myself?
A: Yes, if proper precautions aren’t taken. Always use safety gear, follow instructions carefully, and consider professional help if unsure.
Q6: How do I know which spring size to buy?
A: Measure the wire diameter, inside diameter, and length of the old spring. Alternatively, check your door’s manual or consult a supplier with your door model.
Conclusion
Replacing a torsion spring on your garage door is a manageable DIY project if approached with care and the right tools. By following this guide on how to replace a torsion spring on a garage door, you can restore functionality, enhance safety, and avoid costly service calls. Remember, safety comes first—never rush the process.
If you found this guide helpful, share it with friends or neighbors who might benefit. And if you’re still hesitant, don’t hesitate to call a pro. Your safety—and your garage door—are worth it.
🔧 Stay safe, stay informed, and keep your garage door running smoothly!
Leave a Reply