Introduction
A broken garage door spring can leave your vehicle trapped and your home insecure, turning a simple morning routine into a frustrating ordeal. If you are searching for how to replace a tension spring on a garage door, you likely need a reliable solution that balances safety with cost-effectiveness. This comprehensive guide walks you through the critical safety protocols, necessary tools, and precise installation steps to restore your door’s functionality while prioritizing your well-being above all else.
⚠️ Critical Safety Warning: Read Before Proceeding
Before discussing how to replace a tension spring on a garage door, we must address the elephant in the room: garage door torsion springs are among the most dangerous components in a residential setting. These springs store immense kinetic energy—often exceeding 200 foot-pounds of torque when fully wound. According to the U.S. Consumer Product Safety Commission (CPSC), thousands of emergency room visits annually result from garage door spring accidents, including severe finger amputations and facial trauma.
Expert Insight: Mike Reynolds, a certified garage door technician with 25 years of field experience, states: “I have seen professionals with decades of experience get hurt by cutting corners on spring replacement. If you do not own winding bars specifically designed for torsion springs, or if you feel even 1% uncertain, hire a professional. The $150–$300 service call is infinitely cheaper than an ER visit.”
If you decide to proceed, understand that this tutorial assumes you have mechanical aptitude, the correct specialized tools, and a commitment to following every safety step without deviation.
What Tools Do You Need to Replace a Garage Door Tension Spring?
You cannot safely complete this job with standard household tools. Using screwdrivers as makeshift winding bars is the leading cause of spring-related injuries. Here is the mandatory equipment list:
| Tool | Purpose | Safety Note |
|---|---|---|
| Winding Bars (Pair) | Winding/unwinding torsion springs | Must be steel, 18″ long, 3/8″ diameter; never use substitutes |
| Adjustable Wrenches (2) | Loosening/tightening set screws | Use high-quality wrenches to prevent slipping |
| Vise Grips/Locking Pliers | Securing the shaft during removal | Prevents accidental rotation |
| Safety Glasses & Gloves | Personal protection | ANSI-rated eye protection is non-negotiable |
| Stepladder (Sturdy) | Reaching spring assembly | Must support 300+ lbs; never stand on top rung |
| Socket Set & Ratchet | Removing center bracket bolts | Ensure proper fit to avoid stripping |
| Marker/Paint Pen | Marking winding position | Helps track quarter-turn increments |
| Lubricant (White Lithium) | Post-installation maintenance | Reduces friction and extends spring life |
Pro Tip: Purchase winding bars from a dedicated garage door supplier rather than a general hardware store. Many generic bars are made from softer metals that can bend under torsion load, causing catastrophic slippage.
How Do You Identify the Correct Replacement Spring?
Installing the wrong spring size will either fail to lift your door or overstress your opener, leading to premature system failure. You need four precise measurements:
- Wire Size: Measure the thickness of the existing spring wire using calipers. Common sizes range from 0.192″ to 0.283″. Even a 0.010″ difference dramatically changes lifting capacity.
- Inside Diameter (ID): Measure across the inside of the spring coil. Standard IDs are 1-3/4″, 2″, or 2-5/8″.
- Length: Measure the spring in its relaxed (unwound) state. Count the total number of coils and multiply by wire size, or measure end-to-end excluding the winding cones.
- Wind Direction: Determine if your spring is left-wound or right-wound. Face the spring from inside the garage looking outward; if the wind goes clockwise away from the center, it is right-wound (red cone). Counter-clockwise indicates left-wound (black cone).
For deeper technical context on how torsion mechanics function within counterbalance systems, refer to the Garage Door Torsion Spring entry on Wikipedia.org, which provides excellent foundational engineering principles.
Step-by-Step: How To Replace A Tension Spring On A Garage Door
Step 1: Secure the Door and Disconnect Power
Close the garage door completely. Clamp locking pliers onto the track below the bottom roller on each side to prevent upward movement. Unplug the garage door opener and pull the emergency release cord to disengage the trolley. Never work on a spring system with the opener connected.
Step 2: Release Tension from the Old Spring
Insert a winding bar into the bottom hole of the winding cone. Hold it firmly against the door header. Insert the second bar into the next available hole. Slowly loosen the set screws on the cone using your adjustable wrench while maintaining pressure on both bars. Transfer tension between bars in controlled quarter-turn increments until the spring is fully unwound. Count every quarter-turn and record the number—this is your reference for rewinding.
Step 3: Remove the Old Spring Assembly
Once tension is zero, remove the set screws completely. Slide the old spring off the shaft. If replacing both springs (strongly recommended for balanced wear), repeat the process on the opposite side. Inspect the center bearing plate, cables, and rollers for wear; replace any compromised components now while access is easy.
Step 4: Install the New Spring(s)
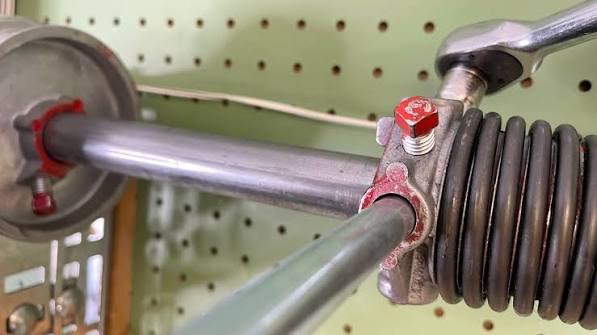
Slide the new spring onto the shaft in the correct orientation (verify wind direction matches original). Reinstall the winding cone, ensuring it seats fully against the spring. Hand-tighten set screws initially. Align the spring so there is approximately 1/4″ gap between the stationary cone and the center bracket—this prevents binding during operation.
Step 5: Wind the New Spring to Proper Tension
This is the most critical phase. Insert your first winding bar securely. Begin winding in the correct direction (upward toward the ceiling for standard installations). Wind in precise quarter-turn increments, alternating bars and never releasing contact with the active bar. Match the exact quarter-turn count you recorded during removal, then add 1/4 to 1/2 additional turn based on door weight testing. Most residential doors require 7.5 to 8.5 full turns (30–34 quarter-turns), but always verify with your specific spring manufacturer’s chart.
Step 6: Tighten Set Screws and Test Balance
With tension applied, tighten both set screws firmly using your wrench. Some technicians recommend tapping the cone gently with a hammer to seat it before final tightening. Remove winding bars slowly. Release the track clamps and manually lift the door halfway. A properly balanced door should stay in place when released at mid-travel. If it rises, reduce tension by 1/4 turn; if it falls, add 1/4 turn. Reconnect the opener only after achieving perfect balance.
Frequently Asked Questions About Garage Door Spring Replacement
How long do garage door tension springs typically last?
Most residential torsion springs are rated for 10,000–20,000 cycles (one open/close = one cycle). With average daily use of 3–4 cycles, expect 7–15 years of service. High-cycle springs (25,000–50,000 cycles) are available for heavy-use households and commercial applications.
Should I replace both springs if only one broke?
Yes, absolutely. Springs are manufactured in matched pairs and experience identical stress cycles. If one has failed due to fatigue, the other is statistically near failure. Replacing both simultaneously ensures balanced lifting force, prevents uneven cable wear, and eliminates a second service call within months.
Can I upgrade to higher-cycle springs during replacement?
Upgrading is often worthwhile. Standard 10,000-cycle springs may cost $40–$60 each, while 25,000-cycle versions run $70–$100. The marginal upfront cost pays for itself through extended lifespan and reduced future labor expenses. Consult a spring sizing calculator to ensure upgraded specifications match your door weight.
Why does my garage door still feel heavy after spring replacement?
Several factors beyond spring tension affect perceived weight: worn rollers creating drag, misaligned tracks, frayed cables adding friction, or an undersized spring. Verify balance at mid-travel first. If balanced but still heavy at extremes, inspect mechanical components. Never compensate for mechanical issues by over-tensioning springs—this accelerates failure.
Is it legal or code-compliant to DIY garage door spring replacement?
No federal or state law prohibits homeowner spring replacement. However, many manufacturers void warranties if non-certified individuals perform repairs. Additionally, some homeowners’ insurance policies exclude injuries sustained during unpermitted mechanical work. Check your policy and warranty terms before proceeding.
What are the signs my tension spring needs replacement soon?
Watch for these warning indicators: visible gap between coils when door is closed, loud popping/banging noises during operation, door struggling to open past midpoint, opener straining audibly, or rust/corrosion on spring coils. Address these proactively rather than waiting for complete failure, which often occurs at inconvenient times.
Conclusion: Prioritize Safety and Precision Over Speed
Learning how to replace a tension spring on a garage door empowers you to maintain one of your home’s most-used mechanical systems, potentially saving hundreds in service fees. However, this knowledge comes with profound responsibility. The margin between successful repair and serious injury is measured in millimeters of tool engagement and seconds of focused attention. Always invest in proper tools, double-check measurements, respect stored energy, and honestly assess your comfort level before beginning.
If you completed this project successfully, share this guide with fellow homeowners who might benefit from safe, accurate information. Tag us on social media with your before-and-after photos—we love celebrating safe DIY wins! And remember: when in doubt, calling a certified professional isn’t defeat; it’s the smartest decision you can make for your safety and your door’s longevity. Stay safe, stay informed, and keep your garage working smoothly for years to come.
Leave a Reply