Introduction
There are few sounds more alarming to a homeowner than the loud bang of a snapping garage door spring, followed immediately by a door that refuses to open. If you are currently staring at a heavy, immovable door and wondering how to repair a broken spring on a garage door, please understand that this is one of the most dangerous DIY tasks in home maintenance. While understanding the mechanics is valuable for every homeowner, the extreme tension stored in these components requires respect, precision, and often professional intervention to avoid severe injury.
Understanding Garage Door Springs: Torsion vs. Extension
Before attempting any assessment, you must identify which system your garage utilizes. The repair process, tools, and risk levels differ drastically between the two primary types. According to mechanical engineering principles documented on Wikipedia, torsion springs operate through rotational torque mounted above the door, while extension springs rely on linear stretching force along the horizontal tracks.
Quick Comparison: Torsion vs. Extension Springs
| Feature | Torsion Springs | Extension Springs |
|---|---|---|
| Location | Mounted horizontally above door opening | Parallel to horizontal tracks on sides |
| Mechanism | Rotational torque via winding cones | Linear tension/stretching |
| Lifespan | 15,000 – 20,000 cycles | 10,000 – 15,000 cycles |
| Safety Risk | Extreme (high torque) | High (snap-back risk) |
| DIY Feasibility | Not recommended for novices | Moderate with safety cables |
| Repair Cost | $200 – $400 (professional) | $100 – $250 (professional) |
⚠️ Critical Safety Warning: Never attempt to repair a torsion spring without proper winding bars, vice grips, and eye protection. The stored energy in a wound torsion spring can cause fatal injuries if released uncontrolled. If you lack experience, skip to the “When to Call a Professional” section.
How Do I Know If My Garage Door Spring Is Broken?
Diagnosing the issue correctly prevents unnecessary repairs. A broken spring typically presents with unmistakable symptoms that differentiate it from opener malfunctions or track misalignment.
Primary Signs of Spring Failure
- The Loud Bang: A gunshot-like noise originating from the garage is the classic indicator of a spring snap.
- Door Won’t Stay Open: If the door falls back down when lifted manually halfway, the counterbalance system has failed.
- Visible Gap in Torsion Spring: Inspect the spring above the door; a broken torsion spring will show a distinct 2-inch gap where the metal has separated.
- Snapped Safety Cable: On extension systems, a dangling or snapped cable running through the spring indicates failure.
- Opener Strain: The motor hums but cannot lift the door, or the door rises only a few inches before stopping.
What Tools Are Required for Garage Door Spring Repair?
If you have assessed the risks and possess mechanical aptitude, having the correct specialized tools is non-negotiable. Standard household wrenches are insufficient and dangerous for this application.
Essential Tool Checklist
- Steel Winding Bars (Pair): Specifically designed for torsion springs. Never use screwdrivers or rebar. Use 1/2-inch diameter steel bars, 18–24 inches long.
- Adjustable Wrench & Socket Set: For loosening set screws on winding cones and cable drums.
- Vice Grips (Locking Pliers): To secure the torsion tube and prevent accidental rotation during work.
- Safety Glasses & Gloves: ANSI-rated impact protection is mandatory.
- Stepladder: Stable platform rated for your weight plus tools.
- Spring Gauge/Wind Calculator: To verify correct spring size and required quarter-turns.
- Lubricant: Lithium-based grease for post-installation maintenance.
Step-by-Step: How To Repair A Broken Spring On A Garage Door (Torsion System)
This guide outlines the technical procedure for educational purposes and experienced DIYers. Always replace both springs simultaneously, even if only one is broken, as the surviving spring is near end-of-life and mismatched springs cause premature failure.
Step 1: Secure the Work Area and Disconnect Power
Unplug the garage door opener to prevent accidental activation. Close the door completely if possible. Place vice grips on the torsion tube below the bottom bracket to immobilize the shaft. This prevents the remaining tension from spinning the tube violently.
Step 2: Release Remaining Tension Safely
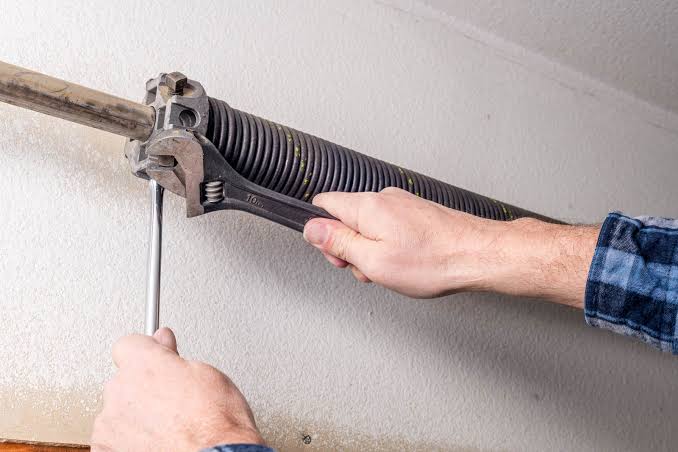
Insert the first winding bar into a hole on the winding cone of the unbroken spring. Maintain firm downward pressure. Loosen the set screws slightly using an adjustable wrench. Slowly let the bar rotate toward the floor, controlling the descent. Insert the second bar into the next hole before removing the first. Repeat until all tension is fully released. Count each quarter-turn; you will need this number for rewinding.
Step 3: Remove the Broken Spring Assembly
With tension fully released, loosen the set screws on the broken spring’s winding cone. Slide the cone off the shaft. Unbolt the center bracket and remove the broken spring from the torsion tube. Measure the old spring precisely: wire size, inside diameter, and overall length. Order exact replacements—guessing causes improper balance.
Step 4: Install New Springs and Hardware
Slide the new springs onto the torsion tube, ensuring the winding direction matches the original (left-wound vs. right-wound). Reinstall the center bracket and tighten securely. Position the winding cones against the bearing plates. Hand-tighten set screws initially.
Step 5: Wind the New Springs to Specification
Using your recorded quarter-turn count from Step 2, wind the new springs. Insert the winding bar and pull upward in controlled quarter-turn increments. Alternate bars after each quarter-turn. Typical residential doors require 28–32 quarter-turns (7–8 full rotations). Verify tension by checking that the door balances at the midpoint when manually lifted.
Step 6: Test Balance and Lubricate
Remove vice grips and winding bars. Manually lift the door to waist height; it should stay in place without drifting up or down. If it falls, add quarter-turns; if it rises, reduce them. Once balanced, apply lithium grease to the springs, hinges, and rollers. Reconnect the opener and test the auto-reverse safety feature.
When Should I Hire a Professional Instead of DIY?
Despite detailed instructions, certain scenarios demand professional service. Industry data shows that emergency room visits related to garage door repairs spike annually, primarily from torsion spring incidents.
Red Flags Requiring Professional Help
- No Prior Mechanical Experience: If you’ve never worked with high-tension systems, the learning curve is too steep for this task.
- Missing Specialized Tools: Improvising with incorrect tools dramatically increases injury risk.
- Unusual Spring Configuration: Custom doors, high-lift tracks, or commercial-grade systems require expert calibration.
- Physical Limitations: The task requires significant upper body strength and stable footing on a ladder while managing extreme forces.
- Uncertainty About Spring Size: Incorrect sizing damages openers and creates unsafe operating conditions.
Professional technicians typically complete dual-spring replacements in 45–90 minutes with warranty coverage, making the $200–$400 investment worthwhile for most homeowners.
Frequently Asked Questions (FAQ)
How much does it cost to repair a broken garage door spring?
Professional torsion spring replacement averages $200–$400 for a pair, including parts and labor. Extension spring repairs range from $100–$250. DIY parts cost $50–$120 per spring, but factor in tool purchases and personal risk. Prices vary by region, spring size, and whether additional hardware (cables, bearings) needs replacement.
Can I replace just one garage door spring?
Technically yes, but professionals strongly recommend replacing both simultaneously. Springs are matched during manufacturing and wear identically. Installing one new spring alongside an aged partner creates imbalance, strains the opener, and guarantees the second spring will fail within months. Dual replacement ensures consistent performance and extends system lifespan.
How long do garage door springs last?
Standard torsion springs are rated for 10,000–20,000 cycles (one cycle = open + close). At four daily cycles, this translates to 7–14 years. Extension springs typically last 10,000–15,000 cycles. Factors reducing lifespan include extreme temperatures, lack of lubrication, oversized doors, and frequent partial openings. Regular annual inspections help predict end-of-life.
Is it safe to manually open a garage door with a broken spring?
You can, but it requires significant physical effort and caution. A standard double-car door weighs 150–200 pounds without spring assistance. Lift slowly using leg muscles, keep fingers clear of sections, and never release the door mid-travel—it will slam shut violently. Consider this a temporary emergency measure only, not a sustainable solution.
Why did my garage door spring break prematurely?
Premature failure (under 5 years) usually stems from undersized springs installed during construction to cut costs, inadequate lubrication causing friction fatigue, corrosion from humidity or road salt, or excessive daily cycling beyond the spring’s rated capacity. A professional assessment can determine if upsizing to higher-cycle springs prevents recurrence.
Conclusion
Understanding how to repair a broken spring on a garage door empowers you to make informed decisions about safety, budgeting, and vendor selection—even if you ultimately choose professional installation. The key takeaways are recognizing spring type, respecting the extreme hazards involved, replacing springs in pairs, and knowing your personal limits. Your family’s safety is worth far more than potential savings from a risky DIY attempt.
Found this guide helpful? Share it with fellow homeowners on Facebook, Pinterest, or Nextdoor to prevent garage door injuries in your community. Tag us with your repair stories or questions—we’re here to help you maintain a safe, functional home! 💪🏡
Leave a Reply