Introduction
Is your garage letting in cold drafts, rainwater, or unwanted pests through the gap at the floor? You are not alone; this is one of the most common complaints from homeowners trying to maintain an energy-efficient and clean space. Learning how to put weather stripping on bottom of garage door is a simple, cost-effective weekend project that can instantly improve your home’s comfort and protect your stored belongings from moisture and debris. In this comprehensive guide, we will walk you through every step of the process so you can achieve a professional-grade seal without hiring a contractor.
Why Is My Garage Door Leaking Air and Water?
Before grabbing your tools, it helps to understand why the existing seal failed. Garage doors are heavy mechanical systems that endure thousands of cycles, and the bottom seal takes the brunt of the friction against concrete. Over time, UV exposure, temperature fluctuations, and physical abrasion cause rubber and vinyl seals to crack, flatten, or tear.
According to the U.S. Department of Energy, unsealed gaps in garages attached to living spaces can account for significant heat loss in winter and heat gain in summer. A compromised seal doesn’t just affect temperature; it creates a highway for rodents, insects, and wind-driven rain. Understanding the mechanics of weatherstripping helps you appreciate why proper installation matters—it is not just about filling a gap, but creating a dynamic barrier that accommodates door movement while maintaining compression.
What Tools and Materials Do I Need for Installation?
Preparation is 80% of a successful installation. Gathering the right supplies prevents mid-project trips to the hardware store and ensures the new seal lasts for years rather than months.
Essential Tool List
- Tape Measure: For precise width measurement.
- Utility Knife or Heavy-Duty Scissors: For cutting thick rubber/vinyl.
- Cordless Drill/Driver: With appropriate bits for retainer screws.
- Flathead Screwdriver or Pry Bar: For removing old fasteners.
- Rubber Mallet: To seat stubborn seals into aluminum retainers.
- Safety Glasses and Gloves: Protect against rusted metal and sharp edges.
- Silicone Spray or Soapy Water: Lubricant for sliding the seal into the track.
Choosing the Right Seal Type
Not all garage doors use the same seal. Identifying yours correctly is critical:
| Seal Type | Best For | Durability | Installation Difficulty |
|---|---|---|---|
| T-Bulb Seal | Standard residential steel doors | High (10+ years) | Moderate |
| U-Shaped Channel | Doors with bottom retainer brackets | Very High | Easy |
| Nail-On Strip | Wooden garage doors | Medium (3-5 years) | Easy |
| Threshold Seal | Uneven/floors with large gaps | High | Moderate |
Expert Tip: Always measure the old seal’s profile, not just the door width. Manufacturers vary significantly in channel dimensions. Bringing a 2-inch sample to the store is the safest way to ensure compatibility.
Step-by-Step: How To Put Weather Stripping On Bottom Of Garage Door
Follow these detailed instructions to replace your seal safely and effectively. This tutorial assumes you have a standard sectional garage door with a bottom retainer bracket, which covers approximately 90% of modern residential installations.
Step 1: Disconnect the Opener and Secure the Door
Safety comes first. Pull the emergency release cord on your garage door opener to disengage it from the door. Manually lower the door completely until it rests on the floor. Never work on a door connected to an active opener, as accidental activation can cause severe injury or damage. Clamp locking pliers onto the track just above a roller on each side to prevent the door from accidentally lifting while you work.
Step 2: Remove the Old Weather Stripping
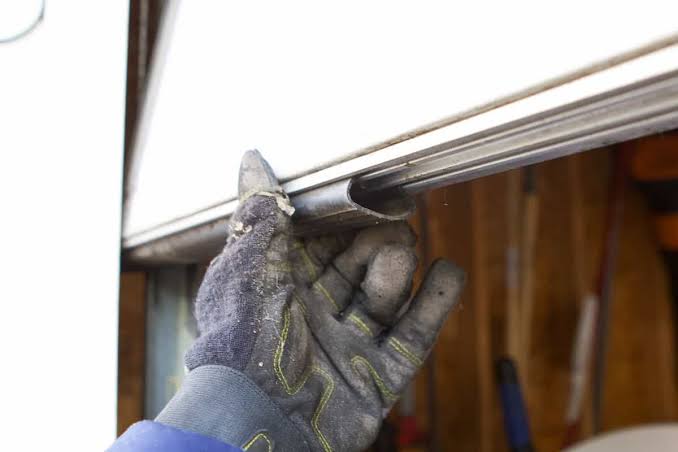
Locate the end caps or retaining screws at both ends of the bottom bracket. Using your drill or screwdriver, remove these fasteners. If your seal is nailed on (common with wood doors), carefully pry up the nails with a flathead screwdriver. Once the fasteners are removed, grip the old seal firmly and pull it horizontally out of the channel. It may require significant force if it has been in place for many years. Clean the channel thoroughly with a wire brush and degreaser to remove rust, dirt, and old adhesive residue. A clean channel ensures smooth insertion of the new seal.
Step 3: Measure and Cut the New Seal
Measure the exact width of your garage door from outside edge to outside edge. Transfer this measurement to your new weather stripping. When cutting, add exactly 1 inch to your measurement. This extra length allows for slight compression and ensures no gaps appear at the corners after the seal settles. Use sharp utility scissors or a fine-tooth saw for a clean cut; ragged edges make insertion difficult and compromise the corner seal.
Step 4: Lubricate and Insert the New Seal
This is where most DIYers struggle. Apply a generous amount of silicone spray or soapy water along the entire length of the retainer channel and the bulb/flange of the new seal. Start at one end and feed the seal into the channel by hand. Work slowly, pushing 6–12 inches at a time. If resistance builds, apply more lubricant—do not force it, as this can tear the seal or bend the retainer. For T-bulb seals, you may need to tap gently with a rubber mallet to fully seat the bulb. Ensure the seal extends evenly beyond both door edges by approximately ½ inch on each side.
Step 5: Reattach End Caps and Test the Seal
Replace the end cap screws or nails to secure the seal in position. Trim any excess material flush with the door edge using your utility knife. Remove the locking pliers from the tracks. Reconnect the opener and operate the door through 2–3 full cycles. Observe the seal’s contact with the floor throughout the travel path. The seal should compress slightly when closed but should not drag excessively during opening. Perform the “paper test”: close the door on a sheet of paper at multiple points along the width. You should feel consistent resistance when pulling the paper out, indicating uniform compression.
Common Mistakes to Avoid During Installation
Even experienced DIYers make errors that shorten seal lifespan. Avoid these pitfalls:
- Skipping Lubrication: Dry installation causes binding, tearing, and premature failure. Always use silicone-based lubricant.
- Over-Tightening End Screws: This distorts the retainer channel and creates gaps. Hand-tighten plus a quarter turn only.
- Ignoring Floor Condition: If your concrete is severely uneven (>¼ inch variation), a standard seal will not suffice. Install a threshold seal or use self-leveling compound first.
- Using Wrong Seal Profile: A U-channel seal forced into a T-bulb retainer will fail within weeks. Verify compatibility before purchasing.
- Neglecting Annual Inspection: Check seal condition every fall. Early detection of wear prevents costly water damage.
FAQ: Your Top Questions Answered
How often should I replace my garage door bottom seal?
Most quality rubber or vinyl seals last 5 to 10 years depending on climate, usage frequency, and floor condition. Inspect annually for cracks, flattening, or gaps. Replace immediately if you notice light visible under the closed door or water infiltration during storms.
Can I install weather stripping without removing the door?
Yes! The method described above works with the door in place. You only need to disconnect the opener and secure the door with clamps. Full door removal is unnecessary and adds significant risk and labor.
What is the best material for extreme climates?
For temperatures below -20°F (-29°C), choose EPDM rubber over vinyl. EPDM remains flexible in deep cold and resists ozone degradation. Vinyl becomes brittle and cracks in freezing conditions. For hot climates, UV-resistant reinforced vinyl performs well.
My floor is uneven and the seal still leaks. What now?
Install a garage door threshold seal. These adhesive-backed rubber strips mount directly to the concrete and create a raised barrier that compensates for floor irregularities up to 1 inch. They work in conjunction with your bottom seal for double protection.
Should I hire a professional for this job?
If your door uses a specialized retainer system, shows structural damage, or if you’re uncomfortable working with heavy components, hire a certified garage door technician. Labor costs typically range from $100–$200 including materials. However, standard replacements are well within DIY capability for most homeowners.
Does new weather stripping improve energy efficiency noticeably?
Absolutely. Studies show that sealing garage gaps can reduce heating and cooling loads by 10–15% for attached garages. Beyond energy savings, you’ll notice reduced dust, fewer pests, and better protection for vehicles and stored items.
Conclusion
Mastering how to put weather stripping on bottom of garage door is one of the highest-ROI maintenance tasks any homeowner can tackle. In just 60–90 minutes, you transform a leaky, drafty garage into a sealed, protected extension of your home. The benefits extend far beyond comfort: lower energy bills, pest prevention, moisture control, and extended lifespan for everything stored inside.
Don’t wait for the next storm or cold snap to expose your garage’s vulnerabilities. Gather your tools this weekend and give your home the seal it deserves. Found this guide helpful? Share it on Facebook, Pinterest, or your neighborhood Nextdoor group to help fellow homeowners stop garage leaks for good! Your friends and neighbors will thank you—and so will their energy bills.
Leave a Reply