If your garage feels drafty, dusty, or exposed to rainwater, you’re not alone. Many homeowners struggle with energy loss and moisture issues due to poorly sealed garage doors. Learning How To Put Weather Stripping On A Garage Door can solve these problems quickly and affordably.
In this guide, you’ll discover a simple step-by-step method to install weather stripping correctly—even if you’ve never done a home improvement project before.
What Is Weather Stripping and Why Does It Matter?
Weather stripping is a flexible material installed along the edges of a garage door to block air, water, dust, and pests from entering.
Read too: Tc1 Tricode Garage Door Opener Remote W/ Clip Chamberlain: Complete Guide
According to general building efficiency studies referenced by Wikipedia, poorly sealed openings in homes can account for up to 30% of energy loss. That means a simple strip of rubber or vinyl can significantly reduce heating and cooling costs.
Benefits of Weather Stripping
- Reduces energy bills
- Prevents rainwater leakage
- Keeps out insects and rodents
- Improves garage temperature stability
- Reduces dust and debris buildup
What Tools Do You Need to Install Weather Stripping?
Before learning How To Put Weather Stripping On A Garage Door, gather the following tools:
- Measuring tape
- Utility knife or scissors
- Screwdriver or drill
- Weather stripping kit (rubber, vinyl, or foam)
- Cleaning cloth
- Adhesive (if required)
How To Put Weather Stripping On A Garage Door Step by Step
Step 1: Clean the Garage Door Edges
Start by cleaning the surface where the stripping will be installed.
- Use warm water and mild soap
- Dry completely before installation
- Remove old rubber or debris
A clean surface ensures stronger adhesion and longer-lasting results.
Step 2: Measure the Door Frame Accurately
Measure all sides of your garage door:
- Top width
- Left vertical side
- Right vertical side
- Bottom edge (threshold area)
Add an extra 2–3 cm to each measurement to allow proper fitting.
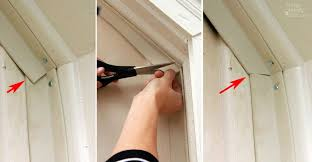
Step 3: Cut the Weather Stripping Material
Using a utility knife or heavy-duty scissors:
- Cut strips according to your measurements
- Ensure straight, clean edges
- Avoid stretching the material
Step 4: Install the Side and Top Strips
This is the most important part of How To Put Weather Stripping On A Garage Door.
- Align strip along door frame
- Press firmly into place
- Use screws or nails (if included in kit)
- Keep consistent pressure while installing
👉 Tip: Start from the top center, then move downward for better alignment.
Step 5: Install the Bottom Seal
The bottom seal is crucial for blocking water and pests.
- Lift the garage door slightly
- Slide or attach rubber seal along the bottom
- Ensure it touches the floor evenly
- Close the door to test fit
Step 6: Test the Seal
After installation:
- Close garage door fully
- Check for light gaps
- Feel for air leaks
- Adjust if necessary
A properly sealed door should block light completely.
Types of Garage Door Weather Stripping
1. Rubber Seals
- Durable and flexible
- Best for extreme weather
2. Vinyl Strips
- Affordable
- Moderate durability
3. Foam Tape
- Easy installation
- Best for light sealing
Comparison Table: Which One Should You Choose?
| Type | Durability | Cost | Best Use |
|---|---|---|---|
| Rubber | High | Medium | Harsh weather |
| Vinyl | Medium | Low | Standard homes |
| Foam | Low | Very low | Temporary fix |
Common Mistakes When Installing Weather Stripping
Avoid these errors when learning How To Put Weather Stripping On A Garage Door:
- Not cleaning the surface properly
- Cutting strips too short
- Using wrong adhesive
- Ignoring floor unevenness
- Installing in cold temperatures (material becomes stiff)
Expert Insight: Why Proper Sealing Matters
Home energy experts estimate that proper sealing around doors and windows can reduce heating and cooling costs by 10–25% annually in residential homes.
This small upgrade not only improves comfort but also extends the lifespan of your garage interior by reducing moisture damage and rust formation.
How Often Should You Replace Weather Stripping?
Weather stripping does not last forever. Replace it if you notice:
- Cracks or brittleness
- Air drafts returning
- Visible gaps or peeling
- Water leaks during rain
On average, replacement is needed every 2–5 years, depending on climate conditions.
Maintenance Tips for Longer Lifespan
To extend durability:
- Clean monthly with damp cloth
- Avoid harsh chemicals
- Check alignment every season
- Lubricate rubber lightly if needed
FAQ: How To Put Weather Stripping On A Garage Door
1. Is it hard to install weather stripping on a garage door?
No, it is a beginner-friendly DIY task that usually takes 30–90 minutes depending on door size.
2. What is the best material for garage door weather stripping?
Rubber is the most durable option, especially for areas with heavy rain or extreme temperatures.
3. Can I install weather stripping without tools?
Some foam strips are peel-and-stick, but most durable systems require basic tools like screws or a drill.
4. Why is my garage still drafty after installing weather stripping?
You may have uneven floors, incorrect measurements, or gaps in side seals.
5. Does weather stripping help reduce energy bills?
Yes. It helps reduce air leakage, which can lower energy costs by up to 10–25% according to home efficiency studies.
6. How long does garage door weather stripping last?
Typically between 2 to 5 years, depending on weather exposure and material quality.
Conclusion
Understanding How To Put Weather Stripping On A Garage Door is one of the easiest and most cost-effective home improvements you can do. It improves energy efficiency, protects your garage from weather damage, and enhances overall comfort.
With just a few tools and a little time, you can significantly upgrade your home’s insulation and durability.
If you found this guide helpful, consider sharing it with friends or posting it on social media so others can also improve their garage protection easily.
Leave a Reply