Introduction
Is your Chamberlain garage door stopping too short, reversing unexpectedly, or failing to close completely? You are not alone; this is one of the most common maintenance issues homeowners face, and it can be incredibly frustrating when you’re rushing to leave for work or trying to secure your home at night. Fortunately, learning how to program travel limits on Chamberlain garage door opener units is a straightforward process that restores safety and functionality without requiring an expensive service call. In this comprehensive guide, we will walk you through the exact steps to calibrate your opener’s up and down limits safely, ensuring smooth operation for years to come.
Why Do Chamberlain Garage Door Travel Limits Need Adjustment?
Before diving into the programming steps, it is vital to understand why these limits drift over time. Garage door openers are mechanical systems subject to wear, temperature fluctuations, and spring tension changes. According to industry data from the International Door Association (IDA), nearly 30% of garage door service calls are related to limit switch malfunctions or improper calibration rather than motor failure.
When the travel limits are incorrect, two dangerous scenarios occur:
- The Door Doesn’t Close Fully: Leaving a gap compromises home security and allows pests or weather inside.
- The Door Reverses on Contact: If the “down” limit is set too low, the opener thinks the floor is an obstruction, triggering the auto-reverse safety mechanism repeatedly.
Understanding the mechanics behind how to program travel limits on Chamberlain garage door opener systems helps you diagnose whether you need a simple adjustment or a professional repair. For foundational knowledge on how these electromechanical safety systems evolved, you can refer to the Garage door opener entry on Wikipedia.org, which details the regulatory history of auto-reverse mechanisms mandated since 1993.
Identify Your Chamberlain Model Type First
Not all Chamberlain openers are programmed identically. Identifying your specific model determines which method below you should use. Check the motor head label for your model number.
| Model Series | Programming Method | Common Models |
|---|---|---|
| Security+ 2.0 / MyQ | Electronic Limit Setting (Button Press) | B970, B9765, C8787, HD750WF |
| Legacy Chain/Belt Drive | Mechanical Limit Screws | T5011M, PD422D, CG40DM |
| Wall-Mount / Jackshaft | Electronic Calibration Cycle | RJO20, RJO70 |
| Smart Garage Hub Add-on | App-Based Calibration | MYQ-G0401 |
⚠️ Critical Safety Warning: Before adjusting any limits, always disconnect the automatic lock feature if installed. Never attempt to adjust limits while the door is disconnected from the opener carriage. Always keep hands clear of moving parts during testing.
How To Program Travel Limits On Chamberlain Garage Door Opener (Electronic Models)
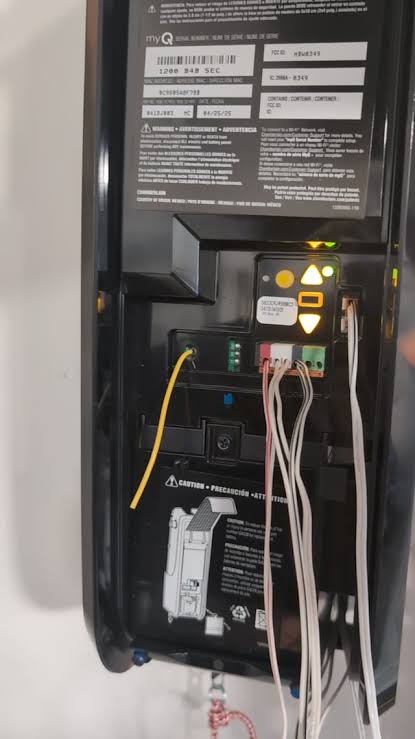
Most modern Chamberlain units manufactured after 2011 use electronic limit setting via the “Learn” button or dedicated UP/DOWN buttons on the motor unit. Here is the precise step-by-step process:
Step 1: Enter Limit Setting Mode
Locate the UP and DOWN navigation buttons on the side or back panel of the motor housing. Press and hold the UP button for approximately 6 seconds until the LED indicator begins flashing slowly. This indicates the opener has entered “Open Limit Set” mode.
Step 2: Set the Open (Up) Travel Limit
While the LED is flashing, press and release the UP button in short increments to move the door to the desired fully-open position.
- Target Height: The bottom of the door should be at least 6 feet above the ground or high enough for your tallest vehicle.
- Fine-Tuning: Use small taps. Holding the button moves the door continuously; tapping allows precision within ¼ inch.
- Once positioned correctly, press and release the SET button (or the center square button depending on model). The LED will flash rapidly to confirm the open limit is saved.
Step 3: Set the Close (Down) Travel Limit
After confirming the open limit, the LED will begin flashing again automatically, signaling “Close Limit Set” mode.
- Press and release the DOWN button in short increments until the door rests fully on the garage floor.
- Critical Detail: The door must make firm contact with the floor but NOT compress excessively. If the rail bows upward or the chain/belt goes slack beyond normal resting tension, you have gone too far.
- Press and release the SET button. The LED will flash rapidly twice to confirm both limits are stored.
Step 4: Perform the Safety Test Cycle
The opener will now automatically run one complete open-close cycle to verify the new settings. Do not interrupt this cycle. Watch carefully to ensure the door seals properly against the floor and opens to the correct height. If the door reverses before hitting the floor during this test, repeat Step 3 and raise the down limit slightly.
Adjusting Mechanical Limit Screws (Legacy Chamberlain Models)
If your unit lacks digital navigation buttons, it uses physical limit switches on the side of the rail or motor housing.
- Locate the two plastic adjustment screws labeled “UP” and “DOWN” on the side panel.
- Turn the UP screw clockwise to increase open travel or counter-clockwise to decrease it. One full rotation typically equals 2–3 inches of door travel.
- Turn the DOWN screw clockwise to extend closing travel or counter-clockwise to shorten it.
- Make adjustments in ½-turn increments only, then test the door using the wall console.
- Repeat until both positions are accurate.
Pro Tip: Mark the original screw positions with a permanent marker before adjusting so you can revert if needed.
Troubleshooting: When Limits Won’t Save or Door Still Reverses
Even when you know how to program travel limits on Chamberlain garage door opener systems correctly, external factors can override your settings.
Check Force Settings
Travel limits tell the door where to stop; force settings tell it how hard to push. If the door hits the correct down limit but still reverses, the down force may be too low. Locate the force adjustment dial (usually near the limit screws or accessible via menu on smart models) and increase it by one increment. Retest immediately—if the door fails to reverse when meeting a 2×4 board laid flat on the floor, the force is dangerously high and must be reduced.
Inspect Safety Sensors
Misaligned photo-eye sensors will prevent the door from closing regardless of limit settings. Ensure both sensors show solid LEDs (not blinking). Clean lenses with a soft cloth and verify nothing blocks the beam path.
Lubricate Moving Parts
Dry rollers, hinges, or tracks create resistance that mimics obstruction. Apply white lithium grease or silicone-based lubricant to all metal contact points. Avoid WD-40, which attracts dust and degrades nylon components.
Reset and Recalibrate
If electronic limits refuse to save, perform a factory reset by holding the LEARN button for 10 seconds until the LED turns off. Then reprogram limits from scratch. Note that this also erases remote controls and keypad codes, requiring re-pairing.
FAQ: Common Questions About Chamberlain Travel Limits
Q1: How often should I reprogram my Chamberlain garage door travel limits?
Under normal conditions, travel limits should remain stable for 3–5 years. However, you should recalibrate whenever you replace springs, cables, rollers, or after significant seasonal temperature shifts that affect metal expansion. Annual safety inspections are recommended by manufacturers.
Q2: Can I program travel limits using the MyQ smartphone app?
Yes, but only for Wi-Fi-enabled models (e.g., B9765, HD750WF). Navigate to Device Settings > Travel Limits in the MyQ app and follow the on-screen calibration wizard. Non-Wi-Fi models require manual adjustment at the motor unit as described above.
Q3: My door closes but immediately reopens—did I set the down limit wrong?
This usually indicates the down limit is set too far, causing the opener to detect excessive pressure against the floor as an obstruction. Raise the down limit by ¼ inch increments until the door stays closed without reversing. Also verify sensor alignment and track lubrication.
Q4: What happens if I skip the safety test cycle after programming?
Skipping verification risks property damage or injury. The test cycle confirms that auto-reverse functions correctly at the new limits. Without it, undetected miscalibration could cause the door to crush objects or fail to reverse on impact, violating federal safety standards.
Q5: Do I need special tools to adjust Chamberlain travel limits?
No special tools are required for electronic models—just access to the motor unit. Legacy mechanical models need only a flathead screwdriver. A stepladder, flashlight, and measuring tape are helpful for precision. Always prioritize ladder safety when working overhead.
Q6: Why does my Chamberlain opener lose its limit settings after a power outage?
Modern units with battery backup retain settings through outages. Older models without non-volatile memory may require reprogramming after extended power loss. Consider installing a surge protector rated for garage door openers to protect the logic board from voltage spikes that corrupt stored settings.
Conclusion
Mastering how to program travel limits on Chamberlain garage door opener systems empowers you to maintain a safe, reliable, and secure garage environment without unnecessary service expenses. Whether you own a cutting-edge MyQ smart opener or a dependable legacy chain-drive model, the principles remain consistent: identify your type, follow precise calibration steps, and always validate with safety testing. Properly adjusted limits extend your opener’s lifespan, prevent costly repairs, and most importantly, protect your family and property.
Found this guide helpful? Share it with fellow homeowners on Facebook, Pinterest, or Nextdoor who might be struggling with their garage doors! Tag us in your success stories—we love seeing DIY wins. Have questions not covered here? Drop them in the comments below; our community of garage door enthusiasts and experts is ready to help. Safe lifting! 🏠🔧
Leave a Reply