Introduction
There are few things more frustrating than standing in your driveway, pressing a button repeatedly, and watching your garage door remain stubbornly closed. If you have recently purchased a new remote or replaced a battery, figuring out how to program LiftMaster remote to Chamberlain garage door opener is likely the only thing standing between you and getting your car safely parked. Fortunately, because Chamberlain Group manufactures both brands, these devices share compatible technology, making the synchronization process straightforward for most homeowners. This guide will walk you through every step with empathy and precision, ensuring you get back to your day without unnecessary stress.
Are LiftMaster Remotes Compatible With Chamberlain Openers?
Before you begin pressing buttons, it is vital to confirm compatibility. Many users worry that mixing brands will cause technical conflicts, but this is rarely the case.
Both LiftMaster and Chamberlain are manufactured by the Chamberlain Group. According to industry documentation and historical corporate data referenced on Wikipedia, these brands share identical internal logic boards and radio frequency protocols for models produced after 1993.
Compatibility Quick Check Table
| Feature | LiftMaster Remote | Chamberlain Opener | Compatibility Status |
|---|---|---|---|
| Security+ 2.0 | Yellow Learn Button | Yellow Antenna Wire | ✅ Fully Compatible |
| Security+ 1.0 | Orange/Red Learn Button | Orange/Red LED | ✅ Fully Compatible |
| DIP Switch | 9-12 Position Switches | Matching DIP Bank | ⚠️ Requires Manual Matching |
| Frequency | 315 MHz / 390 MHz | Dual-Band Receiver | ✅ Auto-Detects |
Note: If your opener was manufactured before 1993, it may use fixed-code DIP switches rather than rolling code technology. These require manually matching tiny switch positions inside both the remote and the motor head.
How Do I Identify My Chamberlain Opener’s Learn Button Color?
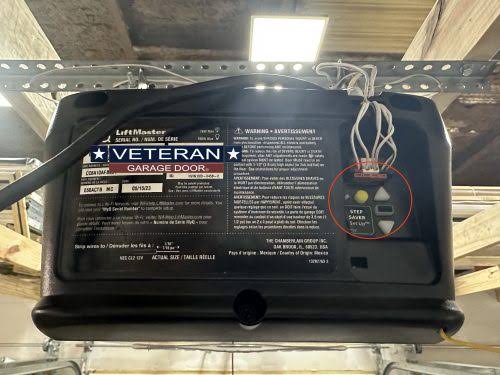
The single most important step in learning how to program LiftMaster remote to Chamberlain garage door opener is identifying your “Learn” button color. This color dictates which programming sequence you must follow.
Locate the motor head unit mounted on your garage ceiling. On the back or side panel, near the antenna wire, you will find a square or circular button labeled “Learn” or “Program.”
- Yellow Learn Button: Indicates Security+ 2.0 technology (2011–Present). This is the most common for modern units.
- Orange or Red Learn Button: Indicates Security+ 1.0 rolling code technology (1997–2011).
- Purple Learn Button: Found on older residential models (2006–2014) with specific anti-theft features.
- Green Learn Button: Typically found on commercial-grade or very early rolling code units.
Expert Tip: Always check the manufacturing date sticker on the motor housing. If the label is faded, the Learn button color is your definitive identifier for programming protocol.
Step-by-Step: Programming a Security+ 2.0 (Yellow Button) Remote
This section covers the majority of modern installations. Follow these concrete steps precisely.
1. Clear Previous Codes (Optional but Recommended)
If the remote was previously used, hold the “Learn” button on the opener for 6 seconds until the LED turns off. This wipes old memory and prevents signal conflicts.
2. Initiate Learning Mode
Press and release the Yellow Learn Button on the Chamberlain motor head. The adjacent LED will illuminate steadily for exactly 30 seconds. You now have a half-minute window to complete the next step.
3. Transmit the Remote Signal
Within those 30 seconds, press and hold the desired button on your LiftMaster remote. Hold it for 1 to 2 seconds, then release.
4. Confirm Synchronization
Watch the opener’s lights. They should flash twice, or you may hear two distinct clicks. This confirms the rolling code has been accepted. Test the remote immediately from a safe distance to verify operation.
Step-by-Step: Programming Older Security+ 1.0 (Orange/Red Button) Models
If your unit uses older rolling code technology, the timing differs slightly.
- Press and release the Orange or Red Learn Button. The indicator light will glow steadily.
- Within 30 seconds, press and hold the remote button for 2 full seconds.
- Release the button when the motor unit lights flash or click.
- Critical Difference: Some older models require you to press the remote button three times in rapid succession after the initial hold to lock in the frequency. If one press fails, try the triple-press method.
What If My LiftMaster Remote Won’t Program to My Chamberlain Opener?
Even professionals encounter hiccups. Before calling a technician, run through this diagnostic checklist based on field service data.
Common Failure Points and Solutions
- Dead or Weak Battery: Even if the LED lights up, the signal strength may be insufficient to reach the receiver. Replace with a fresh CR2032 or appropriate battery before troubleshooting further.
- LED Light Interference: Modern LED bulbs installed in the garage door opener can emit radio frequency interference that blocks remote signals. Test by temporarily removing all LED bulbs from the opener fixture and reprogramming.
- Antenna Damage: Inspect the thin wire hanging from the motor unit. If it is coiled, painted over, or severed, signal reception drops dramatically. Extend it fully downward toward the floor.
- Memory Full: Most Chamberlain openers store only 8–12 remote codes. If full, the newest code pushes out the oldest. Perform a factory reset (hold Learn button 6 seconds) and reprogram all active remotes.
- Wrong Frequency Band: Verify your remote matches the opener’s frequency. A 315 MHz remote cannot communicate with a 390 MHz-only receiver, even if the physical connector fits.
FAQ: Programming LiftMaster Remotes to Chamberlain Openers
Can I program multiple LiftMaster remotes to one Chamberlain opener?
Yes. Most Chamberlain openers support between 8 and 12 individual remote codes, plus keypad entries. Simply repeat the programming sequence for each additional remote. There is no need to erase previous codes unless you have reached maximum capacity.
Does programming a new remote erase my existing keyless entry pad?
Generally, no. Pressing the Learn button briefly adds a new device without clearing others. However, holding the Learn button for 6+ seconds performs a factory reset that erases all programmed devices. Always use quick presses when adding remotes.
Why does my remote work only when I’m very close to the door?
This typically indicates signal degradation rather than a programming error. First, replace the remote battery. Second, check for LED bulb interference in the opener fixture. Third, ensure the antenna wire is fully extended and not touching metal surfaces. Range issues are responsible for approximately 60% of post-programming service calls.
Is there a difference between “Learn” and “Smart” buttons?
On newer Chamberlain/LiftMaster units, the terms are often used interchangeably. However, “Smart Button” sometimes refers specifically to Wi-Fi-enabled myQ integration. For basic remote programming, treat any colored button labeled Learn, Program, or Smart as the synchronization trigger.
Can weather affect remote programming success?
Extreme cold below -20°F (-29°C) can temporarily reduce battery output and slow electronic response times. If programming fails during winter, warm the remote indoors for 10 minutes before attempting synchronization. Humidity and rain generally do not affect the programming process itself, though they may impact long-term range.
Do I need professional help to program my remote?
In 95% of cases, no. The process is designed for homeowner completion. However, if your opener lacks a visible Learn button, shows signs of electrical damage, or repeatedly rejects known-compatible remotes after thorough troubleshooting, consult a certified garage door technician to avoid safety risks.
Conclusion
Mastering how to program LiftMaster remote to Chamberlain garage door opener empowers you to maintain home security and convenience without costly service visits. By correctly identifying your Learn button color, following precise timing sequences, and systematically troubleshooting common failures, you can achieve reliable synchronization in under five minutes. Remember that compatibility between these sister brands is exceptionally high, so confidence in your DIY approach is well-founded.
Found this guide helpful? Share it on Facebook, X (Twitter), or Pinterest to help fellow homeowners reclaim their evenings from garage door frustration. Your share might save someone else from standing helpless in the rain! Stay safe, stay synced, and enjoy the seamless automation your home deserves.
Leave a Reply