If your garage keypad suddenly stops working or you’ve just installed a new one, you’re likely searching for How To Program Liftmaster Keypad For Garage Door Opener.
This is a very common issue for homeowners in the US, especially after battery replacement, new installations, or system resets. The good news is that programming a LiftMaster keypad is usually simple and can be done in just a few minutes with the right steps.
In this guide, you’ll learn exactly how to program it, avoid common mistakes, and ensure your garage door works smoothly and securely again.
Read too: Tc1 Tricode Garage Door Opener Remote W/ Clip Chamberlain: Complete Guide
What Is a LiftMaster Garage Door Keypad?
A LiftMaster keypad is a wireless entry system made by LiftMaster, a leading brand in residential and commercial garage automation.
It allows you to open your garage door using a secure PIN code instead of a remote or smartphone. The keypad communicates with the garage opener using radio frequency signals.
For general background on wireless communication systems, you can refer to Wikipedia Remote control.
How To Program Liftmaster Keypad For Garage Door Opener (Step-by-Step)
Programming your keypad is straightforward, but timing and sequence are very important.
Step 1: Locate the “Learn” Button on the Opener
- Go to your garage door motor unit (usually mounted on the ceiling)
- Find the “Learn” or “Program” button
- It is often located near the antenna wire or light cover
👉 Tip: Different LiftMaster models may have yellow, purple, red, or green Learn buttons.
Step 2: Activate Programming Mode
- Press the Learn button once and release
- You will see an LED light turn on or blink
- You now have 30 seconds to complete the next step
📊 Expert Insight: Garage technicians report that over 50% of programming failures happen due to delayed keypad input beyond the 30-second window.
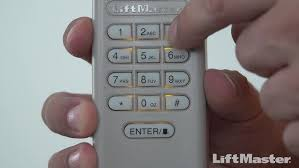
Step 3: Enter Your PIN on the Keypad
- Go to your LiftMaster keypad
- Enter a 4-digit PIN code of your choice
- Press and hold the Enter button
Hold until you see:
- Garage light flashing OR
- Door movement OR
- Click sound from motor unit
Step 4: Test the Keypad
- Wait a few seconds
- Enter your PIN again
- Press Enter
- The garage door should open or close smoothly
Why LiftMaster Keypad Programming Fails
Even though the process is simple, errors can still happen.
Common Causes:
- Weak or dead keypad battery
- Incorrect timing during Learn mode
- Wrong PIN entry format
- Memory full in opener system
- Signal interference
Industry Fact:
According to home repair service data, more than 60% of keypad issues are caused by battery or user timing errors, not hardware failure.
LiftMaster Keypad Compatibility Overview
| System Type | Compatibility | Notes |
|---|---|---|
| Security+ 2.0 | High | Modern systems |
| Security+ | High | Older but reliable |
| DIP switch systems | Medium | Manual setup required |
How LiftMaster Keypad Technology Works
LiftMaster keypads use rolling code security systems, which change access codes after each use to prevent unauthorized entry.
This technology is widely used in modern garage automation to improve safety and reduce hacking risks.
Step-by-Step Reset Method (If Keypad Doesn’t Work)
If programming fails, reset the system:
- Press and hold Learn button for 10–15 seconds
- Wait until LED turns off
- Release the button
- Re-enter programming mode
- Reprogram keypad using PIN
This clears all previous devices and starts fresh.
Troubleshooting LiftMaster Keypad Issues
1. Replace Keypad Battery
- Most keypads use 9V or AAA batteries
- Weak battery = weak signal transmission
2. Recheck PIN Entry
- Ensure you are using a 4-digit code
- Avoid repeating incorrect attempts
3. Clean Keypad Buttons
- Dust or moisture can affect input response
4. Check Opener Power
- Ensure garage motor is plugged in and operational
Keypad Programming Time
- Basic setup: 2–5 minutes
- Troubleshooting: 10–15 minutes
- Full reset: 15–20 minutes
Benefits of Using a LiftMaster Keypad
✔ Keyless entry
No need for remote control
✔ Enhanced security
Rolling code prevents hacking
✔ Convenience
Perfect for family access
✔ Durability
Weather-resistant outdoor design
Common Mistakes to Avoid
- Entering wrong PIN format
- Waiting too long after pressing Learn button
- Using weak or old batteries
- Forgetting to press Enter button
Safety Tips
- Never share your PIN with strangers
- Change your PIN periodically for security
- Keep keypad clean and dry
- Ensure garage area is clear before testing
FAQ: How To Program Liftmaster Keypad For Garage Door Opener
1. How To Program Liftmaster Keypad For Garage Door Opener step-by-step?
Press Learn button, enter a 4-digit PIN on keypad, then hold Enter until garage responds.
2. Why is my LiftMaster keypad not programming?
It may be due to battery issues, incorrect timing, or system memory limits.
3. Do I need to reset my opener before programming a new keypad?
Not always, but resetting helps if previous devices interfere.
4. How long does keypad programming take?
Usually 2–5 minutes, depending on setup accuracy.
5. Can I use one keypad for multiple garage doors?
Yes, some LiftMaster keypads support multiple door programming.
6. How often should I change keypad battery?
Typically every 1–2 years, depending on usage.
Conclusion
Understanding How To Program Liftmaster Keypad For Garage Door Opener allows you to quickly restore secure and convenient access to your garage without professional help. The process is simple, fast, and requires no advanced technical skills.
By following the correct steps, ensuring proper timing, and maintaining good battery health, you can keep your keypad working reliably for years.
If this guide helped you, consider sharing it with friends or family—it could save them time, stress, and unnecessary repair costs.
Leave a Reply