Introduction
Imagine this: you’ve just returned from a long grocery run, your trunk is full, and you punch in your code to open the garage—only to hear silence. It is incredibly frustrating to be locked out of your own home, especially when the garage is your primary entrance. According to the International Door Association (IDA), over 70% of homeowners use the garage door as their main entry point, making a functional keypad essential for daily life.
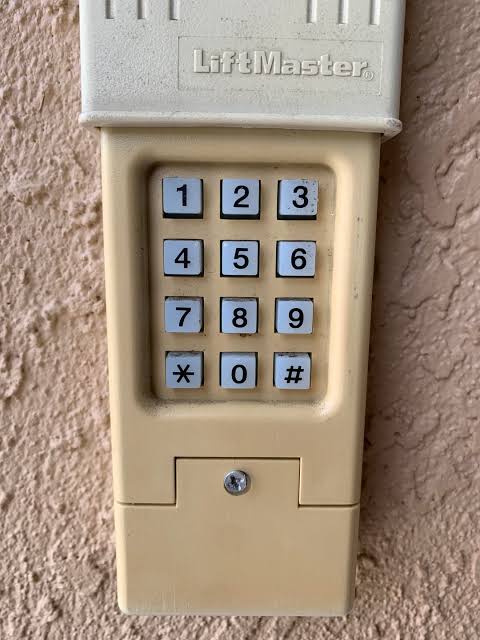
If you are struggling with a new installation or a reset, you are not alone. Many homeowners find the blinking lights and different button colors confusing. This guide will show you exactly how to program keypad for Liftmaster garage door opener models, regardless of the year or color of the “Learn” button. We will walk through the process step-by-step so you can get back inside safely and securely.
Understanding Your Liftmaster Opener: The “Learn” Button
Before we dive into the programming, you need to identify the “brain” of your system. The most critical factor in programming a Liftmaster keypad is the color of the Learn button on the motor unit.
The motor unit is typically hanging from your garage ceiling. You may need a step ladder to see it. Look for a button (usually square or round) located near the white antenna wire hanging down.
- Yellow Learn Button: Found on newer Security+ 2.0 models (2011–Present).
- Purple, Red, or Orange Learn Button: Found on older Security+ 1.0 models (1997–2011).
- Green Learn Button: Found on very old Legacy models (Pre-1997).
Expert Insight: “The color of the Learn button dictates the frequency and rolling code technology used. Mismatching the programming steps for your specific button color is the #1 reason programming fails.” — Certified Garage Door Technician.
To understand the technology securing your home, you can explore the history of garage door openers and how they evolved from simple radio transmitters to complex encrypted systems.
Step-by-Step Guide: How To Program Keypad For Liftmaster Garage Door Opener
Follow the section below that matches the color of your Learn button.
Scenario A: You Have a Yellow Learn Button (Security+ 2.0)
This is the most common modern system. It uses rolling codes for enhanced security.
- Clear Old Codes (Optional but Recommended):
- Locate the Yellow Learn button on the motor.
- Press and hold the button for about 6 seconds (or until the LED next to it turns off). This erases all previously paired remotes and keypads.
- Initiate Programming Mode:
- Press the Yellow Learn button once and release it. The LED will light up or start blinking. You have roughly 30 seconds to complete the next step.
- Enter Your PIN:
- Go to your external keypad.
- Enter your preferred 4-digit PIN (e.g., 1-2-3-4).
- Press and hold the “Enter” button on the keypad.
- Confirm the Link:
- While holding “Enter,” the lights on the motor unit will flash, or you will hear a double click.
- Release the “Enter” button.
- Test the keypad by entering the PIN and pressing “Enter.” The door should activate.
Scenario B: You Have a Purple, Red, or Orange Learn Button
These systems are slightly older but still very reliable.
- Press the Learn Button:
- Press the colored Learn button on the motor unit once and release. The indicator light will turn on or blink.
- Enter Code on Keypad:
- Within 30 seconds, go to your wireless keypad.
- Enter your desired 4-digit PIN.
- Press and hold the “Enter” button on the keypad.
- Wait for Confirmation:
- Hold the button until the motor unit light blinks or clicks. This usually takes about 3–5 seconds.
- Release the button. Your keypad is now synced.
Scenario C: You Have a Green Learn Button (Legacy Models)
Note: These are rare today. If you have this, the process is similar to Scenario B, but you may need to flip the DIP switches on the motor to match the keypad if it is an older non-rolling code model.
Troubleshooting: When It Just Won’t Work
If you followed the steps above and the door still won’t respond, check these common culprits.
| Issue | Potential Cause | Solution |
|---|---|---|
| Keypad Light Doesn’t Turn On | Dead Batteries | Replace with a fresh CR2032 coin cell battery. |
| Door Reverses Immediately | Safety Sensors Blocked | Check the “eyes” near the floor. Ensure the LED is solid green (not blinking). Clean the lenses. |
| No Response from Motor | Distance/Interference | Stand closer to the motor during programming. LED bulbs in the motor can sometimes cause interference; try removing them temporarily. |
| Wrong PIN Accepted | Memory Glitch | Perform a “Hard Reset” by holding the Learn button for 10 seconds to clear memory, then try again. |
Pro Tip: If you are installing a new keypad, ensure the protective tab covering the battery has been removed. It sounds simple, but it is a very common mistake!
Comparison: Keypad vs. Remote vs. Smartphone App
Why bother with a keypad when you have a remote or an app? Here is a quick breakdown of the benefits.
- Wireless Keypad:
- Pros: No batteries to carry (uses long-life coin cell), weather-resistant, great for guests or kids who don’t have phones.
- Cons: Fixed location; you must memorize the code.
- Visor Remote:
- Pros: Instant access, simple one-button press.
- Cons: Can be left inside the car (if car is stolen, garage is compromised), batteries die frequently.
- Smartphone App (myQ):
- Pros: Control from anywhere, get alerts if door is left open.
- Cons: Requires Wi-Fi hub, relies on internet connection.
Frequently Asked Questions (FAQ)
1. How do I reset my Liftmaster keypad without a code? If you forgot your PIN, you must reset the logic board on the motor unit. Locate the Learn button (Yellow, Purple, or Red) and press and hold it for 6 to 10 seconds until the indicator light goes out. This clears all codes. You will then need to reprogram all remotes and the keypad from scratch using the steps above.
2. Why is my keypad blinking but not working? If the backlight blinks but the door doesn’t move, check the battery voltage. A weak battery often has enough power to light the LEDs but not enough to transmit the strong radio frequency signal to the motor. Replace the battery with a high-quality brand like Panasonic or Energizer.
3. Can I program a keypad if I don’t have a remote? Yes, you do not need a working remote to program a keypad. You only need access to the motor unit on the ceiling to press the Learn button. However, if you want to sync a remote and a keypad, you can do both in the same session as long as you do it within 30 seconds of pressing the Learn button.
4. What is the default PIN for a Liftmaster keypad? There is no default PIN. The keypad comes blank from the factory. You must create your own 4-digit code during the programming process. Avoid using obvious combinations like “1234” or your house number for security reasons.
5. My keypad works, but the lights on the door opener don’t turn on. Why? This is a separate feature. The “Light” button on the keypad often has a specific function (sometimes holding it turns on the motor lights). If the door moves but lights don’t, check the light bulb socket in the motor unit. Liftmaster recommends using rough-service bulbs or specific LED bulbs designed for garage doors to prevent radio frequency interference.
Conclusion
Learning how to program keypad for Liftmaster garage door opener is a valuable DIY skill that saves you the cost of a service call. Whether you have a modern Yellow Learn button or an older Purple model, the logic remains the same: Clear, Learn, Enter.
By following these steps, you ensure your home remains secure and accessible. A functioning keypad is more than just a convenience; it is a critical part of your home’s security infrastructure.
Found this guide helpful? Don’t let your friends and family struggle with a locked-out garage! Share this article on Facebook or Pinterest to help them out, or save it to your DIY folder for the next time the batteries need changing.
Leave a Reply