Introduction
There are few things more frustrating than standing in your driveway with a new remote, only to realize your LiftMaster garage door opener doesn’t have the standard “Learn” button everyone talks about. If you are searching for how to program LiftMaster garage door opener remote without button, you likely own an older model or a specific commercial unit that relies on legacy technology. Don’t worry; this is a common scenario for homeowners with pre-1993 openers or specialized systems, and getting your remote synced is entirely possible with the right approach.
In this comprehensive guide, we will walk you through identifying your specific opener type, locating hidden programming mechanisms, and safely syncing your remote. Whether you are dealing with DIP switches, a recessed reset hole, or a Smart Panel interface, we have the expert-backed steps you need to restore access to your home.
Why Does My LiftMaster Opener Lack a Visible Learn Button?
Before diving into the how to program LiftMaster garage door opener remote without button tutorial, it is crucial to understand why the button is missing. This understanding prevents damage to your unit and ensures you use the correct programming method.
1. Pre-1993 DIP Switch Technology
The most common reason for a missing learn button is age. Before Chamberlain/LiftMaster introduced the rolling-code Security+ system in 1993, garage door openers used fixed-code DIP (Dual In-line Package) switches. These units do not have a learn button because they do not “learn” a signal; instead, they must be manually matched via physical switch positions. According to industry archives, millions of these units remain in operation across the US due to their mechanical durability.
2. Recessed or Hidden Programming Ports
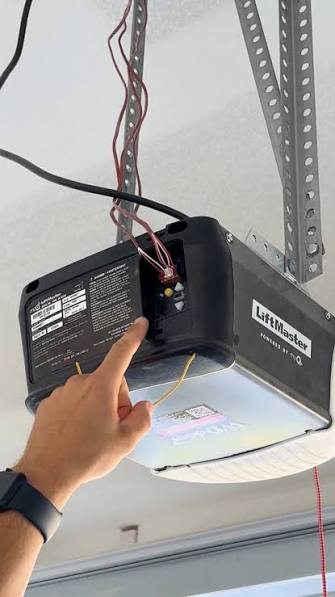
Some commercial-grade or wall-mount LiftMaster openers hide the programming interface to prevent accidental tampering. The “button” may actually be a pinhole requiring a paperclip, or it may be located behind the light lens cover.
3. Smart Control Panel Integration
Newer high-end models sometimes integrate the programming function directly into the wall-mounted Smart Control Panel rather than the motor head. In these cases, the motor itself appears buttonless because the logic board delegates pairing tasks to the interior console.
Expert Note: Always verify your model number against the official LiftMaster Wikipedia history page or manufacturer database to confirm your unit’s generation before attempting any electrical work. Misidentifying a DIP switch unit as a rolling-code unit can lead to hours of futile troubleshooting.
Method 1: Programming DIP Switch Remotes (Pre-1993 Models)
If your opener has no learn button and was manufactured before 1993, you almost certainly have a DIP switch system. Here is the precise method to sync your remote.
Step-by-Step DIP Switch Matching
- Locate the DIP Switches on the Motor: Remove the light lens cover on the main opener unit. Look for a row of 8, 9, or 12 tiny sliding switches. Note the exact position (Up/Down or Left/Right) of each switch.
- Open Your New Remote: Slide off the battery compartment cover or unscrew the back panel of your compatible DIP-switch remote. You should see an identical row of switches inside.
- Match the Pattern Exactly: Using a small flathead screwdriver or pen tip, adjust the switches inside the remote to perfectly mirror the pattern on the motor unit. Even one mismatched switch will prevent operation.
- Test the Signal: Press and hold the remote button while standing within 5 feet of the motor. The door should activate immediately. If it does not, re-verify every switch position and ensure the remote battery is fresh (use a CR2032 or A23 depending on model).
- Secure and Reassemble: Once confirmed working, replace the remote cover and the motor’s light lens.
Pros and Cons of DIP Switch Programming
| Feature | Pros | Cons |
|---|---|---|
| Simplicity | No timing or LED indicators needed | Requires manual dexterity and good eyesight |
| Compatibility | Universal remotes are cheap and abundant | Fixed codes are vulnerable to code grabbing |
| Reliability | Mechanical switches rarely fail digitally | Switches can oxidize over decades |
| Security | N/A | Low security; neighbors’ remotes may interfere |
Method 2: Finding Hidden Learn Buttons on Post-1993 Units
If your unit is newer but you still cannot find the button, follow this diagnostic checklist before assuming it is truly buttonless.
Check Behind the Light Lens
Many LiftMaster belt-drive and chain-drive models conceal the yellow, red, orange, or purple learn button behind the plastic light diffuser.
- Action: Squeeze the tabs on the side of the light cover and pull downward. Shine a flashlight into the chassis near the antenna wire. The button is often recessed and colored to match the wiring harness.
Inspect the Wall Control Panel
For models like the LiftMaster 8500W or certain Elite Series units:
- Locate the digital wall console inside your garage.
- Press and hold the “Program” or “Settings” button for 3–5 seconds.
- Watch the motor head; the LED indicator should begin flashing, indicating it is now in pairing mode despite having no physical button pressed on the motor itself.
Use the Antenna Wire as a Guide
On older Security+ models, the learn button is always positioned within 1–2 inches of where the hanging antenna wire connects to the logic board. Trace the wire with your finger to locate a small, possibly discolored push-button that may have faded from years of dust exposure.
Method 3: Resetting and Reprogramming via Capacitor Discharge
In rare cases, a logic board glitch can make a functional learn button unresponsive, mimicking a “no button” scenario. A hard reset can restore functionality.
- Unplug the Opener: Disconnect power from the ceiling outlet for exactly 60 seconds. This drains residual capacitor charge and forces a logic board reboot.
- Restore Power: Plug the unit back in and wait 10 seconds for the LED to stabilize.
- Attempt Standard Programming: Press the learn button (now hopefully responsive) and immediately press your remote button. Hold for 2 seconds, release, and repeat once more.
- Verify Operation: Test the remote three times from varying distances to confirm the signal is stable.
Safety Warning: Never attempt to open the main logic board housing or bypass safety sensors. Garage door springs store lethal tension, and internal capacitors can retain dangerous voltage even when unplugged. Stick to external programming interfaces only.
Troubleshooting: When Nothing Works
Even after following the correct how to program LiftMaster garage door opener remote without button method, issues can persist. Use this diagnostic table:
| Symptom | Likely Cause | Solution |
|---|---|---|
| Remote LED lights but door doesn’t move | Frequency mismatch or incompatible remote | Verify remote MHz (315 vs 390) matches opener |
| Door moves then reverses immediately | Safety sensor misalignment | Clean sensor lenses and realign brackets |
| Intermittent operation | Weak battery or RF interference | Replace battery; relocate LED bulbs away from antenna |
| No response at all | Blown fuse or dead logic board | Check inline fuse; consult professional technician |
| Works only within 2 feet | Antenna damage or signal blockage | Extend antenna wire; avoid metal shelving near motor |
Frequently Asked Questions (FAQ)
Can I use a universal remote on a LiftMaster opener without a learn button?
Yes, but only if you purchase a universal remote specifically designed for DIP switch or legacy fixed-code systems. Modern universal remotes that rely solely on rolling-code learning will not communicate with pre-1993 buttonless openers. Always check the remote packaging for “DIP switch compatible” or “pre-1993 LiftMaster” designation before purchasing.
Is it safe to continue using a DIP switch garage door opener?
While mechanically safe, DIP switch openers pose significant security risks. Because they use fixed codes, someone with a code grabber or even a neighbor with a similar remote could potentially open your garage. We strongly recommend upgrading to a modern Security+ 2.0 opener with rolling-code encryption and auto-lock features for peace of mind.
How do I know if my LiftMaster opener uses DIP switches or a hidden learn button?
Check the manufacturing date sticker on the motor housing. Units made before 1993 almost always use DIP switches. Units made after 1993 should have a learn button, even if hidden. Additionally, DIP switch units typically have 8–12 visible toggle switches inside the light cover, whereas learn-button units have a single colored push-button and no toggle array.
What if my remote is programmed but only works intermittently?
Intermittent operation usually indicates RF interference or a failing component. First, replace the remote battery with a premium brand. Next, ensure LED light bulbs in the opener are rated “garage door safe,” as cheap LEDs emit radio frequency noise that blocks signals. Finally, inspect the antenna wire for kinks or breaks; extending it vertically by 6 inches can dramatically improve range.
Can I convert my old buttonless opener to work with modern smart remotes?
Direct conversion is not possible, but you can add smart functionality using a universal garage door controller (like myQ or Meross) that wires into your existing wall button terminals. This device acts as a bridge, allowing smartphone control and modern remote compatibility without replacing the entire motor assembly. However, this does not fix the underlying fixed-code security vulnerability of the original opener.
Where can I find the exact model number for my buttonless LiftMaster?
The model number is typically printed on a white or silver sticker located on the rear vertical face of the motor housing, near the power cord entry point. On very old units, it may be stamped directly into the metal casing above the light bulb socket. Write down both the model number and any date codes before visiting a parts supplier or searching online manuals.
Conclusion
Figuring out how to program LiftMaster garage door opener remote without button doesn’t require advanced engineering skills—just patience and the right identification method. Whether you’re matching DIP switches on a vintage unit, uncovering a hidden learn port, or resetting a glitchy logic board, the solutions outlined above cover virtually every buttonless scenario US homeowners encounter. Remember to prioritize safety, verify compatibility before buying remotes, and consider upgrading if security is a concern.
Found this guide helpful? Share it on Facebook, Pinterest, or your neighborhood Nextdoor group to help fellow homeowners regain garage access without costly service calls. Have a unique buttonless model we didn’t cover? Drop a comment below—we’d love to update this resource with your real-world experience!
Leave a Reply