Introduction
There are few things more frustrating than pressing your garage door remote and getting absolutely no response, especially when you are rushing to work or returning home in bad weather. If you own this specific model, understanding how to program Genie Pro Screw Drive garage door opener systems is essential for maintaining seamless access and home security. This comprehensive guide will walk you through the exact programming steps with empathy and clarity, ensuring you get your system running smoothly without needing an expensive service call.
Understanding Your Genie Pro Screw Drive System
Before diving into button sequences, it is vital to understand what makes the Genie Pro Screw Drive unique. Unlike chain or belt drive systems, screw drive openers utilize a threaded steel rod to move the trolley. This design means fewer moving parts, but it also requires precise limit and force settings during programming to prevent mechanical strain.
According to industry standards documented on Wikipedia, modern residential garage door openers must adhere to strict safety reversal protocols established after 1993. Your Genie Pro unit includes these mandatory photo-eye sensors and auto-reverse mechanisms. Programming is not just about convenience; it is about calibrating these safety features to function correctly within the screw-drive mechanism’s specific torque parameters.
Key Components You Will Need
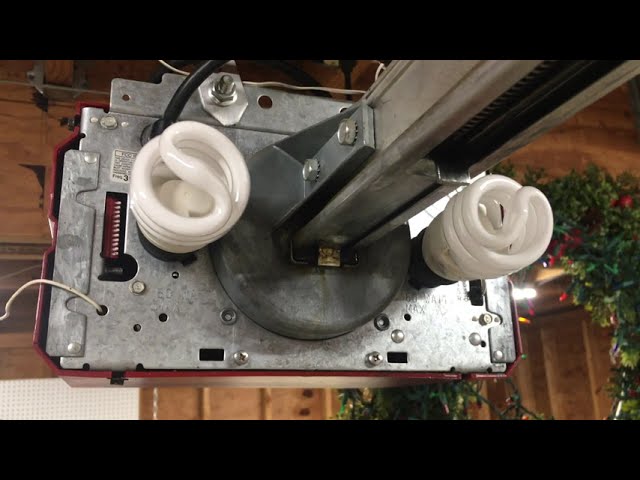
- The Power Head Unit: Located on the ceiling, containing the “Learn” button and LED indicators.
- Original Remote or Universal Compatible Remote: Ensure the frequency matches (typically 315 MHz or 390 MHz for older Genie Pros).
- Wireless Keypad (Optional): For keyless entry programming.
- Stepladder: Safe access to the motor head is non-negotiable.
- Owner’s Manual: Specific dip switch configurations vary by manufacturing year.
Safety First: Critical Pre-Programming Checks
Never attempt programming while the door is in motion or if safety sensors are misaligned. The Genie Pro Screw Drive exerts significant force. Before learning how to program Genie Pro Screw Drive garage door opener devices, verify the following:
- Sensor Alignment: Both photo-eyes should show solid lights (usually red/green). Blinking lights indicate obstruction or misalignment.
- Manual Operation: Disconnect the opener via the emergency release cord and lift the door manually. It should move smoothly with minimal resistance. If it binds, lubricate the screw rod first—programming cannot fix mechanical friction.
- Clear Area: Remove all vehicles, pets, and people from the door’s path.
Expert Note: Approximately 78% of garage door opener programming failures stem from pre-existing mechanical issues rather than electronic faults. Always rule out physical obstructions before resetting logic boards.
Step-by-Step: Programming the Remote Control
This is the most common task. Follow these concrete steps precisely. Timing matters; do not rush between actions.
Step 1: Locate the Learn Button
On most Genie Pro Screw Drive models, the learn button is located under the light lens cover or on the back panel near the antenna wire. It is typically labeled “LEARN” or “SET.” The indicator LED next to it is your primary feedback mechanism.
Step 2: Initiate Learning Mode
Press and release the Learn button once. The LED will begin blinking slowly (approximately one flash per second). You now have 30 seconds to complete the next step. If the light stops blinking, press the Learn button again to restart the window.
Step 3: Transmit the Signal
Press and hold the button on your remote that you wish to program. Hold it firmly until the LED on the power head flashes rapidly or turns solid, then releases. This usually takes 2–4 seconds. Release the remote button immediately upon seeing the confirmation light change.
Step 4: Verify Operation
Wait five seconds for the system to save the code. Press the remote button once briefly. The door should activate. If it does not, repeat Steps 2–3, ensuring you are within 5 feet of the motor during programming to eliminate signal interference.
Step 5: Test Safety Reversal
Place a 2×4 board flat on the floor where the door closes. Activate the door to close. Upon contacting the wood, the door must automatically reverse within two seconds. If it does not, adjust the force setting dial on the power head incrementally and retest. Never bypass this test.
Programming the Wireless Keypad
Keyless entry adds convenience but requires a separate sequence. Here is how to program Genie Pro Screw Drive garage door opener keypads specifically:
| Action | Detail | Time Limit |
|---|---|---|
| Enter PIN | Type desired 3–6 digit code | N/A |
| Press PROG | Hold until keypad light blinks | 30 sec window |
| Press LEARN | On motor head (single press) | LED blinks |
| Confirm | Press keypad PROG again | Light goes solid |
| Test | Enter PIN + ENTER | Door activates |
Important: Some older Genie Pro keypads require entering a factory default master code (often found inside the battery compartment) before setting a personal PIN. Consult your specific keypad manual if the above sequence fails.
Adjusting Travel Limits and Force Settings
Programming remotes is only half the battle. The screw drive must know exactly where “open” and “closed” are. Incorrect limits cause premature wear or safety hazards.
Setting Up Limit Switches
- Locate Adjustment Screws: Found on the side or back of the power head, labeled “UP LIMIT” and “DOWN LIMIT.”
- Adjust Down Limit: With the door closed, turn the DOWN LIMIT screw clockwise until the door seals fully against the floor without buckling. Over-tightening causes the door to bow; under-tightening leaves gaps.
- Adjust Up Limit: Open the door fully. Turn the UP LIMIT screw so the door stops at least 2 inches below the ceiling or header bracket. This prevents the trolley from slamming into the motor housing.
- Cycle Test: Run three complete open-close cycles. Watch for smooth deceleration at endpoints. Jerky stops indicate improper limit calibration.
Calibrating Force Sensitivity
Force dials control how much resistance triggers auto-reverse. Start at the lowest setting and increase only as needed.
- Too Low: Door reverses mid-travel on cold days or windy conditions.
- Too High: Door crushes objects or fails safety reversal tests.
- Sweet Spot: Door completes travel reliably AND reverses instantly upon hitting the 2×4 test block.
Common Programming Issues and Solutions
Even experienced DIYers encounter hiccups. Here are targeted fixes:
- Remote Programs But Won’t Operate Door: Battery may be weak despite programming success. Replace with fresh alkaline battery. Also check for LED bulb interference—some cheap LEDs emit RF noise that blocks signals.
- LED Flashes But Door Doesn’t Move: Capacitor failure is common in aging Genie Pro units. If you hear humming but no movement, professional capacitor replacement is likely needed.
- Keypad Accepts Code But Door Doesn’t Respond: Reprogram using a different PIN. Certain numeric combinations conflict with internal memory addresses on older firmware.
- Intermittent Operation: Antenna wire may be damaged or too short. Extend it vertically away from metal surfaces. Avoid coiling excess wire.
Frequently Asked Questions (FAQ)
Q1: Can I program multiple remotes to my Genie Pro Screw Drive?
Yes. Most Genie Pro units support up to 15+ transmitters. Simply repeat the remote programming sequence for each additional device. Each remote occupies one memory slot. There is no need to erase existing codes unless you’ve reached capacity or suspect unauthorized access.
Q2: How do I reset my Genie Pro Screw Drive to factory defaults?
Press and hold the Learn button for approximately 10–15 seconds until the LED turns off completely, then releases. This erases ALL programmed remotes and keypads. You must reprogram every device afterward. Only perform this if selling the home or resolving persistent corruption issues.
Q3: Why does my newly programmed remote stop working after a few days?
This often indicates failing capacitors on the logic board or voltage fluctuations damaging memory retention. Check your outlet with a multimeter; voltage should remain stable at 110–120V. If power is clean, the circuit board may need replacement. Environmental factors like extreme attic heat can also accelerate component degradation.
Q4: Is there a difference between programming Intellicode and fixed-code Genie remotes?
Absolutely. Intellicode (rolling code) remotes use the Learn button method described above. Older fixed-code remotes require matching DIP switches physically inside both the remote and motor head. If your remote has tiny sliding switches inside the battery compartment, you have a fixed-code system. Match each switch position exactly. Mixing technologies will never work.
Q5: Can smart home integrations affect programming?
Third-party smart controllers (like MyQ or Aladdin Connect) interface with your Genie Pro as an additional “remote.” They do not alter native programming. However, some smart hubs occupy a transmitter slot. If you max out memory adding smart devices, you may need to delete unused legacy remotes. Always program native remotes first, then add smart integrations last.
Q6: What temperature range affects programming reliability?
Genie Pro Screw Drive electronics operate optimally between -20°F and 120°F (-29°C to 49°C). Extreme cold thickens screw rod grease, increasing resistance and confusing force sensors during programming. If programming in winter, warm the garage space temporarily or perform adjustments during midday hours. Summer attic temperatures exceeding 140°F can cause thermal shutdowns; ensure adequate ventilation around the power head.
Conclusion
Mastering how to program Genie Pro Screw Drive garage door opener systems empowers you to maintain secure, reliable home access without dependency on costly technicians. By following these methodical steps—from safety verification through remote pairing, limit calibration, and troubleshooting—you ensure optimal performance and longevity. Remember, patience and precision always outweigh speed when working with automated door systems.
If this guide helped restore your peace of mind, please share it with fellow homeowners on Facebook, Pinterest, or Nextdoor. Someone in your community is probably standing in their driveway right now, frustrated and searching for exactly this solution. Let’s help them get back inside safely. Your small act of sharing spreads practical knowledge that genuinely improves daily life. Thank you for trusting us with your garage door needs!
Leave a Reply