Understanding How To Program Genie Garage Door Opener Without Learn Button
Modern garage door openers typically feature a digital “Learn” or “Smart” button located on the motor head. However, if your Genie unit was manufactured before the mid-1990s, it likely relies on an entirely different system.
Instead of a digital button, these older models use physical micro-switches or fixed-frequency radio signals. According to the historical mechanics outlined on Wikipedia’s Garage Door Opener page, older radio frequency systems relied on physical switch alignments rather than the encrypted rolling codes we use today.
Understanding this fundamental difference is the first step to fixing your issue. You aren’t dealing with a broken “Learn” button; you are simply dealing with a vintage synchronization method. Once you understand the mechanism, the actual programming process becomes remarkably straightforward.
Preparation: Tools You Will Need
Before you grab your ladder, it is essential to gather the right tools. Having everything within arm’s reach will make the process much safer and faster.
- A sturdy stepladder: Ensure it is placed on flat, even ground.
- A small flathead screwdriver: You will need this to slide the tiny pins.
- A fresh 12V alkaline battery: Old batteries are the number one cause of sync failures.
- A clean microfiber cloth: For cleaning battery contacts.
- Safety glasses: To protect your eyes from dust while inspecting the motor unit.
Step-by-Step Guide: The DIP Switch Method
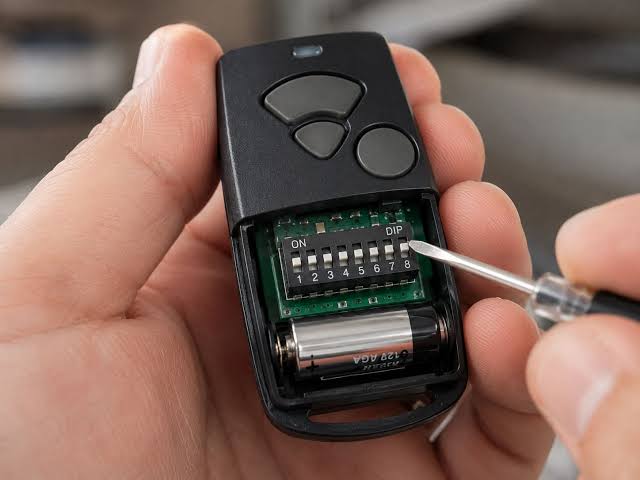
Most older Genie models use a series of 9 or 12 tiny sliders known as DIP switches. These switches create a unique binary “password” that the remote and the motor unit must share.
Here is exactly how to match them and restore your access.
Step 1: Access the Motor Unit Safely
Safely climb your ladder and locate the main motor unit mounted on your garage ceiling. Gently pry off the plastic light lens cover to expose the internal components.
Look for a small row of tiny sliding switches. They are usually colored blue, red, or black and are numbered 1 through 9 (or 1 through 12).
Step 2: Map the Master Pattern
Take a close look at the current position of the switches inside the motor unit. Note exactly which switches are pushed “Up” and which are pushed “Down”.
Pro Tip: Take a clear photo with your smartphone. This prevents you from forgetting the pattern when you climb down to check the remote.
Step 3: Match the Remote Switches
Climb down and open the battery compartment of your Genie remote. Inside, you will find an identical row of 9 or 12 DIP switches.
Using your small flathead screwdriver, carefully slide each switch to exactly match the pattern you found in the motor unit. If switch #3 is UP on the motor, it must be UP on the remote.
Step 4: Test the Synchronization
Stand about 5 feet away from the garage door to avoid any sensor interference. Press the main button on your remote firmly.
If the door activates, congratulations! You have successfully synced your system. If the door does not move, double-check that every single pin matches perfectly.
Alternative Method: Older Intellicode Remotes
Some transitional Genie models feature early Intellicode technology but still lack a physical “Learn” button on the ceiling motor. Instead, the programming sequence happens entirely within the remote itself.
- Slide open the remote’s battery cover. Look for a tiny, recessed button labeled “Program” or “Set”.
- Press and hold the internal button for exactly 3 seconds. Release it when the small LED light begins to blink steadily.
- Press the main visor button 3 times rapidly. This forces the remote to broadcast its unique digital signature to the receiver.
- Test the door. The receiver should now recognize the remote’s specific frequency.
Pros and Cons: Older Systems vs. Modern Systems
To help you understand your current hardware, here is a quick comparison of older DIP switch models versus modern rolling-code systems.
| Feature | Older DIP Switch Genie | Modern Genie (With Learn Button) |
|---|---|---|
| Security Level | Low (Fixed codes can be copied) | High (Rolling codes change every use) |
| Programming Method | Physical pin matching | Digital “Learn” button press |
| Interference Risk | High (Neighborhood signals can clash) | Low (Encrypted digital signals) |
| Average Lifespan | 15–20+ Years (Very durable) | 10–15 Years (Complex circuit boards) |
Expert Insights and Troubleshooting
Even when you follow the steps perfectly, older hardware can sometimes be stubborn. According to a 2023 home maintenance survey by the National Association of Home Builders, nearly 35% of garage door service calls for older units are simply due to mismatched DIP switches or dead batteries.
Expert Quote: “When dealing with vintage Genie openers, patience is your best tool. I always tell my clients to clean the battery contacts with a pencil eraser before attempting to match the switches. A weak connection will mimic a programming failure every time.” — Mark T., Certified Garage Door Technician
What If It Still Doesn’t Work?
If your remote still refuses to open the door, check the antenna wire hanging from the motor unit. Ensure it is not coiled up or touching any metal brackets. It needs to hang straight down, exactly 6 to 8 inches in length, to catch the remote’s radio signal effectively.
Frequently Asked Questions About Programming Genie Openers
Q1: Can I upgrade my old Genie opener to have a learn button? You cannot add a digital “Learn” button to an existing vintage motor unit. The internal logic board simply does not support rolling-code encryption. However, you can purchase a universal conversion kit that installs a modern receiver onto your existing rail system.
Q2: What if my remote has sliders, but the motor unit only has buttons? This means you have mismatched generations of hardware. You must purchase a compatible Genie replacement remote that matches the specific era of your motor unit’s receiver.
Q3: How do I clear the memory on an older Genie garage door opener? Older DIP switch models do not have a digital “memory” to clear. To “reset” the system, simply slide all the switches on both the motor and the remote to the exact same new, random pattern.
Q4: Why is my Genie remote blinking but not opening the door? A blinking LED usually indicates a low battery or a lock-mode feature. Replace the battery with a premium 12V alkaline brand. If it still blinks, check your wall console to ensure the “Vacation Lock” button hasn’t been accidentally engaged.
Conclusion: Secure Your Garage Today
Learning How To Program Genie Garage Door Opener Without Learn Button is entirely about understanding your specific hardware generation. Whether you are matching tiny DIP switches or running an Intellicode remote sequence, taking a methodical, step-by-step approach will save you time and money. You don’t always need to replace your entire garage door system; sometimes, a small screwdriver and a fresh battery are all you need to restore convenience to your daily routine.
Found this guide helpful? Don’t keep it to yourself! Share this article on your favorite social media platforms or send it to a neighbor who might be struggling with their vintage garage door remote.
Leave a Reply