Introduction
There is nothing quite as frustrating as sitting in your driveway, pressing a button repeatedly, and watching your garage door remain stubbornly shut. If you are searching for how to program garage door opener in car with remote, you are likely dealing with this exact inconvenience or setting up a new vehicle for the first time. We understand that syncing technology should be seamless, not a source of stress, which is why we have created this comprehensive, empathetic guide to get you back on track. Whether you are using a built-in system like HomeLink or a standalone universal remote, this article will walk you through the process clearly and safely.
Understanding Your System Before You Begin
Before diving into buttons and blinking lights, it is crucial to identify what type of system you are working with. Not all garage door openers communicate in the same language, and knowing yours saves hours of trial and error.
According to industry standards, most modern vehicles in the US utilize HomeLink, a wireless control system integrated directly into the rearview mirror, overhead console, or visor. However, older vehicles or aftermarket setups may rely on universal handheld remotes.
Quick Comparison: Built-In vs. Universal Remotes
| Feature | Built-In (HomeLink/Car2U) | Universal Handheld Remote |
|---|---|---|
| Convenience | Always in the car; no batteries needed | Portable; requires battery replacements |
| Compatibility | Works with 95% of US openers | Varies by brand/frequency |
| Setup Complexity | Moderate (requires car ignition) | Low to Moderate |
| Security | Rolling code encryption standard | Depends on model age |
| Best For | Daily drivers & multiple users | Guests, renters, or older cars |
Note: Always check your vehicle’s owner manual and garage door opener manual for specific compatibility charts before starting.
Step-by-Step: How to Program Built-In Car Systems (HomeLink)
This is the most common scenario for US drivers. Follow these precise steps to sync your vehicle’s integrated transmitter.
Step 1: Clear Previous Codes (If Applicable)
If you bought a used car or previously programmed a different door, clear the memory first. Press and hold the two outer HomeLink buttons simultaneously for approximately 10–20 seconds until the indicator light flashes rapidly. Release immediately after flashing begins. Do not skip this step if the system was previously used.
Step 2: Position Your Vehicle Correctly
Park outside the garage with the engine running (or ignition in “ON/RUN” position). Ensure the garage door area is clear of people, pets, and objects. Safety is paramount—the door will move during programming.
Step 3: Initiate Pairing Mode
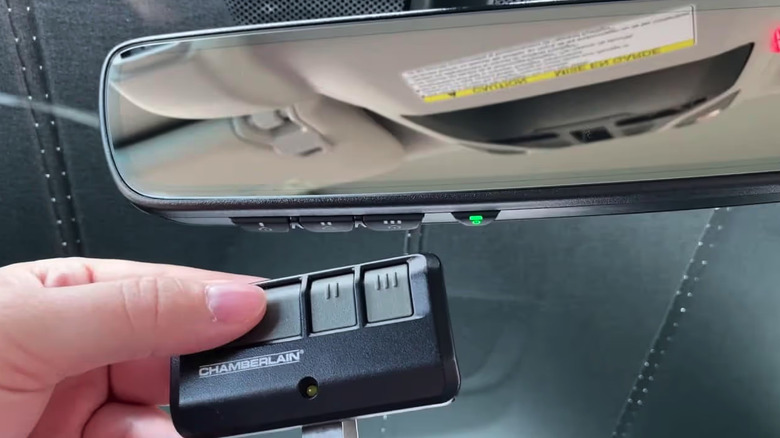
Hold your original handheld garage remote 1–3 inches away from the HomeLink buttons. Simultaneously press and hold both the desired HomeLink button AND your handheld remote’s transmit button. Watch the HomeLink indicator light:
- Slow flash → Rapid flash: Programming successful (fixed-code opener).
- Continuous rapid flash: Proceed to Step 4 (rolling-code opener).
Release both buttons once the light changes pattern. This typically takes 10–30 seconds.
Step 4: Complete Rolling Code Synchronization
Most US openers manufactured after 1996 use rolling codes for security. Locate the “Learn” or “Smart” button on your garage motor unit (usually near the antenna wire or light lens). The color indicates the brand:
- Yellow/Orange: LiftMaster/Chamberlain/Craftsman
- Purple: Older LiftMaster models
- Green/Red: Genie/Overhead Door
Press and release the Learn button. You have 30 seconds to return to your car and firmly press the programmed HomeLink button three times, holding each press for 2 seconds. On the third press, the garage door should activate, confirming synchronization.
Step 5: Test and Verify
Test the system from inside the car with the engine running, then again with the engine off (if supported). Confirm the door opens and closes fully without hesitation.
How to Program a Universal Handheld Remote in Your Car
If your vehicle lacks built-in integration, a universal remote stored in your center console or visor clip is the next best solution.
Step 1: Identify Frequency and Brand Compatibility
Check the back of your existing remote or the motor unit label for frequency (e.g., 315 MHz, 390 MHz) and brand. Purchase a universal remote explicitly listing compatibility. Mismatched frequencies will never pair, regardless of programming attempts.
Step 2: Access DIP Switches or Smart Learn Mode
- Older Openers (DIP Switches): Match the tiny switch positions inside the new remote to those on your motor unit or old remote. Use a pen tip or small screwdriver. All switches must align perfectly.
- Newer Openers (Smart Learn): Skip DIP switches. Proceed to Step 3.
Step 3: Program via Motor Unit Learn Button
Press the Learn button on the garage motor. Within 30 seconds, press and hold the button on your new universal remote until the motor light blinks or clicks. Release. Test immediately.
Step 4: Secure Storage in Vehicle
Use a visor clip, center console organizer, or dedicated remote holder. Avoid leaving remotes in extreme heat (dashboard) or cold, as temperature extremes degrade batteries and circuitry over time.
Troubleshooting Common Programming Failures
Even professionals encounter hiccups. Here are data-backed solutions for the top issues:
- Light Flashes But Door Doesn’t Move: Usually indicates incomplete rolling code sync. Repeat Step 4 above, ensuring you press the HomeLink button three distinct times within the 30-second window.
- Works Only When Engine Is Running: Some vehicles require ignition power for transmitter function. Check fuse box or consult dealer—this may indicate a wiring issue rather than programming failure.
- Intermittent Operation: Replace the handheld remote battery first (CR2032 or similar). Weak signals cause inconsistent pairing. Also, check for LED bulb interference in the garage fixture; some LEDs emit RF noise that blocks signals. Switch to garage-door-rated bulbs if suspected.
- System Resets After Driving: A failing vehicle battery or alternator can corrupt HomeLink memory during voltage fluctuations. Have your electrical system tested if this recurs.
Frequently Asked Questions (FAQ)
Can I program my car’s garage opener without the original remote?
Yes, but only if your garage motor has a functioning Learn button. Press the Learn button, then follow the vehicle’s pairing sequence directly. Without either the original remote OR access to the motor unit’s Learn button, programming is impossible—you’ll need to replace the receiver or hire a technician.
Why does my HomeLink work for one garage but not another?
Different garages often use incompatible frequencies or security protocols. HomeLink supports multiple codes, but each button stores only one. Ensure you’re using an unused button for the second garage. If both doors use the same brand/model, verify you cleared previous codes before reprogramming.
Is it safe to program while the garage door is closed?
Absolutely—and recommended. Programming transmits signals that activate the door. Keeping it closed prevents accidental movement during setup. Always stand clear of the door path and keep children/pets at a safe distance throughout the process.
How often should I reprogram my garage opener?
Only when necessary: after replacing the motor, changing remotes, buying/selling a vehicle, or experiencing persistent malfunctions. Frequent reprogramming isn’t required and may indicate underlying hardware issues. Annual testing of safety sensors and force settings is more important than re-syncing.
Do smart garage openers (Wi-Fi enabled) change the programming process?
The physical pairing steps remain identical. Smart features add app control and notifications but don’t alter RF signal programming. However, some smart systems offer “virtual remote” setup via their app, bypassing traditional button sequences entirely. Check your smart opener’s documentation for app-based alternatives.
What if my car is too new and my garage opener is too old?
Newer vehicles sometimes lack backward compatibility with pre-1996 fixed-code openers. Solutions include installing a compatibility bridge (e.g., HomeLink Compatibility Bridge), upgrading the garage motor, or using a universal handheld remote as a workaround. Consult your vehicle manufacturer’s compatibility database before purchasing adapters.
Conclusion
Mastering how to program garage door opener in car with remote transforms daily convenience and enhances home security. By following these structured steps, understanding your system type, and troubleshooting methodically, you’ve gained confidence to handle this task independently. Remember: patience and precision beat rushed attempts every time.
We hope this guide saved you time, frustration, and potentially a service call. If it helped, please share it on social media—tag a friend who’s been battling their garage door, or post it in your neighborhood group. Together, we make tech less intimidating and life a little smoother. Happy programming!Introduction
There is nothing quite as frustrating as sitting in your driveway, pressing a button repeatedly, and watching your garage door remain stubbornly shut. If you are searching for how to program garage door opener in car with remote, you are likely dealing with this exact inconvenience or setting up a new vehicle for the first time. We understand that syncing technology should be seamless, not a source of stress, which is why we have created this comprehensive, empathetic guide to get you back on track. Whether you are using a built-in system like HomeLink or a standalone universal remote, this article will walk you through the process clearly and safely.
Understanding Your System Before You Begin
Before diving into buttons and blinking lights, it is crucial to identify what type of system you are working with. Not all garage door openers communicate in the same language, and knowing yours saves hours of trial and error.
According to industry standards, most modern vehicles in the US utilize HomeLink, a wireless control system integrated directly into the rearview mirror, overhead console, or visor. However, older vehicles or aftermarket setups may rely on universal handheld remotes.
Quick Comparison: Built-In vs. Universal Remotes
| Feature | Built-In (HomeLink/Car2U) | Universal Handheld Remote |
|---|---|---|
| Convenience | Always in the car; no batteries needed | Portable; requires battery replacements |
| Compatibility | Works with 95% of US openers | Varies by brand/frequency |
| Setup Complexity | Moderate (requires car ignition) | Low to Moderate |
| Security | Rolling code encryption standard | Depends on model age |
| Best For | Daily drivers & multiple users | Guests, renters, or older cars |
Note: Always check your vehicle’s owner manual and garage door opener manual for specific compatibility charts before starting.
Step-by-Step: How to Program Built-In Car Systems (HomeLink)
This is the most common scenario for US drivers. Follow these precise steps to sync your vehicle’s integrated transmitter.
Step 1: Clear Previous Codes (If Applicable)
If you bought a used car or previously programmed a different door, clear the memory first. Press and hold the two outer HomeLink buttons simultaneously for approximately 10–20 seconds until the indicator light flashes rapidly. Release immediately after flashing begins. Do not skip this step if the system was previously used.
Step 2: Position Your Vehicle Correctly
Park outside the garage with the engine running (or ignition in “ON/RUN” position). Ensure the garage door area is clear of people, pets, and objects. Safety is paramount—the door will move during programming.
Step 3: Initiate Pairing Mode
Hold your original handheld garage remote 1–3 inches away from the HomeLink buttons. Simultaneously press and hold both the desired HomeLink button AND your handheld remote’s transmit button. Watch the HomeLink indicator light:
- Slow flash → Rapid flash: Programming successful (fixed-code opener).
- Continuous rapid flash: Proceed to Step 4 (rolling-code opener).
Release both buttons once the light changes pattern. This typically takes 10–30 seconds.
Step 4: Complete Rolling Code Synchronization
Most US openers manufactured after 1996 use rolling codes for security. Locate the “Learn” or “Smart” button on your garage motor unit (usually near the antenna wire or light lens). The color indicates the brand:
- Yellow/Orange: LiftMaster/Chamberlain/Craftsman
- Purple: Older LiftMaster models
- Green/Red: Genie/Overhead Door
Press and release the Learn button. You have 30 seconds to return to your car and firmly press the programmed HomeLink button three times, holding each press for 2 seconds. On the third press, the garage door should activate, confirming synchronization.
Step 5: Test and Verify
Test the system from inside the car with the engine running, then again with the engine off (if supported). Confirm the door opens and closes fully without hesitation.
How to Program a Universal Handheld Remote in Your Car
If your vehicle lacks built-in integration, a universal remote stored in your center console or visor clip is the next best solution.
Step 1: Identify Frequency and Brand Compatibility
Check the back of your existing remote or the motor unit label for frequency (e.g., 315 MHz, 390 MHz) and brand. Purchase a universal remote explicitly listing compatibility. Mismatched frequencies will never pair, regardless of programming attempts.
Step 2: Access DIP Switches or Smart Learn Mode
- Older Openers (DIP Switches): Match the tiny switch positions inside the new remote to those on your motor unit or old remote. Use a pen tip or small screwdriver. All switches must align perfectly.
- Newer Openers (Smart Learn): Skip DIP switches. Proceed to Step 3.
Step 3: Program via Motor Unit Learn Button
Press the Learn button on the garage motor. Within 30 seconds, press and hold the button on your new universal remote until the motor light blinks or clicks. Release. Test immediately.
Step 4: Secure Storage in Vehicle
Use a visor clip, center console organizer, or dedicated remote holder. Avoid leaving remotes in extreme heat (dashboard) or cold, as temperature extremes degrade batteries and circuitry over time.
Troubleshooting Common Programming Failures
Even professionals encounter hiccups. Here are data-backed solutions for the top issues:
- Light Flashes But Door Doesn’t Move: Usually indicates incomplete rolling code sync. Repeat Step 4 above, ensuring you press the HomeLink button three distinct times within the 30-second window.
- Works Only When Engine Is Running: Some vehicles require ignition power for transmitter function. Check fuse box or consult dealer—this may indicate a wiring issue rather than programming failure.
- Intermittent Operation: Replace the handheld remote battery first (CR2032 or similar). Weak signals cause inconsistent pairing. Also, check for LED bulb interference in the garage fixture; some LEDs emit RF noise that blocks signals. Switch to garage-door-rated bulbs if suspected.
- System Resets After Driving: A failing vehicle battery or alternator can corrupt HomeLink memory during voltage fluctuations. Have your electrical system tested if this recurs.
Frequently Asked Questions (FAQ)
Can I program my car’s garage opener without the original remote?
Yes, but only if your garage motor has a functioning Learn button. Press the Learn button, then follow the vehicle’s pairing sequence directly. Without either the original remote OR access to the motor unit’s Learn button, programming is impossible—you’ll need to replace the receiver or hire a technician.
Why does my HomeLink work for one garage but not another?
Different garages often use incompatible frequencies or security protocols. HomeLink supports multiple codes, but each button stores only one. Ensure you’re using an unused button for the second garage. If both doors use the same brand/model, verify you cleared previous codes before reprogramming.
Is it safe to program while the garage door is closed?
Absolutely—and recommended. Programming transmits signals that activate the door. Keeping it closed prevents accidental movement during setup. Always stand clear of the door path and keep children/pets at a safe distance throughout the process.
How often should I reprogram my garage opener?
Only when necessary: after replacing the motor, changing remotes, buying/selling a vehicle, or experiencing persistent malfunctions. Frequent reprogramming isn’t required and may indicate underlying hardware issues. Annual testing of safety sensors and force settings is more important than re-syncing.
Do smart garage openers (Wi-Fi enabled) change the programming process?
The physical pairing steps remain identical. Smart features add app control and notifications but don’t alter RF signal programming. However, some smart systems offer “virtual remote” setup via their app, bypassing traditional button sequences entirely. Check your smart opener’s documentation for app-based alternatives.
What if my car is too new and my garage opener is too old?
Newer vehicles sometimes lack backward compatibility with pre-1996 fixed-code openers. Solutions include installing a compatibility bridge (e.g., HomeLink Compatibility Bridge), upgrading the garage motor, or using a universal handheld remote as a workaround. Consult your vehicle manufacturer’s compatibility database before purchasing adapters.
Conclusion
Mastering how to program garage door opener in car with remote transforms daily convenience and enhances home security. By following these structured steps, understanding your system type, and troubleshooting methodically, you’ve gained confidence to handle this task independently. Remember: patience and precision beat rushed attempts every time.
We hope this guide saved you time, frustration, and potentially a service call. If it helped, please share it on social media—tag a friend who’s been battling their garage door, or post it in your neighborhood group. Together, we make tech less intimidating and life a little smoother. Happy programming!
Leave a Reply