Introduction
Is your older Chamberlain garage door opener refusing to respond, or are you installing a replacement remote for a vintage unit? You are not alone; many homeowners struggle with legacy systems that lack modern “Learn” buttons. Understanding how to program Chamberlain garage door opener with dip switches is essential for restoring access without replacing the entire system. This guide walks you through the process safely and accurately, ensuring your garage remains secure and functional.
What Are Dip Switches and Why Do They Matter?
Before diving into the programming steps, it is crucial to understand the technology you are working with. Dip switches (Dual Inline Package switches) are small manual toggles located inside both the garage door opener motor unit and the remote control. Unlike modern rolling-code systems that generate billions of unique codes automatically, dip switches rely on a fixed binary code.
According to technical documentation archived by Wikipedia, these electromechanical components were the industry standard for radio frequency identification from the 1960s through the early 1990s. For Chamberlain openers manufactured before 1993, typically operating at 390 MHz, the alignment of these tiny switches determines whether the remote communicates with the motor. If even one switch is misaligned, the door will not operate.
Key Characteristics of Dip Switch Systems
- Fixed Code: The code never changes unless you manually move a switch.
- Binary Logic: Each switch represents an “On” (Up) or “Off” (Down) state.
- Physical Matching: Both the receiver (motor) and transmitter (remote) must have identical switch patterns.
- Voltage Sensitivity: Older units often use 12V batteries in remotes, unlike modern 3V lithium cells.
How To Program Chamberlain Garage Door Opener With Dip Switches: Step-by-Step
Programming a dip switch system is entirely mechanical. There is no digital syncing or button-holding sequence. Follow these precise steps to ensure success.
Step 1: Gather Necessary Tools and Safety Gear
Preparation prevents frustration and injury. Ensure you have:
- A sturdy stepladder (never stand on chairs or buckets).
- A small flathead screwdriver or ballpoint pen tip.
- Fresh 12V alkaline battery for the remote.
- Flashlight or headlamp for visibility.
- Safety glasses (debris may fall when opening the motor cover).
Step 2: Access the Motor Unit’s Dip Switches
Safety is paramount. Before touching any internal components, disconnect power to the garage door opener by unplugging it or turning off the circuit breaker. This prevents accidental activation while your hands are near moving parts.
- Locate the light lens cover on the bottom or side of the Chamberlain motor unit.
- Gently squeeze the tabs or remove the screw holding the lens in place.
- Remove the bulb if it obstructs your view (let it cool first if recently used).
- Identify the bank of dip switches. They are usually white or blue, labeled 1–8 or 1–9.
Step 3: Set Your Desired Code Pattern
You can either match an existing remote or create a new code. If creating a new code, avoid simple patterns like all-up or alternating up/down, as these are more susceptible to interference.
- Use your screwdriver or pen to toggle each switch firmly.
- Record your chosen pattern on paper or take a clear photo. This backup is critical.
- Example 8-switch pattern: Up-Down-Up-Up-Down-Down-Up-Down.
⚠️ Critical Warning: Never program your opener with all switches in the same position. This configuration is highly vulnerable to signal interference from neighboring garages and reduces security significantly.
Step 4: Match the Remote Control Transmitter
Now that the motor unit is set, you must replicate the exact pattern in your handheld remote.
- Open the remote’s battery compartment. Some models require removing a back panel screw.
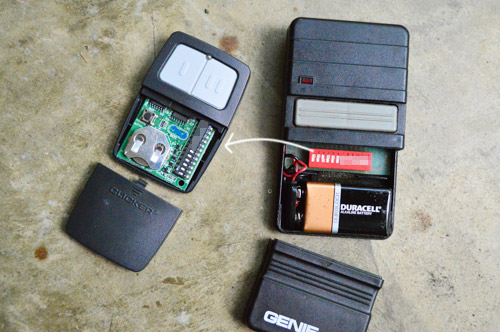
- Locate the dip switch bank inside the remote.
- Using your recorded pattern, adjust each switch to match the motor unit exactly.
- Double-check every single switch. A 99% match equals 0% functionality.
- Insert a fresh 12V battery, observing correct polarity (+/-).
- Reassemble the remote securely.
Step 5: Test and Fine-Tune
Restore power to the garage door opener. Stand at least 5 feet away from the door and press the remote button.
- Success: The motor activates, and the light blinks.
- Partial Response: The light blinks but the motor doesn’t run. Check safety sensor alignment and force settings.
- No Response: Re-verify switch alignment. Even slight misalignment causes failure. Clean switch contacts with electronic contact cleaner if corrosion is visible.
Troubleshooting Common Dip Switch Programming Issues
Even experienced DIYers encounter hiccups. Here are solutions backed by service technician data:
| Symptom | Likely Cause | Solution |
|---|---|---|
| Remote works intermittently | Weak battery or dirty switches | Replace battery; clean switches with contact cleaner |
| Door opens/closes randomly | Neighbor using same code | Change to a complex, non-repeating pattern |
| No response after matching | Faulty remote or receiver board | Test with known-good remote; inspect wiring |
| Motor hums but doesn’t move | Mechanical obstruction or limit issue | Check tracks, springs, and travel limits separately |
| Range less than 5 feet | Antenna damage or RF interference | Extend antenna wire; identify nearby RF sources |
When Hardware Replacement Is Necessary
If you have verified perfect switch alignment, replaced batteries, and confirmed power delivery, the receiver board may have failed. Chamberlain dip switch receivers have a typical lifespan of 15–20 years. Capacitor degradation is common in units over 25 years old. In such cases, consider a universal dip switch receiver kit rather than full system replacement, saving $200–$400 on average.
Security Considerations for Legacy Dip Switch Systems
Understanding how to program Chamberlain garage door opener with dip switches also requires acknowledging security limitations. Fixed-code systems transmit the same signal every time, making them vulnerable to code grabbing devices. While rare in residential settings, this risk exists.
Best Practices for Enhanced Security:
- Change your dip switch code annually.
- Install a smart garage controller as a secondary layer (many work alongside legacy openers).
- Ensure your garage entry door has a quality deadbolt.
- Keep spare remotes secured; lost remotes retain permanent access until switches are changed.
The Consumer Product Safety Commission notes that pre-1993 openers also lack photoelectric reversal sensors. If your unit lacks this safety feature, prioritize upgrading regardless of programming success.
Frequently Asked Questions (FAQ)
Can I use a modern Chamberlain remote with my old dip switch opener?
Generally, no. Modern Chamberlain remotes use Security+ rolling code technology incompatible with fixed dip switch receivers. However, universal aftermarket remotes specifically designed for dip switch systems are available. Always verify frequency compatibility (typically 390 MHz for Chamberlain dip switch units) before purchasing.
How many dip switches does my Chamberlain opener have?
Most Chamberlain residential openers from the 1970s–1990s feature either 8 or 9 dip switches. Count the physical switches in your motor unit. Nine-switch systems offer 512 possible combinations versus 256 for eight-switch units, providing marginally better security against random code collisions.
Why did my programmed remote stop working after months of use?
Three primary causes exist: battery depletion (most common), switch oxidation due to humidity/temperature cycling, or external RF interference from new neighborhood devices. Start with a fresh battery and switch cleaning. If problems persist, reprogram with a new code pattern to rule out interference.
Is it safe to program dip switches myself, or should I hire a professional?
DIY programming is safe if you follow electrical safety protocols and disconnect power before accessing internal components. However, if you are uncomfortable working at height, handling electrical components, or diagnosing mechanical issues, hiring a certified garage door technician is recommended. Professional service typically costs $75–$150 for programming and basic diagnostics.
Can weather affect dip switch performance?
Yes. Extreme cold can make switch contacts brittle and increase resistance. High humidity promotes oxidation on metal contacts. Garage environments experience significant temperature and moisture swings. Annual maintenance including contact cleaning and battery replacement mitigates weather-related failures.
My opener has no visible dip switches—what should I do?
Your unit likely uses a later-generation fixed code system with solder pads or plug-in code modules instead of user-adjustable switches. Alternatively, it may be an early rolling-code model. Consult the manufacturer label on the motor housing for the exact model number, then reference Chamberlain’s official documentation or contact their support line for model-specific programming instructions.
Conclusion
Mastering how to program Chamberlain garage door opener with dip switches empowers you to maintain legacy equipment confidently and cost-effectively. By following systematic steps, prioritizing safety, and understanding the inherent limitations of fixed-code technology, you can restore reliable garage access without unnecessary expense. Remember to document your code pattern, perform annual maintenance, and consider supplementary security measures given the age of this technology.
If this guide helped you solve your garage door dilemma, please share it with fellow homeowners navigating vintage opener challenges on Facebook, Nextdoor, or Reddit. Your share might save someone hours of frustration—and keep their garage secure. Have questions or unique experiences with dip switch programming? Drop a comment below; our community of DIY enthusiasts and professionals loves helping others succeed!
Leave a Reply