Introduction
There is nothing quite as frustrating as standing in your driveway, pressing a remote button repeatedly, only to have your garage door remain stubbornly closed. If you own an older home or have inherited a vintage lift system, figuring out how to program a garage door opener with dip switches can feel like deciphering an ancient code. Unlike modern “smart” openers that use rolling codes and wireless syncing, these legacy systems rely on physical toggle switches that must match perfectly between the motor unit and the remote.
We understand that dealing with outdated technology can be intimidating, especially when ladders and electrical components are involved. However, mastering this skill saves you the cost of a full system replacement and gives you total control over your home’s entry point. In this comprehensive guide, we will walk you through the exact process of aligning your switches safely, ensuring your garage opens smoothly every time.
Understanding DIP Switch Technology vs. Modern Systems
Before grabbing a screwdriver, it is vital to understand what you are working with. DIP (Dual Inline Package) switches were the industry standard for garage door openers manufactured roughly between 1980 and 1995. They function as a hardwired binary code.
According to Wikipedia, a DIP switch is a set of tiny manual switches used to configure electronic devices, allowing users to select specific operating modes or addresses without software. In the context of garage doors, these switches create a unique radio frequency signature. If the pattern of “On” and “Off” positions on your remote matches the pattern on the motor unit receiver, the door operates.
Key Differences at a Glance
| Feature | DIP Switch Openers (Legacy) | Rolling Code Openers (Modern) |
|---|---|---|
| Programming Method | Manual physical switch alignment | Wireless “Learn” button sync |
| Security Level | Low (Fixed code, easily copied) | High (Code changes every use) |
| Frequency | Typically 300–400 MHz | 310–390 MHz + Encryption |
| Compatibility | Universal remotes with sliders | Brand-specific or smart adapters |
| Lifespan Risk | Switches can oxidize/fail | Circuit board/electronic failure |
Understanding this distinction helps manage expectations. You cannot “sync” a DIP switch opener wirelessly; you must physically manipulate the hardware.
Safety First: Preparing Your Workspace
Safety is non-negotiable when working with overhead machinery. Before attempting to program your device, complete this checklist:
- Disconnect Power (Optional but Recommended): While programming usually requires power to test, if you are removing covers near wiring, unplug the unit first.
- Secure Your Ladder: Ensure your stepladder is on flat ground and fully locked. Never stand on the top rung.
- Clear the Area: Remove vehicles and obstacles from the door’s path to prevent accidents during testing.
- Identify Voltage: Most residential units are 120V AC. Treat all exposed wires as live unless verified otherwise.
- Gather Tools: You will need a small flathead screwdriver, a flashlight, and potentially a multimeter.
Expert Note: If your opener shows signs of frayed wiring, burnt smells, or excessive rust, stop immediately. These are fire hazards that require professional replacement rather than simple reprogramming.
Step-by-Step: How To Program A Garage Door Opener With Dip Switches
This tutorial assumes you have a compatible remote and a functioning motor unit. Follow these precise steps to synchronize your system.
Step 1: Locate the DIP Switches on the Motor Unit
Climb your ladder safely to reach the garage door opener motor housing. Look for a plastic cover on the back or side panel. Remove this cover (usually held by one or two screws or friction clips). Inside, you will find a row of 8, 9, or 12 tiny toggle switches. This is your master code.
Note the current position of each switch. Use your phone to take a clear photo before making any changes. This serves as your backup reference.
Step 2: Access the Remote Control Switches
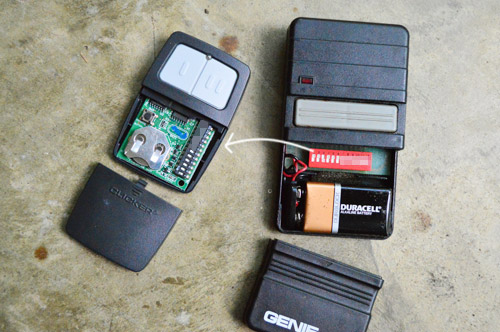
Open your remote control’s battery compartment. Older remotes often have the DIP switches located directly behind the battery or under a separate sliding panel. Newer universal replacements for legacy systems may use slide switches instead of toggles, but the concept remains identical.
Step 3: Match the Pattern Exactly
This is the core of how to program a garage door opener with dip switches. The sequence on the remote must mirror the motor unit exactly.
- Switch 1: If Motor is UP, Remote must be UP.
- Switch 2: If Motor is DOWN, Remote must be DOWN.
- Continue: Repeat for all 8, 9, or 12 positions.
Use your small flathead screwdriver or fingernail to gently adjust the remote switches. Avoid using excessive force, as these plastic components become brittle with age.
Step 4: Test the Synchronization
Once matched, replace the remote cover and restore power to the motor unit (if disconnected). Stand at a safe distance and press the remote button.
- Success: The door activates immediately.
- Partial Success: The light blinks but the door doesn’t move. This often indicates a weak signal or misaligned safety sensors, not necessarily a coding error.
- Failure: No response. Re-check your switch alignment against your reference photo. Even one mismatched switch prevents operation.
Step 5: Fine-Tune Sensitivity (If Needed)
If the door reverses unexpectedly or struggles to close, locate the “Force” and “Travel Limit” adjustment screws on the motor unit. Adjust in quarter-turn increments. Never increase force beyond what is necessary to close the door safely, as this defeats the safety reversal mechanism.
Troubleshooting Common Programming Issues
Even with perfect switch alignment, problems arise. Here is how to diagnose them systematically.
The Remote Works Intermittently
- Cause: Oxidized switch contacts inside the remote or motor.
- Fix: Toggle each switch back and forth 10–15 times vigorously. This friction cleans internal metal contacts. Replace batteries with fresh alkaline cells.
Wrong Frequency Mismatch
- Cause: Your remote operates on 315 MHz while the opener uses 390 MHz.
- Fix: Check the FCC ID label on both devices. Frequencies must match. DIP switch alignment alone cannot bridge a frequency gap. You need a frequency-compatible universal remote.
Door Opens But Won’t Close
- Cause: Misaligned photo-eye sensors or obstructed track.
- Fix: Clean sensor lenses with a soft cloth. Verify indicator lights are solid (not blinking). Inspect tracks for debris. This is rarely a DIP switch issue.
Multiple Remotes Stopped Working Simultaneously
- Cause: Receiver board failure or power surge damage.
- Fix: If reprogramming fails for all remotes, the internal receiver capacitor may have failed. Consider installing an external universal receiver kit rather than replacing the entire motor.
Critical Security Warning: Why You Should Upgrade
While knowing how to program a garage door opener with dip switches is valuable for maintenance, we must address the elephant in the room: security.
DIP switch systems use a fixed code. There are only 256 combinations for 8-switch systems and 4,096 for 12-switch systems. A determined intruder with a simple scanner can cycle through these codes in minutes. Furthermore, neighbors with similar vintage openers might accidentally trigger your door.
Recommendation: If you rely on this system daily, invest in a universal rolling-code receiver conversion kit. These kits install alongside your existing motor, bypassing the old DIP receiver entirely while retaining your functional mechanical opener. This provides modern security without the $500+ expense of a new motor installation.
Frequently Asked Questions (FAQ)
Can I use a modern smart remote with my DIP switch opener?
Not directly. Smart remotes use encrypted rolling codes incompatible with fixed DIP receivers. However, you can purchase a universal rolling-code receiver adapter that wires into your existing opener’s push-button terminals, effectively converting it to accept modern remotes and smart home integrations.
How do I know if my opener uses 8, 9, or 12 DIP switches?
Count the physical switches on the motor unit’s circuit board. Most Chamberlain/LiftMaster units from the 1980s use 9 switches, while Genie models from the same era often use 12. Stanley and Sears Craftsman varied. Always verify visually rather than relying solely on model number assumptions.
My switches are stuck or broken. Can I repair them?
Individual DIP switch blocks can be desoldered and replaced by someone with electronics soldering skills. However, given the age of these boards, other components are likely near failure. For most homeowners, replacing the logic board or adding an external receiver is more cost-effective and reliable than micro-soldering repairs.
Is it legal to own a DIP switch garage door opener?
Yes, ownership is legal. However, manufacturing and selling new fixed-code openers has been restricted in many jurisdictions due to safety and security standards. You can continue using your existing system, but upgrading is strongly advised for insurance and safety reasons.
Why does my neighbor’s remote open my garage?
This is called “code collision.” With limited DIP combinations, duplicates exist in neighborhoods built in the same era. Changing your switch pattern to a less common configuration may help temporarily, but the only permanent solution is upgrading to a rolling-code system with millions of possible combinations.
How often should I reprogram my DIP switches?
You should only reprogram when experiencing issues or after changing components. However, we recommend intentionally changing your code annually as a basic security hygiene practice, similar to changing passwords. Simply shift all switches to a new matching pattern on both the motor and remote.
Conclusion
Mastering how to program a garage door opener with dip switches empowers you to maintain your home’s functionality without unnecessary service calls. By following the precise matching steps outlined above, prioritizing safety, and understanding the limitations of legacy technology, you can keep your garage operating reliably.
Remember, while these systems served us well for decades, their security vulnerabilities are real. Use this knowledge to maintain your current setup, but plan for a rolling-code upgrade to protect your home and family long-term. Your peace of mind is worth the investment.
Found this guide helpful? Share it with fellow homeowners navigating vintage garage door quirks on Facebook, Pinterest, or your neighborhood Nextdoor group. Helping others avoid frustration is what community is all about! Have questions or success stories? Drop a comment below—we’d love to hear from you.
Leave a Reply