Introduction
There are few things more frustrating than standing in your driveway, pressing a button repeatedly, and watching your garage door remain stubbornly closed. If you have recently replaced a battery, purchased a new remote, or reset your system, understanding how to program a Craftsman garage door opener remote 315 is essential for restoring convenience and security to your home. This guide provides clear, empathetic, and professional instructions to get your 315 MHz system synchronized quickly, without the need for expensive service calls.
Understanding Your Craftsman 315 MHz System
Before diving into the programming steps, it is vital to confirm that your equipment operates on the correct frequency. Craftsman has used various frequencies over the decades, but the 315 MHz frequency became the industry standard for many residential openers manufactured between the early 2000s and the mid-2010s.
According to technical documentation referenced in Wikipedia’s article on garage door openers, the shift toward specific radio frequencies like 315 MHz was driven by the need to reduce interference from military and emergency communication systems. Using a remote with the wrong frequency (such as 390 MHz or 433 MHz) will result in failed programming attempts regardless of how perfectly you follow the steps.
Identifying Compatible Models
Check the back of your existing remote or the motor head unit for a label indicating “315 MHz.” Common compatible series include:
- Craftsman AssureLink™ Systems
- Older Sears/Craftsman Chain Drive and Belt Drive models
- Universal remotes specifically labeled for 315 MHz Craftsman/LiftMaster/Chamberlain
Preparation: Safety and Tools Checklist
Programming is simple, but preparation prevents frustration. Before you climb a ladder or start pressing buttons, ensure you have the following:
- Fresh Batteries: Weak batteries are the #1 cause of programming failure. Use high-quality alkaline batteries.
- Stable Ladder: Ensure safe access to the motor unit mounted on the ceiling.
- Clear Area: Remove vehicles and obstacles from the door’s path to prevent accidents during testing.
- Owner’s Manual: Keep it handy for model-specific variations.
- LED Flashlight: Garage ceilings are often poorly lit; good visibility helps locate the learn button.
⚠️ Safety Warning: Never attempt to program the remote while the garage door is in motion. Always ensure the door is fully closed or fully open and stationary before beginning the synchronization process.
Step-by-Step: How To Program A Craftsman Garage Door Opener Remote 315
This is the core procedure for most 315 MHz Craftsman units featuring a “Learn” button. The color of this button typically indicates the frequency and coding type; for 315 MHz systems, the Learn button is usually orange, red, or purple.
Step 1: Locate the Learn Button
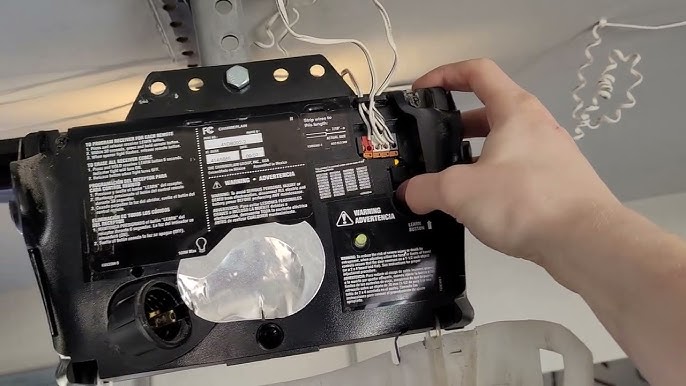
Find the motor head unit on your garage ceiling. On the back or side panel, look for a square or circular button labeled “Learn,” “Smart,” or “Program.” It is often located near the antenna wire or the light lens.
Step 2: Clear Old Codes (Optional but Recommended)
If you are having trouble or suspect memory corruption, hold down the Learn button for 6–10 seconds until the indicator LED turns off. This erases all previously programmed remotes and keypads. Note: You will need to reprogram all devices after doing this.
Step 3: Activate Programming Mode
Press and release the Learn button once. The indicator LED will illuminate steadily or begin blinking, signaling that the opener is in “learning mode.” You typically have 30 seconds to complete the next step before the system times out.
Step 4: Sync the Remote
Within the 30-second window:
- Hold the remote approximately 1–2 feet from the motor unit.
- Press and hold the button on the remote you wish to program.
- Continue holding until the motor unit’s lights flash or you hear two distinct clicks.
- Release the remote button.
Step 5: Test the Connection
Press the programmed remote button once. The garage door should activate immediately. If it does not, repeat Steps 3 and 4, ensuring you are within the time window and using fresh batteries.
Troubleshooting: When Programming Fails
Even when you know how to program a Craftsman garage door opener remote 315, issues can arise. Use this diagnostic table to identify solutions efficiently.
| Symptom | Probable Cause | Recommended Solution |
|---|---|---|
| LED never lights up when Learn is pressed | Power issue or burnt-out logic board | Check power outlet; inspect circuit breaker; test wall console |
| LED lights but remote won’t sync | Wrong frequency or incompatible remote | Verify 315 MHz match; check remote FCC ID compatibility |
| Remote syncs but door doesn’t move | Safety sensor misalignment | Clean sensor lenses; realign brackets; check wiring |
| Remote works only at very close range | Weak battery or antenna damage | Replace battery; inspect antenna wire for breaks or corrosion |
| Door reverses immediately after closing | Force limit setting too low | Adjust force/travel limits per manual specifications |
Expert Insight: The Antenna Factor
Many homeowners overlook the antenna wire. For 315 MHz systems, the antenna must hang vertically and be free of metal obstructions. If the wire is coiled, tucked inside the housing, or touching metal conduit, signal range drops dramatically. Extending or repositioning the antenna can resolve intermittent programming failures without replacing any components.
FAQ: Common Questions About Craftsman 315 Programming
Q1: Can I program multiple remotes to the same Craftsman 315 opener?
Yes. Most Craftsman 315 MHz openers support up to 8–10 remotes plus external keypads. Simply repeat the programming sequence for each additional device. There is no need to erase existing codes unless you have reached the maximum capacity or are experiencing conflicts.
Q2: What if my Craftsman opener doesn’t have a Learn button?
Units manufactured before 1993 may use DIP switches instead of a Learn button. In this case, you must manually match the switch positions inside the remote to those inside the motor unit. However, these older systems typically operate on 390 MHz, not 315 MHz. Confirm your frequency before attempting DIP switch programming.
Q3: Why did my remote stop working after changing the battery?
Battery replacement can sometimes cause a temporary desynchronization due to voltage fluctuation during insertion. Reprogram the remote following the standard steps above. If it still fails, verify the battery polarity and ensure the contacts inside the remote are clean and making proper connection.
Q4: Is a 315 MHz remote compatible with a 390 MHz Craftsman opener?
No. These frequencies are not cross-compatible. You must use a remote that matches your opener’s exact frequency. Attempting to program a mismatched remote will waste time and may cause confusion about whether your equipment is functioning correctly.
Q5: How often should I reprogram my garage door remote?
Under normal conditions, reprogramming is unnecessary. However, experts recommend testing and potentially re-syncing remotes annually as part of routine maintenance, especially after power outages, electrical storms, or battery replacements. This ensures reliable operation and identifies failing components early.
Q6: Can weather affect 315 MHz remote performance?
Extreme cold can reduce battery output, while heavy rain or snow may slightly attenuate radio signals. If you experience seasonal issues, consider installing lithium batteries (which perform better in cold) and ensuring the motor unit’s housing is properly sealed against moisture intrusion.
Advanced Tips for Optimal Performance
Beyond basic programming, maintaining your 315 MHz system ensures long-term reliability:
- Rolling Code Security: Most 315 MHz Craftsman systems use rolling code technology, which changes the access code with every use. This prevents code grabbing and enhances home security. Never disable this feature.
- Interference Management: LED bulbs in the opener’s light fixture can emit RF noise that disrupts 315 MHz signals. If you experience range issues after installing LEDs, switch to RF-shielded garage door opener bulbs or revert to incandescent bulbs temporarily to diagnose the problem.
- Regular Lubrication: While not related to programming, a well-lubricated door reduces strain on the opener motor, extending its lifespan and ensuring consistent response to remote commands. Use white lithium grease on rollers and hinges every six months.
- Backup Battery Consideration: If your area experiences frequent power outages, consider adding a backup battery system. This maintains programming memory and allows operation during blackouts, preventing the need to reprogram after every outage.
Conclusion
Mastering how to program a Craftsman garage door opener remote 315 empowers you to maintain one of your home’s most frequently used entry points without relying on costly technicians. By following the systematic steps outlined above, verifying frequency compatibility, and applying targeted troubleshooting when needed, you can ensure reliable, secure access for years to come. Remember that preparation, patience, and attention to detail are just as important as the programming sequence itself.
Found this guide helpful? Share it with friends, family, or neighbors who might be struggling with their own Craftsman garage door opener. A quick social media share could save someone hours of frustration and an unnecessary service bill. Together, we can make DIY home maintenance accessible, safe, and stress-free for everyone. 🏡🔧
Leave a Reply