Introduction
There are few things more frustrating than pressing your garage door opener only to hear a loud grinding noise and see your door hanging crookedly. If you are currently staring at a derailed door, wondering how to pop a garage door roller back on track, you are not alone, and this is often a fixable issue. While it can be intimidating, understanding the mechanics and safety protocols allows many homeowners to resolve minor derailments without an emergency service call. This guide will walk you through the safe, systematic process of realigning your rollers while prioritizing your safety above all else.
Why Did My Garage Door Roller Come Off the Track?
Before attempting any repair, it is vital to understand the root cause to prevent immediate recurrence. Derailments rarely happen in isolation; they are usually symptoms of underlying wear or misalignment. According to industry data from the International Door Association (IDA), improper maintenance accounts for nearly 70% of residential garage door failures.
Common causes include:
- Loose Track Bolts: Over time, vibration loosens the brackets holding the track to the wall. Even a 1/8-inch gap can allow a roller to slip out.
- Worn Rollers: Nylon rollers typically last 5–7 years, while steel rollers may last longer but become noisy. Flat spots or chipped edges reduce traction.
- Track Misalignment: Accidental bumps from vehicles or settling foundations can bend the track or knock it out of plumb.
- Lack of Lubrication: Dry tracks increase friction, causing rollers to bind and jump.
- Broken Cables: A snapped lift cable creates uneven tension, forcing one side of the door upward faster than the other, which almost always results in derailment.
⚠️ Critical Safety Warning: Never attempt to fix a roller if the lifting cables are loose, frayed, or broken. The torsion springs store enough kinetic energy to cause severe injury or death. In these cases, contact a certified technician immediately. For more on the mechanical principles of counterbalance systems, refer to Wikipedia’s Garage Door article.
What Tools Do I Need to Fix a Derailed Garage Door Roller?
Having the right equipment prevents damage to the door and protects your body. Gather these items before starting:
| Tool | Purpose | Notes |
|---|---|---|
| Adjustable Wrench / Socket Set | Tightening track bolts & brackets | 7/16″ and 1/2″ are most common |
| Rubber Mallet | Gently tapping rollers into place | Prevents metal-on-metal damage |
| Locking Pliers (Vise-Grips) | Securing the door in place | Essential safety backup |
| Level (4-foot) | Checking track plumb & alignment | Accuracy within 1/16″ is ideal |
| Silicone-Based Lubricant | Reducing friction post-repair | Avoid WD-40; it attracts dust |
| Safety Glasses & Gloves | Personal protection | Debris and pinch points are hazards |
| C-Clamps | Stabilizing track during adjustment | Use on vertical track section |
Step-by-Step: How To Pop A Garage Door Roller Back On Track
Follow this precise sequence. Rushing or skipping steps is the primary cause of injury and repeat failures.
Step 1: Disconnect Power and Secure the Door
Unplug the garage door opener or pull the emergency release cord to disengage the trolley. Manually lower the door until the derailed roller is accessible at waist height. Clamp locking pliers onto the track below the bottom roller on the opposite (non-derailed) side to prevent unexpected movement. Place C-clamps on the vertical track just above the derailed roller to create a physical stop.
Step 2: Inspect and Clean the Track Section
Use a flashlight to examine the derailed section. Remove debris, rust flakes, or hardened grease with a wire brush. Check for dents or bends in the track rail. If the track is bent more than 1/16 inch, it must be straightened with adjustable pliers or replaced before proceeding. A damaged track will simply eject the roller again.
Step 3: Loosen the Track Brackets
Using your socket wrench, loosen (do not remove) the bolts securing the track brackets near the derailment point. You need approximately 1/4 to 1/2 inch of lateral play. This flexibility allows you to shift the track toward the roller rather than forcing the roller into a rigid track, which can crack nylon wheels or bend stems.
Step 4: Reposition the Roller
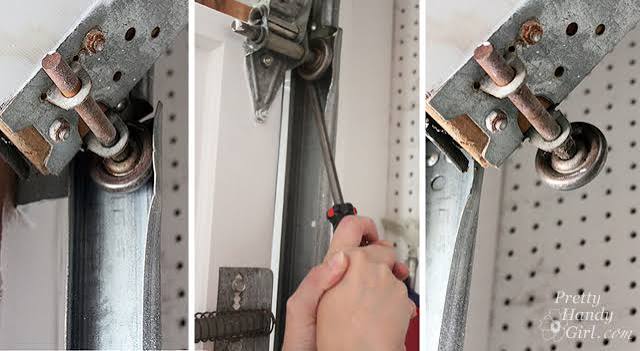
With the track loosened, gently tap the track toward the roller using a rubber mallet. Alternatively, if the roller stem is bent but intact, use locking pliers to carefully guide the roller wheel back into the channel. Do not hammer directly on the roller. The goal is alignment, not force. Once seated, verify the roller spins freely by hand.
Step 5: Realign and Tighten
Place your 4-foot level against the vertical track. Adjust the bracket position until the track is perfectly plumb. Tighten the bracket bolts gradually in a crisscross pattern to maintain alignment. Torque should be firm but not stripped—typically 15–20 ft-lbs for standard residential hardware. Remove the C-clamps and locking pliers only after all bolts are secured.
Step 6: Test and Lubricate
Reconnect the opener and operate the door manually first, then automatically. Listen for binding, popping, or uneven travel. Apply silicone-based lubricant to the rollers, hinges, and track contact points. Operate the door 3–5 full cycles to distribute lubricant evenly.
When Should You Call a Professional Instead?
Not every derailment is a DIY project. Recognize these red flags:
- Spring Issues: Any visible gap in torsion springs, stretched extension springs, or cables off their drums.
- Repeated Derailments: If the same roller pops out more than twice despite proper realignment, the track may be structurally compromised or the door itself may be warped.
- Bent Stems or Hinges: These components bear significant load and cannot be safely bent back into specification.
- Door Weight Imbalance: If the door does not stay in place when lifted halfway manually, the spring system requires professional recalibration.
- Lack of Confidence: If any step feels unsafe or unclear, stopping is the correct decision. Professional service calls average $150–$300 for roller realignment—a fraction of medical bills or door replacement costs.
Frequently Asked Questions (FAQ)
Can I use WD-40 to lubricate my garage door rollers after fixing them?
No. WD-40 is a solvent and degreaser, not a long-term lubricant. It strips existing grease and attracts dust, creating abrasive paste that accelerates wear. Use white lithium grease or silicone-based garage door spray specifically formulated for rolling elements.
How often should I inspect my garage door rollers to prevent derailment?
Perform a visual inspection every 3 months and a full operational test monthly. Replace nylon rollers every 5–7 years and steel rollers every 10–15 years, or sooner if you observe flat spots, chips, or excessive noise. Proactive replacement costs roughly $80–$150 versus $200–$400 for emergency derailment repair.
Is it safe to pop a roller back on track if my garage door has torsion springs?
It is conditionally safe only if the springs are intact, cables are properly seated on the drums, and the door is fully supported with clamps before work begins. Torsion springs themselves do not need to be adjusted for roller realignment. However, if you suspect spring fatigue or cable issues, do not proceed. The stored energy in a wound torsion spring exceeds 200 foot-pounds and can cause catastrophic injury if released unintentionally.
Why does my garage door keep coming off track on the same side?
Consistent single-side derailment indicates systemic misalignment rather than isolated roller failure. Common culprits include a bent horizontal track transition, loose hinge plates on that specific panel, or an unbalanced spring system pulling the door diagonally. Measure the distance from the track to the door edge at multiple heights; variation greater than 1/8 inch confirms misalignment requiring professional assessment.
Can weather affect garage door roller performance and cause derailments?
Yes. Extreme cold makes nylon rollers brittle and metal tracks contract, increasing clearance gaps. High humidity promotes rust on steel rollers and tracks, increasing friction. Seasonal transitions are peak times for derailments. Applying fresh lubricant before winter and summer helps mitigate temperature-related stress.
Conclusion
Knowing how to pop a garage door roller back on track empowers you to handle minor disruptions confidently while recognizing when professional intervention is non-negotiable. By following systematic safety protocols, using proper tools, and addressing root causes rather than symptoms, you extend your door’s lifespan and protect your household. Regular maintenance remains the single most effective prevention strategy—schedule quarterly inspections and replace worn components proactively.
If this guide helped you restore your garage door’s smooth operation, please share it on social media to help fellow homeowners avoid costly mistakes. Tag a friend who’s been battling a stubborn garage door, and let’s keep our homes running safely together! 🛠️🏡
Leave a Reply