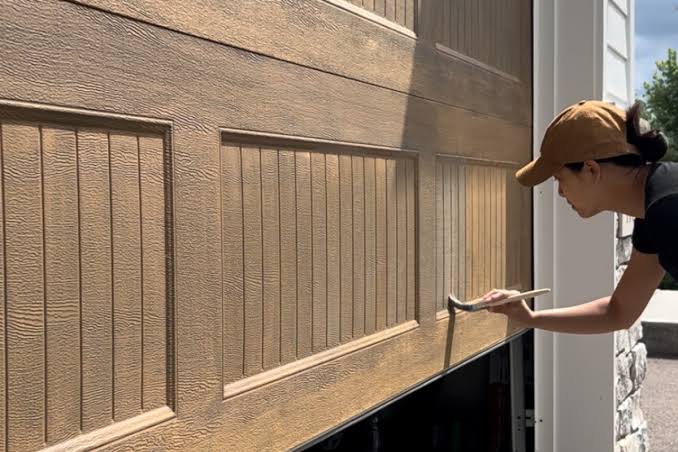
Are you tired of your plain, industrial-looking metal garage door? Many homeowners dream of the warm, inviting aesthetic of natural wood but hesitate due to maintenance concerns and high costs. Learning how to paint metal garage door to look like wood offers the perfect solution, combining durability with beautiful curb appeal without breaking the bank.
This comprehensive guide will walk you through every step, from preparation to final sealing, ensuring professional-quality results that will make your neighbors do a double-take.
Why Choose Faux Wood Painting Over Real Wood Doors?
Before diving into the process, it’s essential to understand why this technique has become increasingly popular among US homeowners. Real wood garage doors require significant upkeep, including regular staining, sealing, and protection against rot and insects. According to industry experts, wooden doors can cost three to five times more than their metal counterparts when factoring in long-term maintenance.
Metal doors, on the other hand, provide superior durability and weather resistance. By mastering the art of faux wood finishing, you gain the best of both worlds: the timeless beauty of wood grain patterns with the low-maintenance benefits of steel or aluminum.
Key Benefits Comparison
| Feature | Real Wood Doors | Painted Metal Doors (Faux Wood) |
|---|---|---|
| Initial Cost | $2,000–$5,000+ | $50–$150 (materials) |
| Maintenance | High (annual sealing) | Low (occasional cleaning) |
| Durability | Moderate (prone to rot) | Excellent (weather-resistant) |
| Lifespan | 15–20 years | 20+ years |
| Customization | Limited by wood type | Unlimited color/grain options |
What Materials Do You Need for This Project?
Gathering the right supplies is crucial for achieving realistic wood grain effects. Using subpar materials often results in peeling paint or unnatural-looking finishes that fail to convince viewers.
Essential Supplies List
- High-quality primer designed for metal surfaces (oil-based or bonding primer)
- Base coat paint in your chosen wood tone (light oak, dark walnut, etc.)
- Glaze or translucent topcoat for creating depth
- Wood grain rocker tool or natural sea sponge
- Fine-grit sandpaper (220–400 grit)
- Painter’s tape and drop cloths
- Clear polyurethane sealer (matte or satin finish)
- Quality brushes (synthetic bristles for latex, natural for oil-based)
- Mineral spirits for cleanup (if using oil-based products)
Investing in proper tools makes a significant difference. A dedicated wood grain rocker, available at most hardware stores for $15–$30, creates authentic-looking patterns that mimic natural wood fibers far better than improvised methods.
How Do You Prepare the Metal Surface Properly?
Preparation accounts for approximately 70% of a successful paint job. Skipping or rushing this stage leads to premature failure, regardless of how skilled your painting technique may be.
Step-by-Step Preparation Process
Step 1: Clean Thoroughly Remove all dirt, grease, and oxidation from the door surface. Mix one cup of trisodium phosphate (TSP) with one gallon of warm water. Scrub the entire door using a stiff brush, paying special attention to corners and panel edges where grime accumulates. Rinse completely and allow 24 hours for drying.
Step 2: Remove Rust and Imperfections Inspect the door carefully for rust spots. Use wire brushes or sandpaper to remove all corrosion until you reach bare metal. For extensive rust damage, consider applying a rust converter product before proceeding. Fill any dents with automotive body filler, then sand smooth once cured.
Step 3: Sand the Surface Lightly sand the entire door with 220-grit sandpaper to create a “tooth” for primer adhesion. This step is critical even if the surface appears smooth. Wipe away all dust using a tack cloth or damp rag.
Step 4: Apply Primer Choose a primer specifically formulated for metal surfaces. Apply an even coat using a roller for flat areas and a brush for edges and details. Allow the primer to dry completely according to manufacturer instructions—typically 4–6 hours for oil-based primers or 2–3 hours for water-based alternatives.
For detailed information about metal surface preparation standards, refer to Wikipedia’s article on surface preparation.
What Is the Best Technique for Creating Realistic Wood Grain?
The wood grain effect requires patience and practice. Don’t expect perfection on your first attempt—consider practicing on cardboard or scrap metal before tackling your actual garage door.
Creating the Base Coat
Apply two thin coats of your base color, allowing proper drying time between applications. Choose colors that match your desired wood species:
- Light Oak: Tan or light beige
- Cherry: Reddish-brown tones
- Walnut: Deep brown with gray undertones
- Mahogany: Rich red-brown hues
Use horizontal strokes for horizontal panels and vertical strokes for vertical sections, following the natural direction wood grain would flow.
Applying the Glaze and Creating Grain Patterns
Step 1: Mix Your Glaze Combine translucent glaze with a small amount of darker paint (approximately 10:1 ratio). This mixture should remain workable for 15–20 minutes, giving you adequate time to create patterns.
Step 2: Apply Glaze Section by Section Work in manageable sections (2×2 feet maximum). Apply the glaze evenly using a brush or roller, maintaining a wet edge to prevent visible lines.
Step 3: Create Wood Grain Patterns Using your wood grain rocker tool, drag it through the wet glaze in long, slightly wavy motions. Vary the pressure and angle to create natural-looking variations. Rotate the tool occasionally to avoid repetitive patterns. For added realism, use a dry brush to lightly feather some areas, softening harsh lines.
Pro Tip: Study photographs of real wood doors to understand grain patterns. Natural wood features knots, color variations, and irregular lines—not perfectly uniform stripes.
How Do You Seal and Protect Your Finished Work?
Sealing protects your faux wood finish from UV damage, moisture, and everyday wear. Without proper sealing, your beautiful work may fade or deteriorate within months.
Sealing Process
- Wait for Complete Curing: Allow the glaze to cure for at least 48 hours before applying sealer. Rushing this step traps moisture and causes cloudiness.
- Choose the Right Sealer: Opt for exterior-grade polyurethane or clear acrylic sealer with UV protection. Matte or satin finishes appear more natural than glossy options.
- Apply Evenly: Use a clean, high-quality brush to apply thin, even coats. Avoid over-brushing, which creates bubbles and uneven texture.
- Multiple Coats: Apply 2–3 coats, allowing 4–6 hours between applications. Lightly sand with 400-grit sandpaper between coats for optimal adhesion.
- Final Cure Time: Wait 72 hours before exposing the door to rain or heavy use. Full curing takes approximately two weeks.
Frequently Asked Questions
How Long Does the Faux Wood Finish Last?
With proper preparation and quality materials, your faux wood finish should last 5–10 years before requiring touch-ups. Factors affecting longevity include climate conditions, sun exposure, and maintenance practices. Regular cleaning with mild soap and water extends the lifespan significantly.
Can I Use Spray Paint Instead of Brushes?
While spray paint works for the base coat, it’s not ideal for creating wood grain effects. The glaze application requires brush or roller control for pattern creation. However, you can use spray primer for faster initial coverage if preferred.
What If I Make Mistakes During the Grain Process?
Don’t panic! As long as the glaze remains wet, you can wipe it away with a damp rag and start over. Once dry, simply apply another layer of glaze and retry. This forgiving nature makes the technique beginner-friendly.
Should I Remove the Garage Door From Its Tracks?
Removing the door provides easier access and prevents paint drips on surrounding areas. However, it’s not strictly necessary if you work carefully and use adequate drop cloths. Consider removing it if you’re a perfectionist or working alone.
What Temperature Is Ideal for Painting?
Paint when temperatures range between 50–85°F (10–29°C) with low humidity. Avoid direct sunlight, which causes paint to dry too quickly and creates uneven finishes. Early morning or late afternoon provides optimal conditions during warmer months.
Can This Technique Work on Fiberglass Doors Too?
Absolutely! The process works equally well on fiberglass, aluminum, and steel doors. Fiberglass actually accepts paint beautifully and may require less intensive preparation than metal surfaces.
Conclusion
Learning how to paint metal garage door to look like wood transforms your home’s exterior while saving thousands compared to purchasing real wood doors. With proper preparation, quality materials, and patience, you’ll achieve professional-looking results that enhance curb appeal and increase property value.
Remember, practice makes perfect. Don’t hesitate to experiment with different grain patterns and colors until you find your ideal combination. The investment of time and effort pays dividends in lasting beauty and satisfaction.
Ready to start your transformation? Share this guide with friends who might benefit from these tips, and don’t forget to post before-and-after photos on social media using #FauxWoodGarageDoor. Your stunning results might inspire others to tackle their own DIY projects!
Leave a Reply