Introduction
There is nothing quite as frustrating as waking up to a garage door that refuses to open, leaving your car trapped inside. Often, the culprit is a snapped spring, and while replacing it seems like a simple fix, buying the wrong one can be dangerous and costly. If you are wondering how to know what garage door spring to buy, you are not alone; this is one of the most common yet critical questions homeowners face. In this guide, we will walk you through the exact steps to identify the correct spring, ensuring your door operates smoothly and safely once again.
Why Identifying the Right Spring Matters
Before diving into measurements, it is crucial to understand why precision is non-negotiable. Garage door springs are under immense tension—enough to lift hundreds of pounds of steel and wood. Using a spring with the incorrect wire size, length, or cycle rating can lead to premature failure, damage to your garage door opener, or even serious injury.
According to industry standards, a properly balanced garage door should stay in place when lifted halfway manually. If your spring is mismatched, this balance is impossible to achieve. By taking the time to identify the correct specifications, you ensure longevity for your entire garage door system.
Step 1: Determine Your Spring Type
The first step in learning how to know what garage door spring to buy is identifying which of the two main types your door uses. The installation method and location differ significantly between them.
1. Torsion Springs
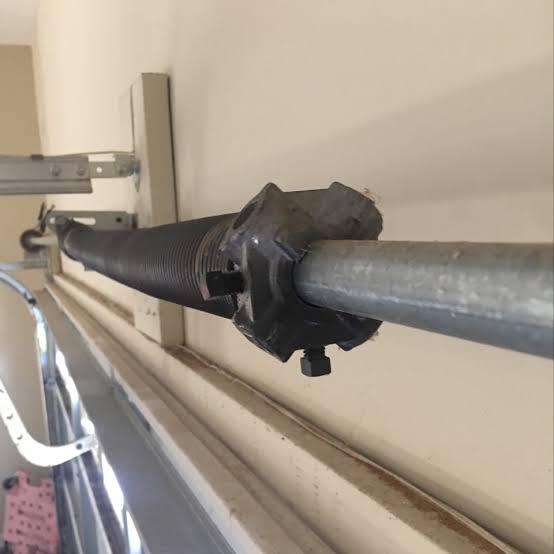
These are mounted horizontally above the closed garage door on a metal shaft (torsion tube). They work by twisting (torque) to lift the door.
- Visual Cue: Look for a long metal bar running across the top of your door opening. You will see one or two tightly wound coils centered on this bar.
- Common Use: Most modern residential homes, especially those with heavier doors.
2. Extension Springs
These run parallel to the horizontal tracks on either side of the door. They stretch (extend) to provide lifting force.
- Visual Cue: Look for long springs attached to pulleys and cables along the side walls of your garage. They often have a safety cable running through the center.
- Common Use: Older homes or lighter single-car garage doors.
Expert Tip: If you are unsure, take a photo of your current setup. Most hardware store associates or online support teams can identify the type instantly from a picture.
Step 2: Measuring Torsion Springs (The Most Common Type)
If you have determined you have torsion springs, accuracy is vital. You will need a tape measure and a calm environment. Never attempt to measure a spring while it is still under tension if it is broken or loose.
Here are the four critical measurements you must take:
1. Wire Size
This is the thickness of the metal wire itself, not the whole spring. This is the most difficult measurement to get right by eye.
- How to Measure: Use a caliper if possible. If not, measure the length of 10 or 20 coils, then divide by the number of coils to get the average wire diameter.
- Common Sizes: 0.207″, 0.218″, 0.225″, 0.250″. Even a slight deviation here changes the lifting power dramatically.
2. Inside Diameter (ID)
This is the width of the hollow center of the spring.
- How to Measure: Measure across the inside of the coil.
- Standard Sizes: Most residential springs are either 2 inches or 2.25 inches. Measure carefully, as these two sizes are not interchangeable.
3. Length of the Spring
Measure the total length of the spring body, excluding the cones (the pointed ends) and the winding bars.
- How to Measure: Lay the tape measure along the side of the coiled wire.
- Note: If you have two springs, they should generally be the same length. Common lengths range from 18 to 34 inches.
4. Wind Direction
Torsion springs are wound either left or right. You must buy the correct wind for each side.
- Left Wound: The coils go up and to the left. Usually installed on the left side of the door (when facing it from outside).
- Right Wound: The coils go up and to the right. Usually installed on the right side.
- Rule of Thumb: If you are replacing both, you typically need one Left Wound and one Right Wound spring.
Step 3: Measuring Extension Springs
Extension springs are slightly easier to measure but require attention to safety cables and pulley systems.
1. Length
Measure the length of the spring excluding the hooks or loops at the ends.
- Important: Measure when the door is fully closed. The spring should be slightly stretched but not fully extended.
2. Wire Size
Similar to torsion springs, measure the thickness of the wire. Common sizes include 0.225″ and 0.250″.
3. Color Code
Many extension springs use a color-coded paint mark on the end loop to indicate their weight capacity.
- Example: A white tag might indicate a 100lb door, while a red tag indicates a heavier load. Check the manufacturer’s chart for your specific brand.
Comparison: Torsion vs. Extension Springs
To help you decide if you should stick with your current type or consider an upgrade (if applicable), here is a quick comparison.
| Feature | Torsion Springs | Extension Springs |
|---|---|---|
| Lifespan | 15,000–20,000 cycles | 10,000 cycles |
| Safety | Safer; contained on a shaft | Higher risk; can snap violently |
| Balance | Smoother, more consistent | Can be jerky if not maintained |
| Cost | Higher initial cost | Lower initial cost |
| Space | Requires headroom above door | Fits in tight side spaces |
For more detailed technical definitions on spring mechanics, you can refer to Wikipedia’s entry on Torsion Springs.
Step 4: Calculating Door Weight (The Hidden Variable)
Sometimes, measuring the old spring isn’t enough because the previous owner may have installed the wrong one. To be 100% sure, you should verify your door’s weight.
- Disconnect the Opener: Pull the red emergency release cord.
- Lift Manually: Lift the door halfway. It should stay in place. If it falls, the spring is too weak. If it flies up, the spring is too strong.
- Weigh It: For precise data, use a bathroom scale. Place it under the bottom edge of the door (with the door closed) and lift slightly until the weight registers. Divide this number by the leverage ratio (usually complicated), or simply consult a professional chart based on your door’s material (steel, wood, aluminum) and dimensions.
General Rule: A standard double-car steel door usually weighs between 130–180 lbs. A wooden door can weigh over 250 lbs.
Where to Buy and What to Look For
Once you have your measurements (Wire Size, ID, Length, and Wind), you are ready to purchase.
- Cycle Rating: Look for springs rated for at least 10,000 cycles (standard) or 25,000+ cycles (high-cycle). High-cycle springs last longer and are worth the extra investment.
- Material: Galvanized steel is standard. Oil-tempered wires offer better fatigue resistance.
- Reputable Brands: Stick to known manufacturers like DDM Garage Doors, Spring Corp, or Wayne Dalton. Avoid generic, unbranded springs from unknown sellers, as quality control can be inconsistent.
FAQ Section
Q1: Can I replace just one torsion spring if only one is broken?
A: It is highly recommended to replace both springs. Since they were installed at the same time, they have undergone the same amount of wear. If one has broken, the other is likely near the end of its life. Replacing both ensures balanced lifting and saves you from another repair bill soon.
Q2: Is it safe to replace garage door springs myself?
A: Torsion spring replacement is dangerous due to the high tension involved. It requires specific winding bars and knowledge of safety protocols. Extension springs are safer but still carry risk. If you are uncomfortable or lack the proper tools, hiring a professional is the safest choice.
Q3: How long do garage door springs last?
A: Standard springs are rated for 10,000 cycles (one open and one close = one cycle). For an average family, this equals 7–10 years. High-cycle springs can last 15–20 years. Climate also plays a role; humid or salty air can corrode springs faster.
Q4: What does the “IPPT” mean on my spring?
A: IPPT stands for “Inches Per Pound Turn.” It is a technical specification used by manufacturers to calculate the exact torque required. As a homeowner, you generally don’t need to calculate this yourself if you match the wire size, diameter, and length exactly.
Q5: My door is noisy after replacing the springs. Why?
A: Noise can result from improper lubrication or misaligned tracks. Ensure you apply a silicone-based lubricant to the springs and rollers. Also, check that the cables are seated correctly in the drum grooves.
Conclusion
Learning how to know what garage door spring to buy empowers you to take control of your home maintenance while avoiding costly mistakes. By accurately measuring your wire size, inside diameter, length, and wind direction, you can select a spring that restores perfect balance to your garage door. Remember, safety is paramount—never underestimate the power stored in these coils.
If you found this guide helpful, please share it with your neighbors or on social media to help others tackle their garage door woes with confidence. A well-functioning garage door is not just about convenience; it’s about the safety and security of your home.
Leave a Reply