Introduction
Is your garage door refusing to close, or does it reverse immediately after touching the floor? It is one of the most frustrating home maintenance issues, but the culprit is often simpler than you think. Understanding how to know if garage door sensors are aligned is the first step to restoring convenience and safety to your home without calling an expensive technician. In this guide, we will walk you through the diagnostic process with clarity and confidence.
Why Sensor Alignment Matters for Safety
Before diving into the “how,” it is crucial to understand the “why.” Garage door sensors, technically known as photo-eye sensors, are a mandatory safety feature required by federal law in the United States since 1993. Their primary job is to detect obstacles in the door’s path. If the beam between the two sensors is interrupted, the door stops and reverses to prevent injury or damage.
When these sensors are misaligned, the system interprets the broken beam as an obstacle, even when nothing is there. This results in the infamous “blinking light” scenario where the door simply refuses to stay closed. According to the Consumer Product Safety Commission, proper maintenance of these safety devices is critical to preventing entrapment accidents, particularly involving children and pets.
Visual Indicators: The LED Light Code
The fastest way to determine sensor status is by looking at the LED lights on the sensor units themselves. Most modern garage door openers use a universal color code, though there can be slight variations by manufacturer.
Interpreting the Lights
- Solid Green Light: This usually indicates the receiving sensor is getting power and the beam is connected. This is the ideal state.
- Solid Amber/Yellow Light: This typically indicates the sending sensor is transmitting the beam correctly.
- Blinking Red or Orange Light: This is the universal sign of misalignment. If the receiving sensor’s light is blinking, it means it is not receiving the infrared beam from the sender.
- No Light At All: If neither sensor has a light, check your power source or the wiring back to the motor unit.
Pro Tip: Stand directly in front of the sensors. If you see a steady green light on one and a steady amber light on the other, your alignment is likely perfect. If either is blinking, you have found your problem.
Physical Inspection: Checking for Obstructions
Sometimes, the sensors are perfectly aligned mechanically, but something is blocking the invisible infrared beam. Before you start twisting brackets, perform a quick physical check.
- Clean the Lenses: Use a soft, dry microfiber cloth to wipe the small plastic lenses on both sensors. Dust, spiderwebs, or mud can block the signal.
- Check for Sunlight Interference: Direct sunlight hitting the receiving sensor can sometimes overwhelm the infrared receiver. If this happens only at certain times of day, consider installing a small shade or hood over the sensor.
- Remove Debris: Ensure there are no boxes, bicycles, or trash cans partially blocking the path between the two units.
Step-by-Step Guide to Realigning Sensors
If the lights are blinking and the lenses are clean, it is time to physically realign the units. You do not need special tools; a simple adjustable wrench or pliers will suffice.
Step 1: Loosen the Wing Nut
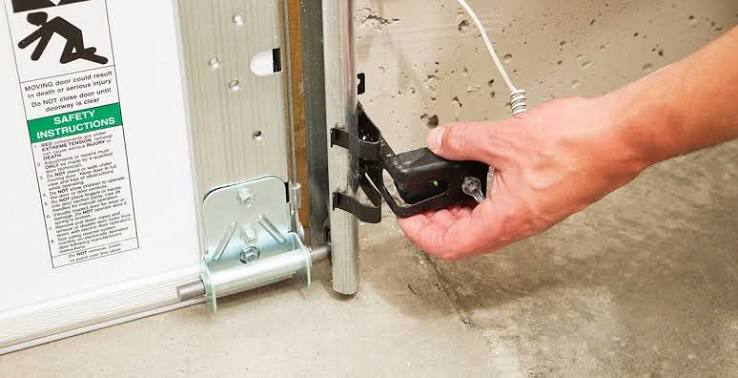
Locate the wing nut or bolt that holds the sensor bracket to the mounting rail. Do not remove it completely; just loosen it enough so that the sensor can be moved by hand.
Step 2: Adjust the Angle
Gently move the sensor until the blinking light turns solid. This requires patience. Move the sensor in tiny increments—millimeters matter. You may need to adjust both the height and the horizontal angle.
Step 3: Tighten Securely
Once the light is solid, hold the sensor firmly in place and tighten the wing nut. Be careful not to overtighten, as this can crack the plastic housing.
Step 4: Test the Door
Press your wall button to close the door. If it closes smoothly, you are done. If it reverses again, repeat the adjustment process.
Common Misconceptions About Sensor Issues
Many homeowners assume that if the door won’t close, the sensors are broken. However, misalignment is far more common than hardware failure.
| Issue | Symptom | Likely Cause |
|---|---|---|
| Misalignment | Blinking LED, door reverses immediately | Bracket shifted due to vibration or impact |
| Dirty Lens | Intermittent closing issues | Dust or spiderwebs blocking the beam |
| Wiring Damage | No LED lights on one or both sensors | Rodents chewing wires or loose connections |
| Sunlight Glare | Fails only during specific hours | Direct sun overwhelming the receiver |
Understanding these differences saves time and money. For instance, if the lights are off entirely, realigning the bracket will not help—you need to check the wiring.
When to Call a Professional
While aligning sensors is a straightforward DIY task, there are scenarios where professional help is warranted. If you have realigned the sensors multiple times and the light continues to blink, the issue may be internal to the motor unit or the sensors themselves may be faulty.
Additionally, if you notice frayed wires, exposed copper, or signs of water damage in the electrical components, stop immediately and contact a licensed garage door technician. Electrical repairs carry risks that go beyond simple mechanical adjustments.
FAQ Section
Q1: Can I bypass the sensors to close the door?
A: While some older openers allow you to hold the wall button to force closure, this is highly discouraged. Bypassing sensors removes a critical safety feature, increasing the risk of injury or property damage. It is always better to fix the alignment.
Q2: Why do my sensors keep going out of alignment?
A: Vibrations from the door opening and closing, temperature changes causing metal expansion/contraction, or accidental bumps from vehicles can shift the brackets. Ensuring the brackets are tightly secured and using thread-locker fluid can help prevent this.
Q3: Do I need to replace both sensors if one is broken?
A: Not necessarily. If one sensor is physically damaged (cracked lens or housing), you can often replace just that unit. However, ensure the replacement is compatible with your opener’s brand and frequency.
Q4: How often should I check my garage door sensors?
A: It is good practice to visually inspect the sensors once a month. A quick glance at the LED lights while the door is idle can confirm they are still aligned and functional.
Q5: What if the lights are solid but the door still won’t close?
A: If the lights are solid, the alignment is correct. The issue may lie with the travel limits settings on the motor unit, obstructed tracks, or a malfunctioning logic board. Check the owner’s manual for limit adjustment instructions.
Conclusion
Knowing how to know if garage door sensors are aligned empowers you to handle one of the most common garage door issues quickly and safely. By checking the LED indicators, cleaning the lenses, and making minor adjustments to the brackets, you can restore functionality in minutes. Regular maintenance not only ensures convenience but also protects your family and property.
If you found this guide helpful, please share it with your neighbors or on social media. Helping others solve this common frustration builds a safer community for everyone. Stay safe, and keep those doors moving smoothly!
Leave a Reply