If you notice cold air, dust, water, or even insects entering your garage, the issue is often a worn-out bottom seal. Many homeowners search for How To Install Weather Stripping On Bottom Of Garage Door because it’s one of the most effective and affordable ways to improve insulation and protect their garage space.
The good news is that installing weather stripping is a simple DIY project that can be completed in under an hour with basic tools. This guide will walk you through everything step-by-step so you can get a tight, durable seal.
How To Install Weather Stripping On Bottom Of Garage Door Step-by-Step
Understanding How To Install Weather Stripping On Bottom Of Garage Door starts with knowing its purpose. The bottom seal acts as a barrier between your garage floor and the outside environment, preventing air leaks, moisture, and pests.
Read too: How Do You Change Code On Garage Door Keypad Fast?
A=Garage Door Bottom Seal Efficiency
According to energy efficiency studies, properly sealed garage doors can reduce heat loss by up to 15% in attached garages, helping lower energy bills.
What Is Garage Door Weather Stripping?
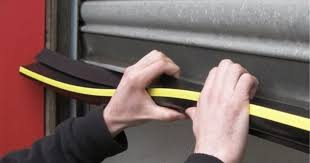
Garage door weather stripping is a flexible rubber or vinyl strip attached to the bottom of the door. It compresses when the door closes, creating a tight seal against the floor.
You can read more about sealing systems and insulation concepts here:
https://en.wikipedia.org/wiki/Weather_stripping
Main functions include:
- Blocking cold and hot air
- Preventing water leaks
- Keeping out insects and rodents
- Reducing dust and debris
Tools and Materials You Need
Before starting the installation, prepare the following:
| Tool | Purpose |
|---|---|
| Measuring tape | Measuring door width |
| Utility knife | Cutting rubber strip |
| Screwdriver or drill | Removing/installing fasteners |
| New weather stripping | Rubber or vinyl seal |
| Cleaning cloth | Cleaning bottom surface |
Most materials cost between $10–$30, making it a very affordable home upgrade.
Step-by-Step Guide: How To Install Weather Stripping On Bottom Of Garage Door
1. Measure the garage door width
- Use a measuring tape
- Measure from one end of the door to the other
- Add 1–2 cm for adjustment
2. Remove old weather stripping
- Lift the garage door halfway
- Unscrew or pull out the old seal
- Clean the area thoroughly
3. Clean the bottom surface
- Use a damp cloth
- Remove dirt, oil, and debris
- Let it dry for 10–15 minutes
4. Cut the new weather stripping
- Match it to your door width
- Use a utility knife for clean edges
5. Install the new seal
- Insert it into the metal track or groove
- Start from one end and slide across
- Ensure it fits tightly
6. Secure the seal
- Tighten screws if required
- Check alignment across the entire door
7. Test the garage door
- Close the door completely
- Look for light gaps or uneven contact
- Adjust if necessary
Why Is Weather Stripping Important?
A poorly sealed garage door can significantly impact home comfort and energy efficiency.
Common problems caused by missing seals:
- Heat loss in winter
- Increased cooling costs in summer
- Water damage during rain
- Pest infestation
Experts estimate that garages without proper sealing can increase household energy usage by 5–10% annually.
Types of Garage Door Bottom Seals
Choosing the right material is important for long-term performance.
| Type | Material | Durability | Best Use |
|---|---|---|---|
| Rubber seal | Flexible rubber | High | All-weather protection |
| Vinyl seal | PVC-based | Medium | Mild climates |
| Bulb seal | Air-filled rubber | Very high | Uneven floors |
| Brush seal | Bristle design | Medium | Dust protection |
Pros and Cons of Installing Weather Stripping
Advantages
- Improves insulation
- Blocks pests and moisture
- Reduces energy costs
- Easy DIY installation
Disadvantages
- Requires periodic replacement
- May wear faster in extreme climates
- Needs proper sizing for effectiveness
Common Mistakes to Avoid
When learning How To Install Weather Stripping On Bottom Of Garage Door, avoid these errors:
1. Incorrect measurement
Even a 1–2 cm mistake can cause gaps.
2. Not cleaning the surface
Dirt prevents proper sealing.
3. Using low-quality materials
Cheap seals wear out quickly.
4. Improper alignment
Uneven installation reduces efficiency.
Expert Insight on Garage Insulation
Home improvement specialist Daniel Harper states:
“A properly sealed garage door is one of the most cost-effective upgrades a homeowner can make. It improves comfort and reduces energy loss immediately.”
This shows how small upgrades can have a big impact on overall home efficiency.
How Long Does Weather Stripping Last?
The lifespan depends on material and climate:
- Rubber seals: 3–5 years
- Vinyl seals: 2–4 years
- Bulb seals: 4–7 years
Extreme heat or cold can reduce lifespan by up to 30%, especially in direct sun exposure areas.
Maintenance Tips for Longer Lifespan
To maximize durability:
- Inspect every 6 months
- Clean dirt and debris regularly
- Avoid harsh chemicals
- Replace if cracks appear
When Should You Replace Weather Stripping?
You should replace it if you notice:
- Visible cracks or tears
- Water entering the garage
- Drafts near the door
- Flattened or hardened rubber
FAQ: How To Install Weather Stripping On Bottom Of Garage Door
1. How long does it take to install weather stripping?
Most installations take 30–60 minutes, depending on experience and door size.
2. Can I install weather stripping myself?
Yes, it is a simple DIY project that requires only basic tools.
3. What is the best material for garage door weather stripping?
Rubber seals are generally the most durable and weather-resistant.
4. How often should I replace garage door seals?
Typically every 3–5 years or when visible wear appears.
5. Why is my garage still drafty after installing a new seal?
It may be due to uneven flooring or improper installation alignment.
6. Do all garage doors use the same type of seal?
No, different doors require different track sizes and seal types.
Conclusion
Learning How To Install Weather Stripping On Bottom Of Garage Door is a simple yet powerful way to improve your home’s comfort, energy efficiency, and protection against external elements. With minimal tools and effort, you can complete this upgrade in less than an hour.
A properly sealed garage door helps reduce energy costs, block pests, and keep your garage clean and dry year-round.
If you found this guide helpful, share it with friends or homeowners who might benefit from improving their garage insulation.
Leave a Reply