If your garage feels drafty, lets in dust, or allows water to seep inside, you’re not alone. Many homeowners struggle with poor sealing—especially during extreme weather. Learning How To Install Weather Stripping On A Garage Door is a simple, cost-effective fix that can improve comfort, reduce energy bills, and protect your space.
Why Is Weather Stripping Important for Garage Doors?
Weather stripping plays a crucial role in protecting your home. It acts as a barrier between the outdoors and your garage interior.
Read too: How Do You Change Code On Garage Door Keypad Fast?
Key Benefits:
- Energy Efficiency: According to the U.S. Department of Energy, proper sealing can reduce energy loss by up to 30%.
- Pest Prevention: Keeps insects and rodents out.
- Moisture Protection: Prevents water leaks during rain.
- Temperature Control: Maintains a stable indoor climate.
Without proper weather stripping, your garage becomes a weak point in your home’s insulation system.
What Tools and Materials Do You Need?
Before starting, gather all necessary tools. Preparation ensures a smooth installation process.
Tools Checklist:
- Tape measure (accurate to 1/16 inch)
- Utility knife
- Hammer or drill
- Screwdriver
- Cleaning cloth
Materials:
- Weather stripping (vinyl, rubber, or foam)
- Bottom seal (garage door sweep)
- Nails or screws (typically 1–1.5 inches)
- Adhesive (if required)
What Types of Weather Stripping Are Available?
Choosing the right type is essential for durability and effectiveness.
Common Types:
| Type | Best For | Pros | Cons |
|---|---|---|---|
| Vinyl | Cold climates | Durable, flexible | Slightly expensive |
| Rubber | All weather | Strong seal | Can harden over time |
| Foam Tape | Small gaps | Easy install | Less durable |
| Brush Seal | Uneven floors | Flexible | Not fully airtight |
👉 Pro Tip: For most U.S. homes, vinyl or rubber seals offer the best long-term performance.
How To Install Weather Stripping On A Garage Door (Step-by-Step)
This is the part you came for. Follow these steps carefully for a professional-quality result.
Step 1: Measure the Garage Door
Use a tape measure to determine:
- Width of the door (e.g., 9 ft or 16 ft)
- Height of side frames
📏 Accuracy matters — even a 0.5-inch gap can reduce effectiveness.
Step 2: Remove Old Weather Stripping
- Use a screwdriver or pry bar to remove nails or screws.
- Pull off the old seal gently.
- Clean the surface with a damp cloth.
🧼 Dirt or debris can prevent proper adhesion.
Step 3: Install Bottom Seal (Garage Door Sweep)
- Slide the new seal into the track or attach it with screws.
- Ensure it sits evenly across the floor.
👉 Ideal compression: 0.25–0.5 inches when the door is closed.
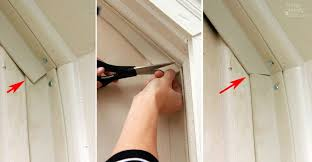
Step 4: Attach Side Weather Stripping
- Cut strips to match door height.
- Position them so they lightly press against the door.
- Nail or screw them every 12–16 inches.
🔧 Avoid over-tightening—it can warp the material.
Step 5: Install Top Seal
- Measure and cut the top strip.
- Align it evenly across the top frame.
- Secure it firmly.
📌 This prevents rainwater from dripping inside.
Step 6: Test the Seal
Close the garage door and check for:
- Light gaps
- Air drafts
- Uneven pressure
💡 If light passes through, adjust the strips slightly.
Common Mistakes to Avoid
Even simple DIY projects can go wrong. Here’s what to watch out for:
❌ Mistakes:
- Installing without cleaning the surface
- Cutting strips too short
- Using low-quality materials
- Over-tightening screws
- Ignoring uneven garage floors
How Much Does It Cost?
Installing weather stripping is budget-friendly.
Cost Breakdown:
| Item | Average Cost (US) |
|---|---|
| Weather stripping kit | $20–$50 |
| Bottom seal | $15–$40 |
| Tools (if needed) | $20–$100 |
| Professional install | $100–$300 |
👉 DIY installation can save you up to 70%.
How Long Does Weather Stripping Last?
Durability depends on material and climate.
- Vinyl: 5–8 years
- Rubber: 3–5 years
- Foam: 1–2 years
Regular inspection every 6–12 months is recommended.
For more details on sealing materials, see this resource: https://en.wikipedia.org/wiki/Weatherstripping
Signs You Need New Weather Stripping
Not sure if it’s time to replace? Look for these signs:
- Visible cracks or gaps
- Increased energy bills
- Water entering the garage
- Drafts or cold air
- Light visible around the door edges
FAQ: How To Install Weather Stripping On A Garage Door
Q1: Can I install weather stripping without professional help?
Yes. Most homeowners can complete the installation in 1–2 hours with basic tools.
Q2: What is the best material for garage door weather stripping?
Vinyl and rubber are the most durable and weather-resistant options.
Q3: How tight should weather stripping be?
It should press lightly against the door—tight enough to seal, but not so tight that it restricts movement.
Q4: Does weather stripping really save energy?
Yes. Proper sealing can significantly reduce heating and cooling costs by preventing air leaks.
Q5: Can weather stripping fix water leaks?
It helps reduce water intrusion, but severe drainage issues may require additional solutions like floor grading.
Conclusion
Installing weather stripping is one of the easiest and most effective ways to improve your garage’s comfort and efficiency. By following this guide on How To Install Weather Stripping On A Garage Door, you can block drafts, prevent moisture, and save money—all in just a few hours.
If you found this guide helpful, share it with friends or on social media—someone else might be dealing with the same garage issues right now!
Leave a Reply