Introduction
Is your garage letting in cold drafts, rainwater, or unwanted pests because of a gap under the door? You are not alone; a worn-out bottom seal is one of the most common issues homeowners face, but fixing it is simpler than you think. In this comprehensive guide, we will show you exactly how to install rubber seal on bottom of garage door safely and effectively, restoring your home’s energy efficiency and protection in just an afternoon.
Why Is My Garage Door Seal Failing? (And Why It Matters)
Before diving into the installation process, it is crucial to understand why this component matters. The bottom seal, often called the astragal or threshold seal, serves as the primary barrier between your garage and the outside environment. According to the U.S. Department of Energy, unsealed gaps in building envelopes can account for significant heating and cooling losses, directly impacting your utility bills.
When rubber degrades due to UV exposure, temperature fluctuations, and mechanical friction, it loses its elasticity. This failure leads to:
- Energy Loss: Unconditioned air enters, forcing HVAC systems to work harder.
- Water Damage: Rain and snowmelt seep in, potentially ruining stored items or drywall.
- Pest Intrusion: Rodents and insects use even small gaps as entry points.
- Dust and Debris: Pollen, dirt, and exhaust fumes contaminate your garage space.
Understanding these consequences highlights why learning how to install rubber seal on bottom of garage door is a high-value maintenance skill. For more context on how thermal insulation and sealing contribute to overall building performance, you can refer to Wikipedia’s article on Weatherization, which details the science behind effective air sealing.
What Tools Do I Need to Replace a Garage Door Bottom Seal?
Preparation is half the battle. Having the right tools prevents frustration and ensures a professional-grade result. Below is a checklist of essentials versus optional upgrades.
Essential Tool Checklist
| Tool | Purpose | Estimated Cost |
|---|---|---|
| Cordless Drill/Driver | Removing old screws/bolts | $40–$80 |
| Socket Set / Wrench | Loosening retainer brackets | $20–$50 |
| Utility Knife | Trimming excess rubber | $5–$10 |
| Tape Measure | Ensuring accurate length | $5–$15 |
| Safety Glasses & Gloves | Protection from rust/debris | $10–$20 |
| Flathead Screwdriver | Prying out stuck seals | $3–$8 |
Pro Tip: If your garage door uses a T-style channel retainer, consider purchasing a specialized seal puller tool. It reduces physical strain and prevents damage to the aluminum track during removal.
Step-by-Step: How To Install Rubber Seal On Bottom Of Garage Door
This tutorial assumes you have already purchased the correct replacement seal type (T-style, bead-style, or bulb-style) matching your existing retainer system. Always measure twice before cutting.
Step 1: Disconnect the Opener and Secure the Door
Safety is non-negotiable. Pull the emergency release cord on your automatic opener to disengage the trolley. Manually lower the door completely onto the floor. Lock the door in place using C-clamps on both sides of the track just above a roller to prevent accidental upward movement while you work.
Step 2: Remove the Old Deteriorated Seal
Locate the end caps or bolts securing the seal within the retainer channel. Using your socket wrench or drill, remove these fasteners. Gently pull the old rubber out of the channel. If it is stuck due to corrosion or paint buildup, apply a penetrating lubricant and let it sit for 10 minutes. Use pliers carefully to extract stubborn sections without bending the metal retainer.
Step 3: Clean and Inspect the Retainer Channel
Debris, rust flakes, and old adhesive residue will prevent the new seal from seating properly. Use a wire brush and vacuum to clean the channel thoroughly. Inspect the aluminum or steel retainer for bends or cracks. If the retainer itself is damaged, replace it before proceeding; a new seal cannot fix a broken mounting system.
Step 4: Insert the New Rubber Seal
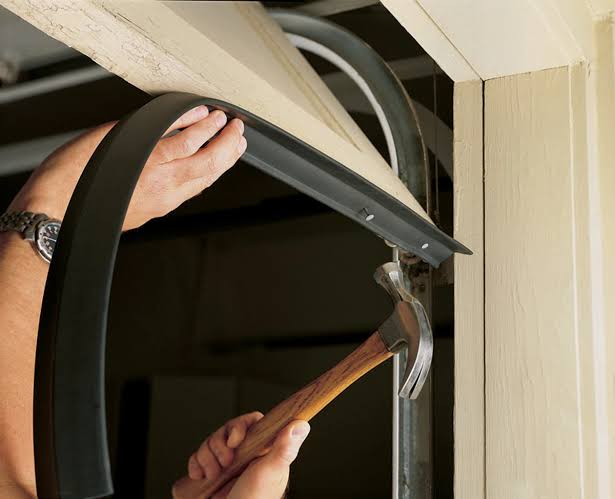
Starting at one end, feed the new seal’s T-edge or bead into the retainer channel. This step often requires patience. Apply silicone spray or soapy water to the channel to reduce friction. Push the seal through evenly—do not force it, as stretching causes shrinkage later. Once fully inserted, ensure the bulb faces downward toward the floor.
Step 5: Trim, Secure, and Test
Measure the exact width needed and mark the rubber with a pencil. Cut squarely using a sharp utility knife. Reinstall the end caps or retaining bolts, tightening them securely but not overtightening (which can strip threads). Remove the C-clamps, reconnect the opener, and test the door’s cycle. Observe the seal making uniform contact with the concrete across the entire width. Adjust limit switches if necessary to ensure proper compression.
Common Mistakes When Installing Garage Door Seals
Even experienced DIYers stumble on these pitfalls. Avoid them to ensure longevity:
- Buying the Wrong Profile: Not all seals are universal. Match the T-shape, bead diameter, and bulb size precisely to your manufacturer’s specifications.
- Stretching During Installation: Pulling too hard creates tension that pulls the seal back over time, leaving gaps at the ends.
- Ignoring Floor Unevenness: If your concrete slab has settled unevenly, a standard seal may not bridge the gap. Consider adding an adjustable threshold ramp underneath.
- Skipping Lubrication: Dry installation increases friction and wear. Always use silicone-based lubricants compatible with EPDM or vinyl rubber.
- Forgetting Post-Install Testing: Never assume success. Run multiple open/close cycles and check for light leaks at night with interior lights on.
FAQ: Your Top Questions About Garage Door Bottom Seals
How long does a garage door bottom seal typically last?
Most quality EPDM or vinyl seals last 5 to 10 years, depending on climate, usage frequency, and sun exposure. Coastal areas with salt air or regions with extreme temperature swings may see reduced lifespans. Annual visual inspections help catch degradation early.
Can I install a rubber seal myself, or should I hire a professional?
Absolutely, most homeowners can handle this as a DIY project requiring only basic tools and 1–2 hours. However, if your door is unusually heavy, the retainer is severely corroded, or you lack confidence working near torsion springs, hiring a certified technician is safer. Spring systems store dangerous energy and should never be adjusted by amateurs.
What type of rubber seal is best for cold climates?
For freezing temperatures, choose EPDM (Ethylene Propylene Diene Monomer) rubber over vinyl. EPDM remains flexible down to -40°F (-40°C), whereas vinyl becomes brittle and cracks. Look for seals rated for “extreme weather” or “arctic grade.”
How do I know if my seal needs replacing versus adjusting?
If the seal appears intact but gaps persist, first check door alignment and spring balance. An unbalanced door won’t close evenly regardless of seal condition. If the rubber is cracked, flattened permanently, torn, or missing chunks, replacement is necessary—not adjustment.
Will a new seal fix water leaking under my garage door?
A properly installed seal stops surface water intrusion. However, if water enters despite a good seal, the issue may be hydrostatic pressure, poor drainage grading, or foundation cracks. Address exterior grading and consider installing a garage threshold drain system alongside seal replacement for comprehensive waterproofing.
Are there eco-friendly or recycled rubber seal options available?
Yes, several manufacturers now offer seals made from recycled tire rubber or sustainable EPDM compounds. These perform identically to virgin materials while reducing landfill waste. Check product certifications like GreenGuard or Cradle to Cradle when shopping.
Conclusion: Seal It Right, Protect Your Home Year-Round
Learning how to install rubber seal on bottom of garage door empowers you to protect your property against weather, pests, and energy waste—all with minimal investment and effort. By following this step-by-step approach, avoiding common mistakes, and choosing the right materials for your climate, you’ll enjoy a tighter, cleaner, and more efficient garage for years to come.
Did this guide help you tackle your garage door seal project? Share it with fellow homeowners on Facebook, Pinterest, or Nextdoor who might be battling the same drafty garage woes! Tag us in your before-and-after photos—we love seeing successful DIY transformations. Together, we can build smarter, safer homes one seal at a time. 🔧🏡
Leave a Reply