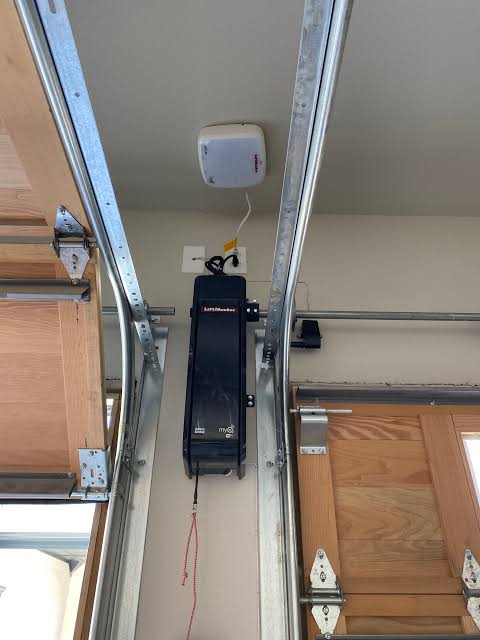
Upgrading your garage often starts with reclaiming overhead space, yet many homeowners feel intimidated by the prospect of mounting a heavy motor on the wall beside their door. If you are searching for how to install LiftMaster 8500 wall mount garage door opener, you are likely looking for a reliable, space-saving solution without the headache of complex ceiling assemblies. This guide breaks down the process into manageable steps so you can achieve a professional-grade installation safely and efficiently.
Why Choose a Wall Mount Over a Traditional Ceiling Opener?
Before grabbing your drill, it is vital to understand why this specific model dominates the US market. Unlike traditional trolley-style openers that hang from the center ceiling rail, the LiftMaster 8500 (also known as the Elite Series 8500) mounts directly to the torsion bar shaft.
According to industry standards referenced in technical documentation on Wikipedia, jackshaft openers like the 8500 transfer torque directly to the spring system rather than pulling the door via a track. This design offers distinct advantages:
- Ceiling Clearance: Frees up 8+ inches of headroom, ideal for low ceilings or storage racks.
- Quiet Operation: Eliminates chain/belt vibration against ceiling joists; operates at roughly 40% less noise than standard chain drives.
- Security: The manual release mechanism is inaccessible from outside, reducing break-in risks.
- Aesthetics: Provides a clean, minimalist look preferred in modern home designs.
However, these benefits come with strict installation requirements. The 8500 requires a minimum of 7 inches of side clearance and a properly balanced torsion spring system. Do not attempt this installation if your door uses extension springs.
Pre-Installation Checklist: Tools and Safety Requirements
Safety is non-negotiable when working with high-tension garage components. Before starting, verify you have the following:
Essential Tools
- Stepladder (6ft or taller)
- Cordless drill with metal bits (3/16″ and 1/4″)
- Adjustable wrench set and locking pliers
- Level (24-inch minimum)
- Tape measure and pencil
- Wire strippers and electrical tape
- Safety glasses and work gloves
Critical Safety Warnings
- Disconnect Power: Always unplug existing openers and turn off the circuit breaker before beginning.
- Spring Tension: Never loosen torsion springs unless trained. The 8500 installs onto the existing shaft; spring adjustment should only be done by certified technicians.
- Door Balance Test: Manually lift the door halfway. It must stay in place. If it falls or rises, your springs are unbalanced and must be serviced first. An unbalanced door will destroy the 8500 motor within weeks.
Step-by-Step Installation Guide for LiftMaster 8500
Follow these concrete steps precisely. Rushing alignment is the #1 cause of premature failure.
Step 1: Determine Mounting Position and Clearances
Measure 7 inches horizontally from the end of the torsion tube to the nearest wall obstruction. The motor housing requires this exact clearance. Mark the vertical centerline on the wall where the motor will sit. The bottom of the unit must be at least 8 inches above the floor to prevent water damage and comply with UL safety standards.
Pro Tip: Use a laser level to project a perfectly horizontal line across both sides of the door. Even a ¼-inch misalignment causes binding and excessive wear.
Step 2: Install the Motor Unit Bracket
Hold the mounting bracket against the wall at your marked height. Ensure it is perfectly level. Drill pilot holes using a 3/16″ masonry bit (for concrete/block walls) or appropriate wood bit for stud mounting. Secure with provided lag bolts. Torque all fasteners to manufacturer specifications—overtightening can warp the bracket and misalign the drive shaft.
Step 3: Mount the Drive Shaft Collar and Motor
Slide the drive collar onto the torsion tube. Position the motor onto the wall bracket and engage the drive shaft into the collar. Tighten the set screws on the collar using an Allen wrench. Apply firm, even pressure—these screws bear the entire lifting load. Double-check that the motor sits flush against the bracket with no lateral play.
Step 4: Install the Cable Tension Monitor
This is a critical safety component unique to wall-mount systems. Mount the tension monitor on the opposite side of the door from the motor, aligned with the drum cable path. Thread the monitoring cable through the designated slot and secure per the manual. This device detects broken cables and instantly stops the motor, preventing catastrophic door collapse.
Step 5: Electrical Wiring and Sensor Setup
Run low-voltage wires from the motor to the door sensors and wall control panel. For US installations, ensure sensor placement complies with federal safety mandates: photo-eye sensors must be mounted 4–6 inches above the floor on both door tracks. Connect the power cord to a dedicated 120V outlet. Never use an extension cord. Verify polarity and ground integrity before restoring power.
Step 6: Program Travel Limits and Force Settings
Power on the unit. Enter programming mode by pressing and holding the “Program” button until the LED blinks blue. Follow the on-screen prompts to set:
- Open Limit: Door fully open position
- Close Limit: Door fully sealed on floor
- Force Adjustment: Auto-calibrates based on door weight
Test the auto-reverse safety feature immediately after programming. Place a 2×4 board flat on the floor under the door center. Close the door; it must reverse upon contact. Repeat monthly.
Pros vs Cons: Honest Assessment for Homeowners
| Feature | Advantage | Potential Drawback |
|---|---|---|
| Space Saving | Maximizes overhead storage | Requires 7″ side clearance |
| Noise Level | Near-silent operation | Higher upfront cost ($400-$600) |
| Reliability | Direct-drive durability | Professional balancing required |
| Security | Internal release mechanism | Complex DIY troubleshooting |
| Compatibility | Works with MyQ smart tech | Not compatible with extension springs |
Frequently Asked Questions About LiftMaster 8500 Installation
Can I install the LiftMaster 8500 myself as a beginner?
Yes, but only if you possess intermediate mechanical skills and your door is already perfectly balanced with torsion springs. Beginners should budget $200–$350 for professional installation to avoid voiding warranties or causing injury. The electrical and programming portions are straightforward; the mechanical alignment demands precision.
What happens if my garage door isn’t perfectly balanced before installation?
The 8500’s internal clutch will slip repeatedly, triggering error codes and eventually burning out the logic board. Balance issues also create unsafe conditions where the door could fall unexpectedly. Always hire a technician to adjust torsion springs before installing any jackshaft opener. Spring work is extremely dangerous and not a DIY task.
Does the LiftMaster 8500 work with existing MyQ accessories?
Absolutely. The 8500 features built-in Wi-Fi and integrates seamlessly with MyQ smartphone controls, Amazon Key, and most smart home platforms. No additional hub is needed for basic remote access. However, older third-party remotes may require a compatibility adapter.
How long does a typical installation take?
Experienced DIYers complete installation in 2–3 hours. First-timers should allocate 4–5 hours including calibration and testing. Professional installers typically finish in 90 minutes due to specialized tools and familiarity with alignment procedures.
Is maintenance different from traditional openers?
Minimal maintenance is actually a key benefit. There are no chains to lubricate or belts to tighten. Annually inspect the drive shaft collar set screws for tightness, test safety sensors, and wipe dust from ventilation slots. Replace backup batteries every two years. The sealed gearbox requires no oil changes.
What are common installation mistakes to avoid?
The three most frequent errors are: insufficient side clearance causing motor bind, improper sensor alignment leading to false reversals, and skipping the balance test resulting in motor strain. Also, never mount the unit directly to drywall without hitting studs or using toggle anchors rated for dynamic loads. Vibration will eventually pull inadequate fasteners free.
Final Thoughts: Reclaim Your Garage Space Safely
Installing the LiftMaster 8500 transforms cluttered garages into functional spaces while delivering whisper-quiet reliability. By following this guide on how to install LiftMaster 8500 wall mount garage door opener, you’ve taken the first step toward smarter home automation. Remember: patience during alignment pays dividends in decades of trouble-free service.
If this tutorial helped you navigate your installation, please share it with fellow DIY enthusiasts on Facebook, Pinterest, or Reddit’s r/GarageDoor community. Your experience could save someone else hours of frustration! Have questions about your specific setup? Drop them in the comments below—we’re here to help you succeed safely.
Leave a Reply