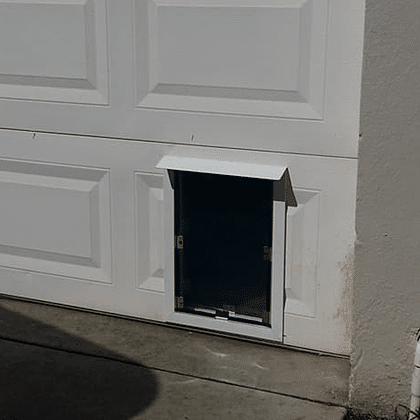
Introduction
Giving your furry friend the freedom to roam between the yard and the garage shouldn’t mean compromising your home’s security or energy efficiency. Many US homeowners struggle with finding a safe, weatherproof solution that doesn’t damage their primary garage door panels. If you are wondering how to install a pet door in a garage door without voiding warranties or creating drafts, this comprehensive guide is designed specifically for you. We understand that balancing pet convenience with structural integrity can feel overwhelming, but with the right approach, it is a manageable weekend project that enhances both your pet’s lifestyle and your home’s functionality.
Can You Safely Install a Pet Door in a Garage Door?
Before picking up a jigsaw, it is critical to determine if your specific garage door can accommodate a modification. Not all doors are created equal, and cutting into the wrong type can compromise safety mechanisms or insulation values.
Steel vs. Wood vs. Fiberglass Doors
- Wood Doors: Generally the easiest to modify. They are solid and forgiving when cutting, though they require sealing to prevent rot.
- Steel Doors: Common in modern US homes but tricky. Most have a foam core sandwiched between thin metal skins. Cutting requires specialized blades and immediate edge sealing to prevent rust and maintain insulation R-values.
- Fiberglass/Aluminum: Often hollow or lightly insulated. These are lightweight but can crack during cutting. Reinforcement frames are mandatory here.
Expert Insight: According to industry standards from major garage door manufacturers, modifications should never be made within 6 inches of hinges, rollers, or the bottom seal bracket. Cutting near stress points can cause panel failure during operation.
Pros and Cons of Garage Door Pet Entries
| Feature | Advantage | Disadvantage |
|---|---|---|
| Convenience | Pets enter directly from yard | Potential security risk if not locked |
| Energy | Keeps main house door closed | Possible heat loss in uninsulated doors |
| Cost | Cheaper than wall installation | May void garage door warranty |
| Aesthetics | Hidden from street view | Visible from inside garage |
What Tools Do You Need for Installation?
Gathering the correct tools prevents mid-project trips to the hardware store and ensures clean cuts that maintain your door’s integrity.
Essential Tool Checklist
- Jigsaw with Metal/Wood Blade: Choose a bi-metal blade (14-18 TPI) for steel doors or a fine-tooth wood blade for timber.
- Drill with ½-inch Spade Bit: For creating starter holes in each corner of your cutout.
- Measuring Tape & Level: Precision is non-negotiable; an unlevel frame binds the flap.
- Clamps: To secure the template firmly against the door surface.
- Silicone Sealant (Exterior Grade): Must be paintable and temperature-rated for -40°F to 180°F.
- Safety Gear: ANSI-approved safety glasses, work gloves, and hearing protection.
- Pet Door Kit with Frame: Ensure it includes interior/exterior trim pieces and mounting hardware.
How To Install A Pet Door In A Garage Door: Step-by-Step
This section answers the core query: how to install a pet door in a garage door. Follow these precise steps to ensure a weather-tight, functional result. Always disconnect your garage door opener before beginning any physical modification to prevent accidental activation.
Step 1: Measure Your Pet Accurately
Do not guess. Measure your pet’s shoulder height (withers) and add 2 inches for clearance. For width, measure the widest part of the chest and add 1 inch. Example: A 20-inch tall Beagle needs a flap opening at least 22 inches high. Mark this dimension on the door, positioning the bottom of the opening at least 3 inches above the lowest panel seam to avoid structural weakness.
Step 2: Create and Secure the Template
Use the manufacturer’s paper template included in your kit. Center it horizontally on the chosen panel. Use clamps to hold it flush—tape alone often shifts during drilling. Double-check levelness diagonally; even a ¼-inch tilt causes flap binding over time.
Step 3: Drill Starter Holes
At each corner of the marked rectangle, drill a ½-inch hole completely through the door. These holes allow your jigsaw blade to enter without plunging into the material, which reduces splintering and blade deflection. For steel doors, apply cutting oil to reduce friction and heat buildup.
Step 4: Cut the Opening
Insert the jigsaw blade into a starter hole. Cut slowly along the outer edge of the marked line—not inside it. Let the tool do the work; forcing causes jagged edges. For insulated steel doors, expect resistance as you pass through the foam core. Vacuum debris immediately to prevent track jamming later.
Step 5: Test Fit and Dry Assemble
Insert the pet door frame without screws. Check for gaps exceeding 1/16 inch. If the fit is tight, sand edges lightly. Never force the frame, as this warps the flap mechanism. Reconnect the opener temporarily to test door balance; if the modified panel feels heavier, consider adding counterweight adjustments per manufacturer specs.
Step 6: Seal and Secure Permanently
Apply a continuous bead of exterior silicone sealant around the entire cutout edge. Insert the frame, then install mounting screws hand-tight first. Tighten in a star pattern (top-left, bottom-right, top-right, bottom-left) to distribute pressure evenly. Wipe excess sealant immediately. Allow 24 hours cure time before exposing to rain or extreme temperatures.
Step 7: Weatherproofing Final Checks
Install the provided weatherstripping gasket between frame halves. Test the flap swing—it should close fully without sticking. Apply a second sealant bead around the exterior frame perimeter where it meets the door skin. This double-seal method prevents water infiltration during wind-driven storms common in many US regions.
How Do I Maintain My Garage Pet Door?
Installation is only half the battle. Regular maintenance extends lifespan and preserves energy efficiency.
- Monthly: Inspect weatherstripping for cracks or compression. Replace if flattened beyond 50% thickness.
- Quarterly: Lubricate hinge pins with silicone spray (never petroleum-based grease, which attracts dirt). Clean flap surfaces with mild soap to maintain transparency and flexibility.
- Annually: Reapply exterior sealant if peeling occurs. Check screw tightness; vibration from door operation loosens fasteners over time.
- Seasonal: Before winter, verify flap seals completely. In summer, ensure UV exposure hasn’t brittle-plasticized components.
Frequently Asked Questions About Garage Pet Doors
Will installing a pet door void my garage door warranty?
Most manufacturers state that unauthorized modifications void coverage on the affected panel only—not the entire system. Document pre-installation condition with photos. Some brands offer approved pet door kits that preserve warranty; check your model number against manufacturer guidelines before cutting.
How do I prevent intruders from using the pet door?
Choose models with electronic locking collars that only open for your pet’s RFID tag. Alternatively, install a manual slide-lock for nighttime security. Position the door away from ground-level windows or landscaping that provides concealment. Smart pet doors now integrate with home security systems for real-time alerts.
Can I install a pet door in an insulated garage door without losing efficiency?
Yes, if done correctly. Select pet doors rated for insulated applications with dual-flap designs and magnetic seals. The key is sealing the cut edge of the foam core with expanding foam or specialized edge tape before frame installation. Properly installed units lose less than 2% of the panel’s original R-value.
What size pet door do I need for multiple pets?
Size for your largest pet, then verify your smallest pet can comfortably operate the flap weight. For significant size differences (e.g., Great Dane and Chihuahua), consider two separate entries or an adjustable-height model. Never oversize excessively, as larger openings increase energy loss and security risks disproportionately.
Is professional installation worth the cost?
For standard sectional doors, DIY is feasible for intermediate skill levels ($50-$150 materials). However, hire professionals for custom wood doors, high-R-value insulated systems, or if your door has torsion springs requiring adjustment post-modification. Professional installs typically run $200-$400 but include warranty protection and code compliance verification.
How high should the pet door be placed on the garage door?
Bottom of opening should sit 3-6 inches above the lowest panel seam AND clear of the bottom weather seal. For aging pets, lower placement reduces joint strain, but never sacrifice structural integrity. Consult your door’s engineering diagram for safe zones; some reinforced panels have designated modification areas.
Conclusion
Learning how to install a pet door in a garage door empowers you to enhance your pet’s independence while maintaining your home’s security and energy performance. By selecting appropriate materials, following precise measurement protocols, and committing to ongoing maintenance, you create a durable solution that serves both family and furry members for years. Remember: patience during installation prevents costly repairs later, and proper sealing is non-negotiable for US climate extremes.
Loved this guide? Share it with fellow pet parents on Facebook, Pinterest, or Nextdoor who are tackling similar projects! Tag us in your installation photos—we’d love to celebrate your success and help troubleshoot any challenges. Your pet’s newfound freedom starts with one careful cut; make it count. 🐾
Leave a Reply