Introduction
There are few things more frustrating than pressing your remote and hearing a terrible grinding noise instead of seeing your garage door open. A derailed door leaves your vehicle trapped and your home insecure, creating an immediate need for a solution. If you are searching for how to get the garage door back on the track, this comprehensive guide will walk you through safe, effective troubleshooting steps to restore normal function without unnecessary panic.
Why Did My Garage Door Come Off The Track?
Before attempting any repair, understanding the root cause is essential for preventing future failures and ensuring safety. Garage doors typically derail due to misaligned tracks, worn rollers, broken cables, or impact damage from vehicles. According to industry data, lack of lubrication and loose hardware account for nearly 60% of residential garage door malfunctions. Identifying the specific trigger helps determine whether a simple realignment suffices or if professional intervention is required.
Common Causes at a Glance
| Cause | Symptom | DIY Fixable? |
|---|---|---|
| Loose Track Bolts | Visible gap between track and bracket | Yes |
| Worn Rollers | Chipping, cracking, or loud squeaking | Yes |
| Bent Track | Visible dent or warp in metal rail | No (Replace) |
| Broken Cable | Door hangs unevenly or slams shut | No (Dangerous) |
| Obstruction Debris | Door stops mid-cycle or jerks | Yes |
Note: If a torsion spring or lift cable is broken, do not attempt a DIY fix. These components store immense kinetic energy and can cause severe injury.
Safety First: Critical Precautions Before Starting
Garage doors are heavy mechanical systems under significant tension. Prioritizing safety prevents life-altering injuries during the repair process. Always disconnect the automatic opener by pulling the emergency release cord and unplugging the unit before touching any hardware. Wear heavy-duty work gloves and safety goggles to protect against sharp metal edges and debris. Never place fingers near roller joints or hinge points while moving the door manually. For detailed mechanical principles behind these safety protocols, refer to the Garage Door Wikipedia Entry, which outlines standard engineering specifications and hazard warnings recognized globally.
Step-by-Step: How To Get The Garage Door Back On The Track
Follow this precise tutorial to safely realign a derailed residential garage door. This method applies to standard sectional steel or aluminum doors with side-mounted vertical tracks.
1. Secure the Area and Disconnect Power
Unplug the garage door opener and lock it out to prevent accidental activation. Close the door manually as far as possible without forcing it. Place C-clamps or locking pliers on the track below the bottom roller on the side that is still aligned. This prevents the door from sliding down unexpectedly while you work. Ensure no children or pets are within 10 feet of the workspace.
2. Inspect and Clean the Track System
Use a flashlight to examine the entire length of both vertical and horizontal tracks. Remove any debris, rust flakes, or hardened grease using a wire brush and shop vacuum. Check for dents or bends; even a 3mm deformation can prevent proper roller seating. Tighten all track mounting brackets with a socket wrench, but do not fully torque them yet—leave slight adjustability for alignment. Verify that the track gauge (distance between inner rails) matches manufacturer specs, typically 48–52 inches for standard single-car doors.
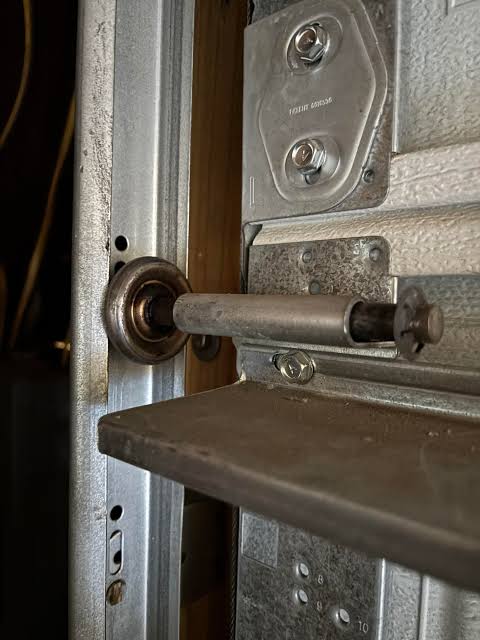
3. Reposition the Derailed Rollers
Gently lift the door section near the derailed roller just enough to relieve pressure. Use a rubber mallet to tap the roller back into the track channel, working from the top downward. If the roller is damaged, replace it immediately with an identical nylon or steel model. Never force a roller; excessive pressure indicates underlying misalignment. Once seated, test movement by hand-lifting the door 6–12 inches to confirm smooth travel without binding.
4. Realign and Secure the Tracks
With rollers repositioned, use a level to verify vertical tracks are perfectly plumb (90° to floor). Adjust bracket positions incrementally, tightening bolts only after achieving true alignment. Horizontal tracks should have a consistent ¼-inch upward slope toward the rear wall to assist closing momentum. Torque all fasteners to manufacturer specifications (usually 25–30 ft-lbs for ⅜” bolts). Double-check clearance: rollers should move freely with 1/16–1/8 inch lateral play, never rubbing against track edges.
5. Test Manually Before Reconnecting Opener
Remove C-clamps and operate the door entirely by hand through three full cycles. Listen for grinding, popping, or hesitation. The door should lift smoothly with minimal effort (under 15 lbs of force for balanced systems). If resistance exceeds this threshold, recheck alignment and roller condition. Only after flawless manual operation should you reconnect the opener and test automatic function at low speed initially.
When To Call A Professional Instead Of DIY
Not every derailment is suitable for homeowner repair. Recognizing red flags saves time, money, and potential harm. Contact a certified technician if you observe bent tracks requiring replacement, broken torsion springs or cables, persistent imbalance after realignment, or electrical opener malfunctions. Professional service averages $150–$350 for track realignment but prevents catastrophic failure risks. Investing in expert help is prudent when structural integrity is compromised or when multiple components show wear beyond simple adjustment.
Preventive Maintenance To Avoid Future Derailments
Consistent upkeep dramatically reduces derailment frequency and extends system lifespan. Lubricate rollers, hinges, and bearings quarterly with silicone-based spray (never WD-40, which attracts grime). Inspect track bolts biannually and retighten as needed. Replace nylon rollers every 7–10 years and steel rollers every 15–20 years regardless of visible wear. Keep tracks clean and free of obstructions year-round. Schedule annual professional inspections to catch subtle issues before they escalate. Documenting maintenance dates creates a valuable record for warranty claims and future homeowners.
Frequently Asked Questions About Garage Door Track Repair
Can I use WD-40 to lubricate my garage door track?
No. WD-40 is a solvent and degreaser, not a lubricant. It strips existing grease and attracts dust, accelerating wear. Use white lithium grease or silicone spray specifically formulated for garage doors. Apply sparingly to roller stems and hinge pivots only—not directly inside the track channel where it collects debris.
How much does professional track realignment cost?
National averages range from $150 to $350 for labor and minor parts. Complex jobs involving track replacement or spring adjustments may reach $500+. Obtain three written estimates and verify contractor licensing and insurance. Avoid quotes significantly below market rate, as they often indicate unqualified technicians or hidden fees.
Is it safe to drive my car out while the door is partially derailed?
Absolutely not. A derailed door can collapse suddenly without warning, causing severe property damage or personal injury. Even if the opening appears wide enough, structural instability makes passage hazardous. Always complete repairs or call emergency service before attempting vehicle egress.
How long does DIY track realignment take?
Experienced homeowners typically complete basic realignment in 60–90 minutes. First-timers should allocate 2–3 hours including inspection, cleaning, and testing. Rushing increases error risk. Work methodically, document each step, and pause if uncertainty arises. Patience ensures lasting results over quick fixes.
What tools do I need for this repair?
Essential tools include adjustable wrenches (8–19mm), socket set, rubber mallet, level, C-clamps, flashlight, wire brush, shop vacuum, and safety gear. Specialty items like roller pullers or track benders are rarely needed for standard realignment. Invest in quality tools; cheap alternatives slip easily and damage fasteners. Borrow or rent specialized equipment rather than purchasing for one-time use.
Why does my door keep coming off track after fixing it?
Recurring derailments signal unresolved underlying issues. Common culprits include improperly tensioned springs, worn drum bearings, incorrect track pitch, or foundation settlement shifting the door frame. Superficial fixes mask deeper problems. Comprehensive diagnosis requires professional assessment of the entire counterbalance system. Addressing root causes prevents cyclical repairs and ensures reliable long-term operation.
Conclusion: Restore Safety And Function With Confidence
Learning how to get the garage door back on the track empowers homeowners to resolve common issues safely while recognizing when professional expertise is non-negotiable. By following systematic inspection, precise realignment, and rigorous testing protocols, you restore security and convenience without compromising safety. Remember that preventive maintenance is far more cost-effective than reactive repairs. Regular care preserves your investment and provides peace of mind for years to come.
If this guide helped you regain control of your garage door, please share it on social media to assist fellow homeowners facing similar challenges. Tag friends who might benefit from these safety-first repair strategies. Together, we build safer, smarter homes—one properly functioning garage door at a time. Your proactive approach today prevents tomorrow’s emergencies. Stay safe, stay informed, and keep those doors rolling smoothly!
Leave a Reply