Introduction
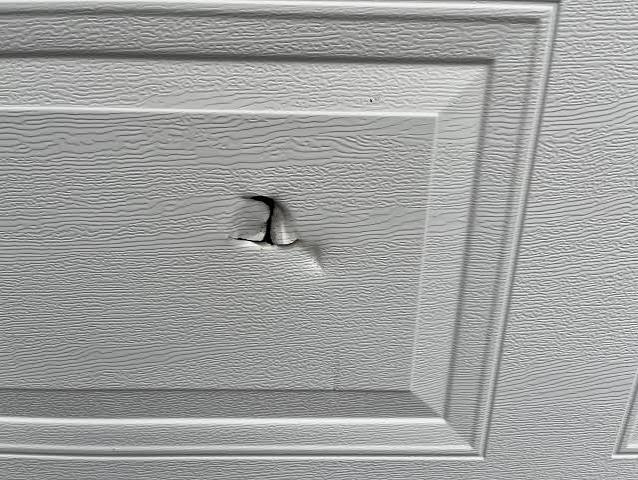
Discovering a dent or puncture in your garage can be stressful, but learning how to fix a hole in a garage door is easier than you might think. Whether caused by an accidental bicycle bump, a stray baseball, or harsh weather debris, addressing it promptly protects your home’s security, insulation, and curb appeal. This friendly, step-by-step guide will walk you through the exact materials and methods needed for a flawless, budget-friendly repair.
How To Fix A Hole In A Garage Door: Assessing the Damage
Before grabbing your tools, it is crucial to evaluate the extent of the damage. Not all holes are created equal, and the repair method depends heavily on the door’s material and the size of the puncture.
- Small Holes (Under 2 inches): These are ideal for DIY repairs using automotive body filler and a mesh patch.
- Medium Holes (2 to 4 inches): These require a more rigid backing, such as an aluminum sheet, secured with rivets or heavy-duty epoxy before applying filler.
- Large Holes (Over 4 inches) or Structural Damage: If the hole compromises the panel’s structural integrity or is located near the hinges and rollers, it is highly recommended to replace the entire panel or consult a professional.
Safety First: Always disconnect your garage door opener and ensure the door is fully closed and locked in place before beginning any repair. Wear safety goggles and heavy-duty gloves to protect yourself from sharp metal edges.
Tools and Materials You Will Need
Gathering the right supplies beforehand ensures a smooth, uninterrupted workflow. For a standard steel or aluminum garage door, you will need:
- Cleaning Supplies: Rubbing alcohol (isopropyl alcohol, 70% or higher) and clean, lint-free microfiber cloths.
- Abrasive Tools: 220-grit and 320-grit sandpaper, or a small orbital sander.
- Patching Material: Self-adhesive aluminum fiberglass mesh patch (cut at least 1 inch larger than the hole on all sides).
- Filler: High-quality, two-part automotive body filler (e.g., Bondo) and a hardener.
- Application Tools: Flexible plastic putty knife, mixing board, and a stirring stick.
- Finishing Supplies: Automotive-grade primer, matching exterior paint (check your door’s RAL color code), and a small foam roller or brush.
Step-by-Step Guide to Patching a Steel or Aluminum Garage Door
Follow these concrete, expert-approved steps to achieve a professional-looking finish.
Step 1: Clean the Affected Area
Thoroughly clean the damaged panel and the surrounding 3-inch radius. Wipe it down with rubbing alcohol to remove dirt, grease, and oxidation. Allow it to air dry for exactly 5 minutes to ensure a pristine bonding surface.
Step 2: Sand the Edges
Using 220-grit sandpaper, lightly sand the area around the hole. Extend your sanding about 1 inch beyond the visible damage. This creates a “feathered” edge, allowing the body filler to adhere seamlessly without creating a visible bump later. Wipe away the dust with a damp cloth and let it dry.
Step 3: Apply the Mesh Patch
Cut your self-adhesive aluminum mesh patch so it extends at least 1 inch beyond the hole in every direction. Peel off the backing and press it firmly over the hole. Use the edge of your putty knife to burnish the patch, ensuring it is completely flat against the door panel.
Step 4: Mix and Apply the Body Filler
On your mixing board, squeeze out a golf-ball-sized amount of body filler. Add the hardener at a strict 1:1 ratio (or as specified by the manufacturer). Mix them thoroughly for 30 seconds until the color is completely uniform.
Pro Tip: Work quickly, as the mixture will begin to cure in about 3 to 5 minutes. Apply the filler over the patch using your putty knife, pressing firmly to force it through the mesh. Smooth it out, leaving it slightly raised (about 1/16 inch) above the surface to account for shrinkage during curing.
Step 5: Let it Cure and Sand Smooth
Allow the filler to cure for 20 to 30 minutes at a room temperature of 22–28°C (72–82°F). If your garage is colder or more humid, extend this time to 45 minutes. Once rock-hard, use 320-grit sandpaper to sand the patch flush with the surrounding door panel. Run your hand over it; if you can feel a ridge, keep sanding until it is perfectly smooth.
Step 6: Prime and Paint
Wipe away all sanding dust. Apply a thin, even coat of automotive-grade primer over the repaired area. Let it dry for 1 hour. Finally, apply two light coats of your matched exterior paint, allowing 30 minutes of drying time between coats.
Wood and Fiberglass Garage Door Repairs: Key Differences
While the steps above work perfectly for metal doors, other materials require slight adjustments:
- Wooden Garage Doors: For small holes or rot, use a two-part wood epoxy filler instead of automotive body filler. Apply it with a putty knife, let it cure for 2 hours, and sand it smooth. For larger holes, you may need to cut out the damaged section and splice in a new piece of matching wood.
- Fiberglass Garage Doors: Use a dedicated fiberglass repair kit. This involves applying a fiberglass resin and cloth patch. The resin must cure for at least 2 hours before sanding, as it remains slightly flexible to match the door’s natural movement.
Pros and Cons: DIY vs. Professional Garage Door Repair
| Feature | DIY Repair | Professional Repair |
|---|---|---|
| Cost | Low ($20 – $50 for materials) | High ($150 – $350+ per panel) |
| Time | 2 – 3 hours (plus drying time) | 1 – 2 hours (same-day service) |
| Skill Level | Beginner to Intermediate | Expert / Certified Technician |
| Finish Quality | Good (with careful sanding/painting) | Flawless / Factory-match guaranteed |
| Warranty | None | Usually 1-year labor warranty |
Verdict: If the hole is small and on a flat section of a steel door, DIY is highly rewarding and cost-effective. For large, complex, or structurally critical damage, hiring a pro is the safer investment.
Expert Insight and Industry Data
Addressing minor damage promptly is not just about aesthetics; it is a critical maintenance practice. According to the International Door Association (IDA), regular maintenance and prompt minor repairs can extend a garage door’s operational lifespan by up to 30%, while also preventing minor issues from escalating into costly spring or track failures.
Understanding the basic mechanics of a garage door, including its spring tension and panel structure, is crucial before starting any repair. You can read more about the general construction, materials, and history of residential garage doors on Wikipedia’s Garage Door page to better understand how your specific door functions.
Frequently Asked Questions (FAQ)
Q1: Can I use duct tape to fix a hole in my garage door?
Answer: While duct tape can serve as a very temporary, emergency patch to keep rain or pests out, it is not a viable long-term solution. Tape will peel due to temperature fluctuations, leave a sticky residue, and does nothing to restore the door’s structural integrity or insulation.
Q2: How much does it cost to fix a hole in a garage door?
Answer: A DIY repair typically costs between $20 and $50, covering the price of sandpaper, mesh patch, body filler, and touch-up paint. If you hire a professional to replace a single damaged panel, expect to pay between $150 and $350, depending on the door’s material and brand.
Q3: Will fixing a hole improve my garage’s insulation?
Answer: Absolutely. Even a small hole compromises the thermal envelope of your garage, allowing cold drafts, moisture, and pests to enter. Properly sealing the hole restores the panel’s insulating properties, which can help stabilize temperatures in attached garages.
Q4: Can I fix a hole if it is located on a curved or stamped panel?
Answer: Yes, but it requires extra care. You must use a flexible aluminum mesh patch that can conform to the curve. When applying the body filler, use a flexible plastic spreader rather than a rigid metal putty knife to mimic the door’s natural contour.
Q5: How long does the body filler take to dry completely?
Answer: Under ideal conditions (22–28°C with low humidity), standard automotive body filler will set in 20 to 30 minutes. However, it is best to wait at least 1 hour before sanding to ensure it has reached maximum hardness, preventing it from gumming up your sandpaper.
Conclusion
Learning how to fix a hole in a garage door empowers you to protect your home, improve energy efficiency, and maintain your property’s value without breaking the bank. By following this step-by-step guide, assessing the damage accurately, and using the right materials, you can achieve a seamless, durable repair that looks professionally done.
Don’t let a small hole become a big problem. Gather your tools, take your time, and enjoy the satisfaction of a job well done!
Found this guide helpful? Share it with your friends and neighbors on Facebook, Twitter, or Pinterest to help them tackle their own DIY home maintenance projects!
Leave a Reply