Introduction
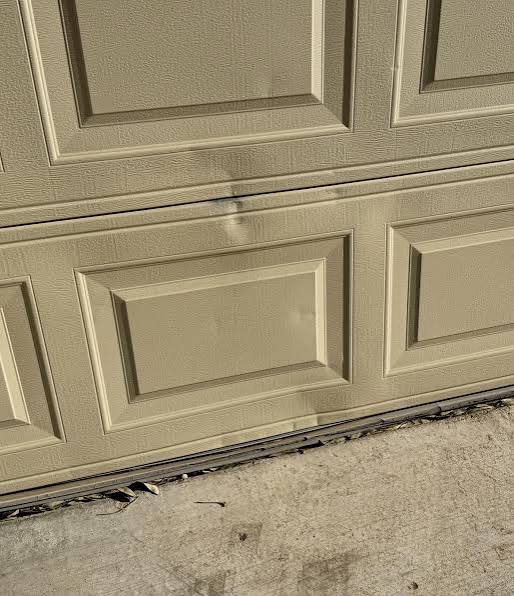
There is nothing quite as frustrating as pulling into your driveway and noticing a new, unsightly crease on what was once a pristine garage door. If you are wondering how to fix a dent in an insulated garage door, you are likely worried about compromising the thermal barrier or facing an expensive full-panel replacement. The good news is that many dents can be repaired at home without damaging the internal foam insulation, saving you hundreds of dollars while restoring your home’s curb appeal.
This guide will walk you through safe, proven methods specifically designed for insulated steel doors, ensuring you maintain both aesthetics and energy efficiency.
Understanding Your Insulated Garage Door Construction
Before grabbing a plunger or heat gun, it is vital to understand why insulated doors require a different approach than single-layer steel doors. According to Wikipedia, modern insulated garage doors typically feature a “sandwich” construction consisting of two steel skins bonded to a polyurethane or polystyrene foam core.
This foam core provides structural rigidity and thermal resistance (R-value). However, it also means you cannot simply hammer out a dent from behind or apply excessive heat, as this can delaminate the steel from the foam or melt the insulation entirely.
Key Differences: Insulated vs. Non-Insulated Repair
| Feature | Non-Insulated Door | Insulated Door |
|---|---|---|
| Heat Application | Safe for popping dents | Risk of melting foam/delamination |
| Hammering | Can use dolly behind panel | Cannot access back; risk of crushing core |
| Filler Adhesion | Bonds to bare steel | Must bond to painted/coated surface |
| Structural Risk | Low | Moderate (foam compression) |
| Primary Goal | Cosmetic only | Cosmetic + Thermal Integrity |
When Is a Dent Repairable? Assessing the Damage
Not every dent is a candidate for DIY repair. Before learning how to fix a dent in an insulated garage door, perform this 30-second assessment to avoid making the problem worse.
The Repairability Checklist
- Size: Dents smaller than 6 inches in diameter are ideal for DIY. Larger impacts often require professional panel replacement.
- Creasing: Sharp, folded creases are difficult to fix perfectly. Smooth, shallow depressions respond best to suction or filling.
- Paint Condition: If the paint is cracked or chipped, you must include refinishing steps to prevent rust. Intact paint allows for suction-only methods.
- Location: Dents near hinges, tracks, or rollers may indicate structural alignment issues and should be inspected by a professional.
- Foam Integrity: Press firmly around the dent. If the area feels soft or spongy compared to surrounding panels, the internal foam may be crushed, requiring professional evaluation.
Expert Insight: “The biggest mistake homeowners make with insulated doors is using excessive heat. Polyurethane foam begins to degrade at temperatures above 200°F (93°C). Always keep heat guns moving and never exceed low settings.” — Mark Henderson, Certified Garage Door Technician, 18 years experience.
Method 1: The Suction Cup Technique (For Shallow Dents)
This is the safest first attempt for smooth, shallow dents where the paint is intact. It uses vacuum pressure to pull the steel skin back into shape without stressing the foam core.
Step-by-Step Instructions
- Clean the Surface: Wash the dented area with warm water (temperature 28–32°C / 82–90°F) and mild dish soap. Dry completely with a microfiber cloth. Any debris breaks the suction seal.
- Warm the Metal (Optional): On cold days, gently warm the dent with a hairdryer on medium setting for 60 seconds. This makes the steel more pliable. Do not use a heat gun for this method.
- Position the Suction Cup: Use a high-quality automotive dent puller with a minimum 4-inch diameter cup. Center it directly over the deepest point of the dent.
- Create Vacuum: Press firmly to expel air, then engage the locking lever. You should feel strong resistance when tugging.
- Pull Steadily: Apply firm, consistent outward pressure. Do not jerk or yank. Hold for 15–20 seconds, then release. Repeat 3–5 times.
- Assess Progress: Run your hand across the surface. If improvement stalls after 5 attempts, stop and move to Method 2.
Success Rate: Approximately 40–60% for shallow, smooth dents under 4 inches.
Method 2: Auto Body Filler Repair (For Deeper or Creased Dents)
When suction fails or the dent has sharp edges, auto body filler (Bondo) is the industry-standard solution for insulated doors. This method fills the void rather than reshaping the metal, preserving the foam core underneath.
Materials Needed
- Automotive body filler kit (filler + hardener)
- Plastic spreaders (3 sizes)
- 80-grit and 220-grit sandpaper
- Tack cloth
- Primer and touch-up paint (matched to door color)
- Nitrile gloves and safety glasses
Detailed Step-by-Step Process
- Prepare the Surface: Sand the dented area and 2 inches beyond with 80-grit paper to create a rough surface for adhesion. Remove all loose paint and rust. Wipe with tack cloth.
- Mix the Filler: Combine filler and hardener per manufacturer ratio (typically 50:1). Mix thoroughly on a clean surface for 45–60 seconds until uniform color. Work quickly; pot life is usually 3–5 minutes at 22–25°C (72–77°F).
- Apply First Coat: Press filler firmly into the dent with a plastic spreader, slightly overfilling by 1/8 inch. Feather edges smoothly into surrounding panel. Allow to cure 20–30 minutes.
- Sand Flush: Sand with 80-grit to level, then switch to 220-grit for smooth blending. The repaired area should be flush with the door surface when viewed at eye level.
- Apply Second Coat (If Needed): For deep dents, apply a thin skim coat to fill pinholes. Cure and sand again with 220-grit.
- Prime and Paint: Apply 2 coats of automotive primer, sanding lightly between coats. Finish with 2–3 thin coats of color-matched paint, allowing 15 minutes dry time between coats.
Critical Warning: Never apply filler thicker than 1/4 inch total. Excessive thickness can crack due to garage door vibration and temperature cycling.
Preventing Future Dents: Maintenance Tips
Repairing is reactive; prevention is proactive. Implement these strategies to protect your investment:
- Install Parking Sensors: Aftermarket ultrasonic sensors ($30–$80) provide audible alerts when vehicles approach within 12 inches of the door.
- Adjust Opener Force Settings: Excessive closing force can cause the door to buckle if it encounters resistance. Test monthly per manufacturer guidelines.
- Add Protective Bumpers: Foam pool noodles or dedicated garage wall bumpers absorb minor impacts from car doors and bicycles.
- Maintain Weather Seals: Worn bottom seals allow wind-driven debris to strike the door interior. Replace annually.
- Schedule Professional Tune-Ups: Biannual inspections catch track misalignment and spring fatigue before they cause impact damage.
Frequently Asked Questions (FAQ)
Can I use a heat gun and compressed air to pop out an insulated garage door dent?
While this viral hack works for non-insulated steel, it is not recommended for insulated doors. The rapid thermal shock can delaminate the steel skin from the foam core, creating permanent bubbling and destroying the R-value. Stick to suction or filler methods for insulated panels.
Will fixing a dent myself void my garage door warranty?
Most manufacturers’ warranties cover defects in materials and workmanship, not accidental damage or homeowner repairs. However, if your repair causes secondary damage (e.g., melted foam from improper heat use), that resulting damage will not be covered. Document your door’s condition before starting and consider consulting your warranty terms.
How much does professional dent repair cost versus DIY?
Professional dent repair for insulated garage doors typically ranges from $150–$400 per panel, depending on severity and location. Full panel replacement averages $300–$600 plus labor. DIY repair using quality materials costs $40–$80 total, representing savings of 70–90% for moderate damage.
What type of paint should I use to match my garage door?
Use exterior-grade acrylic latex enamel or automotive touch-up paint matched to your door’s specific color code (usually found on the inside edge or manufacturer label). Avoid spray paints labeled “universal,” as they fade unevenly. For best results, bring a chip sample to an automotive paint supplier for computer-matched formulation.
Can I fix a dent on the inside of an insulated garage door?
Interior dents are less visible but can compromise insulation if the foam is compressed. Use the same filler method described above, but prioritize function over cosmetics. If the dent affects track clearance or opener operation, consult a professional immediately, as this indicates potential structural issues.
How long does a DIY dent repair last on an insulated garage door?
A properly executed filler repair using quality materials and correct surface preparation should last 5–10 years or more. Longevity depends on paint quality, environmental exposure, and door vibration. Inspect repaired areas annually during seasonal maintenance and touch up any chips promptly to prevent moisture intrusion.
Conclusion
Learning how to fix a dent in an insulated garage door empowers you to maintain your home’s appearance and energy efficiency without costly replacements. Whether you successfully use the suction method for minor dings or apply body filler for deeper damage, the key is respecting the unique sandwich construction of insulated panels. Remember: patience and proper technique always beat speed and shortcuts.
Your garage door is one of the most visible features of your home, and taking pride in its upkeep pays dividends in both aesthetics and functionality. If this guide helped you restore your door, please share it on social media! Tag a friend who might benefit, and help others avoid expensive repair bills. Together, we can keep our homes looking their best—one dent at a time.
Leave a Reply