Have you ever woken up to the sound of a loud bang from your garage, only to find your door stuck halfway open? It is a frustrating and potentially dangerous situation that leaves many homeowners feeling helpless. If you are staring at a snapped coil and wondering how to determine what garage door spring I need, you are not alone. Identifying the correct replacement part is critical for both the functionality of your door and the safety of your home.
In this guide, we will walk you through the exact steps to identify your spring type, measure it accurately, and choose the right replacement. We will cut through the technical jargon and provide you with actionable advice backed by industry standards.
Why Identifying the Right Spring Matters
Before we dive into the measurements, it is essential to understand why precision is non-negotiable. Garage door springs are under extreme tension. Using the wrong spring can lead to immediate failure, damage to your garage door opener, or even severe personal injury.
According to industry data, garage door springs typically last between 10,000 to 20,000 cycles (one cycle equals one opening and closing). If you have a family of four using the door twice a day, your springs may only last 3–5 years. Replacing them with the incorrect specification reduces this lifespan significantly and puts undue stress on other components like cables and rollers.
Step 1: Identify Your Spring Type
The first step in learning how to determine what garage door spring I need is recognizing which system your door uses. There are two main types: Torsion Springs and Extension Springs.
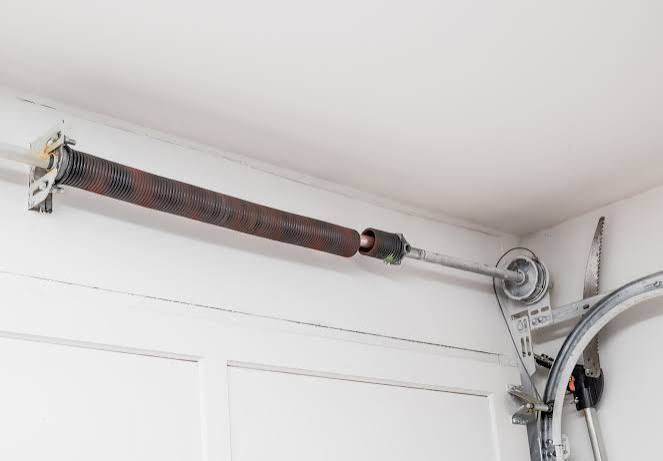
Torsion Springs
These are mounted horizontally above the closed garage door on a metal shaft. They twist (torque) to lift the door.
- Location: Above the door opening.
- Appearance: One or two tightly wound coils on a central bar.
- Common Use: Heavier doors, double-car garages, and modern installations.
Extension Springs
These run parallel to the horizontal tracks on both sides of the door. They stretch to provide lifting force.
- Location: Alongside the upper horizontal tracks.
- Appearance: Long coils with pulleys and cables at the ends.
- Common Use: Lighter doors, single-car garages, and older homes.
Safety Note: Torsion springs are generally considered safer and more durable than extension springs. If you are unsure, look for a safety cable running through extension springs; if it’s missing, exercise extreme caution.
Step 2: Measure Your Spring Accurately
Once you know the type, you must take precise measurements. Do not rely on visual estimates. Even a small discrepancy can cause the door to operate poorly.
For Torsion Springs
You need three specific measurements. Grab a tape measure and follow these steps:
- Wire Size: This is the thickness of the steel wire. Common sizes include 0.207″, 0.218″, 0.225″, and 0.250″. Use a caliper for accuracy if possible, as standard tape measures may not be precise enough for decimal points.
- Inside Diameter (ID): Measure the inside width of the coil. Standard sizes are usually 1.75″, 2.0″, or 2.25″. Measure across the center of the spring, not the outer edge.
- Length: Measure the length of the spring itself, excluding the cones (the pointed ends). Common lengths range from 18″ to 36″.
| Measurement | Tool Needed | Common Values |
|---|---|---|
| Wire Size | Caliper/Tape | 0.207″ – 0.250″ |
| Inside Diameter | Tape Measure | 1.75″ – 2.25″ |
| Length | Tape Measure | 18″ – 36″ |
For Extension Springs
Extension springs require slightly different metrics:
- Length: Measure the length of the spring when the door is closed. Do not stretch it to measure.
- Outside Diameter: Measure the width of the coil from outer edge to outer edge.
- Weight Capacity: This is often printed on the spring itself (e.g., “200 lbs”). If not, you may need to weigh your door sections or consult the manufacturer’s manual.
Step 3: Determine the Wind Direction (Torsion Only)
If you have torsion springs, you must identify the winding direction. This is crucial because springs are manufactured specifically for left-hand or right-hand winding.
- Right-Wound: The coils wrap clockwise. These are typically installed on the left side of the door (when facing the door from outside).
- Left-Wound: The coils wrap counter-clockwise. These are typically installed on the right side.
Pro Tip: Look at the end of the spring. If the coil moves away from you to the right, it is right-wound. If it moves to the left, it is left-wound. Installing the wrong wind direction will prevent the spring from seating correctly on the cone.
Step 4: Calculate the Required Weight Capacity
Knowing the physical dimensions is only half the battle. You must also match the spring’s lifting power to your door’s weight.
How to Weigh Your Garage Door
- Disconnect the garage door opener by pulling the release cord.
- Lift the door manually until it is about halfway open.
- Let go. If the door stays in place, the current springs are balanced. If it falls, the springs are too weak. If it rises, they are too strong.
- For a precise measurement, use a bathroom scale. Place the scale under the bottom section of the door while it is closed and slowly lift until the scale reads the weight. Alternatively, consult your door’s manual, which often lists the total weight.
Matching Cycles to Usage
Springs come in different cycle ratings (e.g., 10,000, 15,000, or 25,000 cycles).
- Standard Residential: 10,000 cycles are sufficient for average use.
- High-Use Households: If you use the door frequently, opt for 15,000+ cycles. While more expensive, they last longer and provide better long-term value.
For more detailed technical specifications on spring mechanics, you can refer to general engineering principles on Wikipedia.
Torsion vs. Extension: Which Should You Choose?
If you are replacing an entire system or upgrading, consider the differences below:
| Feature | Torsion Springs | Extension Springs |
|---|---|---|
| Lifespan | Longer (15k–25k cycles) | Shorter (10k cycles) |
| Safety | Higher (contained in tube) | Lower (can snap violently) |
| Smoothness | Very smooth operation | Can be jerky |
| Cost | Higher initial cost | Lower initial cost |
| Space | Requires headroom above door | Requires side clearance |
Most professionals recommend torsion springs for their durability and safety features. However, if your current setup uses extension springs and you are on a budget, you can replace them with identical specs.
Common Mistakes to Avoid
When figuring out how to determine what garage door spring I need, homeowners often make these errors:
- Measuring the Outer Diameter: Always measure the inside diameter for torsion springs. Measuring the outside will give you a false reading.
- Ignoring the Cones: Do not include the length of the winding cones in your total length measurement.
- Guessing the Wire Size: A difference of 0.001 inches can change the lifting capacity significantly. Use a caliper if you have one.
- Replacing Only One Spring: If you have two torsion springs and one breaks, replace both. The second spring is likely near the end of its life as well, and mismatched springs can cause uneven lifting.
FAQ Section
1. Can I replace garage door springs myself?
While it is physically possible, it is highly discouraged for torsion springs due to the high tension involved. Improper handling can cause serious injury or death. Extension springs are safer but still require caution. If you are not experienced, hire a professional.
2. How do I know if my garage door spring is broken?
Signs include a loud bang, the door being crooked, the opener struggling to lift the door, or visible gaps in the coils. If the door feels extremely heavy when lifted manually, the spring has likely lost its tension or snapped.
3. What is the average cost of replacing a garage door spring?
Professional replacement typically costs between $150 and $350, depending on the type of spring and your location. DIY costs are lower ($50–$100 for parts) but come with significant safety risks.
4. Do I need to lubricate my new springs?
Yes. Use a silicone-based lubricant or a specialized garage door spray. Avoid WD-40 as it can attract dust and grime. Lubricating your springs every six months can extend their lifespan.
5. Can I use a stronger spring than recommended?
No. Using a spring with higher lifting capacity than your door requires can damage the opener, bend the tracks, and create a hazardous situation where the door slams shut unexpectedly. Always match the specifications exactly.
Conclusion
Learning how to determine what garage door spring I need is a valuable skill that can save you time and prevent costly mistakes. By identifying your spring type, taking precise measurements of wire size, diameter, and length, and understanding your door’s weight requirements, you can ensure a smooth and safe replacement process.
Remember, safety should always be your top priority. If you feel uncertain at any step, do not hesitate to call a certified technician. A properly balanced garage door not only lasts longer but also protects your vehicle and your home.
Did you find this guide helpful? Share it with your neighbors or on social media to help others tackle their garage door woes safely!
Leave a Reply