Introduction
There are few things more frustrating than fumbling for a plastic remote while sitting in your driveway during a rainstorm or freezing winter. If you have been searching for how to connect your garage door opener to your car, you are looking for the convenience of seamless, button-press entry without cluttering your keychain. Modern vehicles offer integrated solutions that not only improve daily comfort but also enhance home security through encrypted rolling-code technology. This guide will walk you through every method available, from built-in HomeLink systems to universal visor clips, ensuring you get connected safely and correctly on the first try.
Understanding Your Vehicle’s Compatibility
Before attempting any programming, it is vital to identify which system your vehicle uses. Not all cars communicate with garage openers in the same way, and misidentifying your system can lead to hours of unnecessary frustration.
Built-In Systems vs. Universal Remotes
Most vehicles manufactured after 2005 come equipped with an integrated transmitter system. The most common industry standard is HomeLink, found in over 90% of new vehicles sold in North America. Some brands use proprietary systems like Car2U or XpressKit. Conversely, older vehicles or base models may require a universal visor-mounted remote.
| Feature | Integrated System (HomeLink) | Universal Visor Remote | Smartphone App |
|---|---|---|---|
| Installation | Pre-installed | Clip-on / Adhesive | OBD-II or Hub Install |
| Battery Required | No (Uses Car Power) | Yes (CR2032/A23) | Phone Battery |
| Security | Rolling Code Encrypted | Varies by Model | Cloud + Local Encryption |
| Range | Standard (100–300 ft) | Variable | Unlimited (Wi-Fi/LTE) |
| Cost | Free (Included) | $25 – $45 | $30 – $150 + Subscription |
According to automotive safety standards outlined by Wikipedia, modern integrated transmitters must comply with FCC Part 15 regulations and utilize rolling-code encryption to prevent signal interception. Always verify your specific vehicle’s owner manual before proceeding, as programming sequences vary significantly between manufacturers.
Step-by-Step: Programming HomeLink in Your Car
For the vast majority of drivers, this is the primary answer to how to connect your garage door opener to your car. Follow these precise steps to ensure successful synchronization.
Step 1: Clear Previous Codes (If Applicable)
If you purchased a used vehicle or have never programmed the buttons before, start fresh. Press and hold the two outer HomeLink buttons simultaneously for approximately 10 seconds until the indicator light flashes rapidly. This resets the module. Note: New vehicles often skip this step.
Step 2: Train the Car Button
- Sit in the driver’s seat with the ignition in the “ON” or “ACC” position (engine running is recommended to prevent battery drain).
- Hold your original handheld garage remote 1–3 inches away from the HomeLink buttons.
- Simultaneously press and hold both the handheld remote button AND your chosen HomeLink button.
- Watch the indicator light above the HomeLink buttons. It will flash slowly at first, then rapidly when the frequency has been captured. This typically takes 5–20 seconds.
- Release both buttons once the rapid flashing begins.
Step 3: Program the Garage Door Motor Unit
This critical step syncs the car to the actual motor, not just the remote signal.
- Locate the “Learn” or “Smart” button on your garage door opener motor unit (usually on the back or side panel near the antenna wire). Colors vary: yellow, purple, orange, red, or green.
- Press and release the Learn button. You have exactly 30 seconds to complete the next action.
- Return to your vehicle and press the newly programmed HomeLink button firmly three times, holding each press for 2 seconds.
- Test the connection. The door should activate. If it does not, repeat Step 3, ensuring you are within the 30-second window.
⚠️ Safety Warning: Never program your garage door opener while the door is moving or obstructed. Ensure the safety reversal sensors are clean and aligned before testing. Keep hands and objects clear of the door path during programming.
Connecting via Universal Visor Remotes
If your vehicle lacks built-in integration, a universal visor remote is the most reliable alternative for understanding how to connect your garage door opener to your car without aftermarket modifications.
Choosing the Right Universal Remote
Not all universal remotes work with all openers. Check compatibility lists on packaging. Brands like Chamberlain, Genie, and LiftMaster offer broad compatibility. Look for units labeled “Rolling Code Compatible” if your opener was manufactured after 1996.
Installation and Programming Steps
- Mount the Remote: Use the included visor clip or adhesive pad. Position it where your hand naturally reaches without stretching.
- Insert Batteries: Most use CR2032 or A23 batteries. Ensure polarity is correct.
- Enter Programming Mode: Press and hold the “Program” or “Learn” button on the universal remote until the LED blinks (usually 3–5 seconds).
- Transfer Signal: Press the button on your original remote while holding the universal remote’s program button. Wait for confirmation flash.
- Sync to Motor: Just like HomeLink, press the Learn button on the garage motor, then press the new universal remote button within 30 seconds.
Smart Garage Controllers: The Modern Alternative
For drivers who want smartphone integration alongside in-car control, smart garage controllers bridge the gap. Devices like myQ, Tailwind, or Meross connect to your existing opener and provide app-based control, geofencing, and status alerts.
Benefits Over Traditional Methods
- Remote Access: Open/close from anywhere via cellular data.
- Auto-Close Features: Automatically shuts the door if left open beyond a set time.
- Guest Access: Grant temporary digital keys to family or service providers.
- Integration: Works with Alexa, Google Home, and Apple HomeKit.
While these systems don’t replace in-car buttons, they complement them perfectly. Many newer vehicles now integrate directly with myQ or similar platforms via infotainment screens, eliminating the need for physical button programming entirely.
Troubleshooting Common Connection Issues
Even with perfect instructions, hiccups occur. Here are solutions to the most frequent problems when learning how to connect your garage door opener to your car.
Problem: Light Flashes But Door Doesn’t Move
- Cause: Frequency captured, but rolling code not synced to motor.
- Fix: Repeat Step 3 of HomeLink programming. Ensure you press the Learn button on the motor before pressing the car button. Verify the Learn button color matches your opener’s generation.
Problem: Works Intermittently
- Cause: Weak battery in handheld remote used during training, or interference from LED bulbs.
- Fix: Replace batteries in your original remote before reprogramming. Swap out garage LED bulbs for RF-shielded models designed for garage openers. Incandescent bulbs cause zero interference.
Problem: HomeLink Won’t Enter Programming Mode
- Cause: Module locked, fuse blown, or vehicle requires ignition cycle.
- Fix: Turn ignition OFF, wait 30 seconds, turn back to ACC. Check vehicle fuse box for “HomeLink” or “Accessory” fuse. Consult dealer if module appears dead.
Problem: Older Fixed-Code Opener Incompatible
- Cause: Pre-1996 openers use fixed codes that modern rolling-code systems reject.
- Fix: Purchase a “HomeLink Compatibility Bridge” (available from opener manufacturers). This device translates old signals to new protocols. Alternatively, upgrade the opener motor—a worthwhile investment for safety and reliability.
Frequently Asked Questions (FAQ)
Q1: Can I program my car’s garage button without the original remote?
Yes, but only if your garage opener has a functioning Learn button and you can access the motor unit. Press the Learn button on the motor, then immediately follow the vehicle-side programming sequence. However, having the original remote makes initial frequency capture significantly faster and more reliable.
Q2: Why does my HomeLink work sometimes but not others?
Intermittent operation usually stems from weak batteries in the training remote, RF interference from nearby electronics or LED lighting, or incomplete rolling-code synchronization. Replace training remote batteries, eliminate potential interference sources, and re-sync following the full three-step process. Temperature extremes can also temporarily affect signal strength.
Q3: Is it safe to program my garage opener myself, or should I hire a professional?
DIY programming is completely safe and intended by manufacturers. No electrical wiring is involved—only wireless signal pairing. However, if your opener lacks safety reversal sensors, shows signs of mechanical wear, or you’re uncomfortable accessing the motor unit, consult a certified technician. Safety should always precede convenience.
Q4: Will connecting my car void my vehicle or garage door warranty?
No. Programming integrated transmitters like HomeLink is a standard user function covered in your vehicle’s owner manual. Similarly, syncing approved remotes to your garage opener does not violate manufacturer warranties. Only unauthorized hardware modifications or forced electrical alterations could potentially impact coverage.
Q5: How do I know if my car has HomeLink or another system?
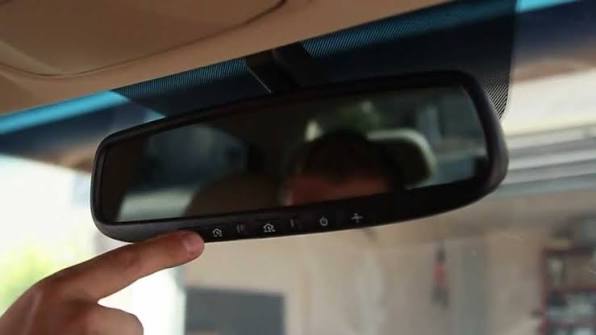
Check your rearview mirror, overhead console, or sun visor for buttons labeled “HomeLink,” “Car2U,” or generic icons resembling a house/garage. Consult your vehicle’s owner manual index under “Garage Door Opener” or “Universal Transmitter.” Manufacturer websites also provide VIN-based feature lookups.
Q6: Can multiple cars be programmed to the same garage opener?
Absolutely. Most modern garage door openers support 8–32 individual remote/transmitter codes. Each vehicle must be programmed separately using the Learn button sequence. There is no limit to the number of cars, though exceeding the memory capacity requires clearing old codes first. Refer to your opener’s manual for exact capacity.
Conclusion
Learning how to connect your garage door opener to your car transforms a daily annoyance into effortless routine. Whether you’re syncing built-in HomeLink buttons, installing a universal visor remote, or upgrading to smart controller technology, the result is the same: secure, weatherproof, hands-free access to your home. By following the precise steps outlined above and respecting safety protocols, you’ll achieve reliable performance that lasts for years.
Found this guide helpful? Share it with friends, family, or neighbors who still wrestle with bulky remotes! Tag us on social media with your success story—we love seeing seamless garages across the country. Safe driving and happy parking! 🏡🚗
Leave a Reply