Struggling with a disconnected system? Learning how to connect garage door opener to garage door doesn’t have to be a headache, and we’re here to walk you through every step with ease. Whether you just bought a new unit or rehung an old one, this guide will help you get your system running smoothly in no time.
How To Connect Garage Door Opener To Garage Door: What Tools Do You Need?
Before we dive into the physical work, let’s gather the right equipment. Having everything within arm’s reach will save you countless trips up and down the ladder.
Here is a concrete list of tools you will need for a successful installation:
- A sturdy stepladder (at least 6 feet tall)
- A power drill with a 5/32-inch and 3/16-inch drill bit
- Adjustable wrenches and locking pliers
- A tape measure and a carpenter’s level
- Socket set and screwdrivers (both flathead and Phillips)
- Safety goggles and work gloves
How Do You Properly Mount the Opener Motor to the Ceiling?
Mounting the motor is the foundation of your entire system. If it is not level, the door will struggle to open and close, leading to premature wear.
Step 1: Mark the Centerline Use your tape measure to find the exact center of your garage door. Snap a chalk line from the top of the door straight up to the ceiling. This line is your primary guide.
Step 2: Hang the Angle Iron Most modern openers come with a hanging angle iron. Position the angle iron so it straddles your chalk line. Use your drill to secure it to the ceiling joists with the provided lag screws. Ensure it is perfectly level using your carpenter’s level.
Step 3: Attach the Motor Unit With a helper, lift the motor unit and slide it onto the angle iron. Secure it using the provided bolts. Pro tip: Leave about 2 inches of clearance between the motor and the top of the garage door to prevent any mechanical interference.
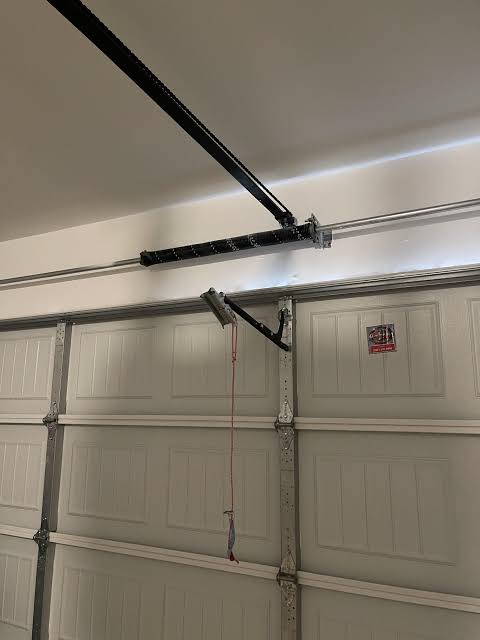
How Do You Assemble the Rail and Attach the Door Arm?
The rail acts as the highway for the trolley that pulls your door. Assembling it correctly ensures a quiet and efficient operation.
Step 1: Connect the Rail Sections Lay the rail sections on the floor. Slide them together and secure them with the provided bolts. Make sure the connections are tight but do not overtighten, which can strip the threads.
Step 2: Attach the Rail to the Motor Slide the assembled rail onto the motor unit. Secure it with the bolts provided. You should hear a distinct click when it locks into place.
Step 3: Install the Trolley and Door Arm Insert the trolley carriage into the rail. Next, connect the curved door arm to the trolley and the straight arm to the top bracket on your garage door. Use the provided clevis pins and cotter pins to secure the connections.
When attaching the top bracket to the garage door itself, use a level to ensure it is perfectly horizontal. Drill 4 pilot holes using a 5/32-inch drill bit, then secure the bracket with the provided carriage bolts. Adjust the length of the straight arm so it forms a slight downward angle when the door is closed.
How Do You Install and Align the Safety Sensors?
Safety sensors are non-negotiable. They prevent the door from crushing objects, pets, or people. According to the Wikipedia entry on garage door openers, modern openers are legally required to have these auto-reverse mechanisms to ensure household safety.
Step 1: Mount the Sensor Brackets Attach the sensor brackets to the vertical tracks on both sides of the door. They must be exactly 6 inches above the floor. Use your tape measure to verify this height on both sides.
Step 2: Wire the Sensors Run the sensor wires along the wall and ceiling back to the motor unit. Use insulated staples to keep the wires neat and secure. Strip 1/2 inch of insulation from the wire ends and connect them to the corresponding terminals on the back of the motor.
Step 3: Align the Sensors This is the most critical step. Both sensors must face each other directly. Adjust them until the LED lights on both sensors glow solidly (usually green or amber, depending on the brand). If a light is blinking, they are misaligned.
Note: If you live in an area with direct sunlight, the sun’s infrared rays can sometimes blind the sensors in the late afternoon. If this happens, consider swapping the sending and receiving sensors, or install a small sun shield over the lenses.
How Do You Program the Remote and Test the Auto-Reverse?
With everything physically connected, it is time to bring the system to life and ensure it operates safely.
Step 1: Set the Travel Limits The travel limits tell the motor when to stop opening and closing. Locate the limit adjustment screws on the side of the motor. Turn the “Down” limit screw to set where the door rests on the floor. Turn the “Up” limit screw to set where the door stops when fully open.
Step 2: Adjust the Force Settings The force setting dictates how much power the motor uses. If the setting is too high, the door won’t reverse when it hits an obstacle. If it is too low, the door will stop prematurely. Adjust the dials incrementally until the door opens and closes smoothly without straining.
Step 3: Program the Remote Press the “Learn” button on the motor unit until the indicator light blinks. Within 30 seconds, press and hold the button on your remote control. Release it when the motor light flashes or clicks, indicating the code is saved.
Step 4: Connect the Wall Console Run the thin 2-conductor wire from the motor to your desired indoor location, usually inside the house entry door. Strip 1/4 inch of insulation and connect the wires to the back of the wall console. Mount it at least 5 feet high to keep it out of the reach of small children.
Step 5: Test the Auto-Reverse Place a 2×4 piece of wood flat on the floor under the center of the door. Close the door. Upon touching the wood, the door must immediately reverse direction. If it does not, adjust the force settings and test again.
Chain Drive vs. Belt Drive: Which is Right for You?
Before you start, ensure you have the right type of opener for your specific needs. Here is a quick comparison to help you understand your hardware:
| Feature | Chain Drive Opener | Belt Drive Opener |
|---|---|---|
| Noise Level | Loud and noticeable | Whisper-quiet operation |
| Durability | Extremely high | Very high |
| Best For | Detached garages | Garages attached to bedrooms |
| Price Point | Budget-friendly | Slightly more expensive |
DIY Installation vs. Hiring a Professional
Still on the fence about doing it yourself? Here is a breakdown of what to expect:
| Feature | DIY Installation | Hiring a Professional |
|---|---|---|
| Cost | $150 – $300 (Unit + Tools) | $300 – $600 (Unit + Labor) |
| Time Required | 4 to 6 hours | 2 to 3 hours |
| Skill Level | Beginner to Intermediate | Expert Handled |
| Warranty | Unit warranty only | Unit + Labor warranty |
| Safety Risk | Moderate (Working at heights) | Zero (Fully insured) |
Frequently Asked Questions About Garage Door Openers
1. Can I install a garage door opener by myself? Yes, you absolutely can. If you are comfortable using basic hand tools, following instructions, and working on a stepladder, you can handle this project. Just take your time and prioritize safety.
2. How long does it take to connect a garage door opener? For a first-time DIYer, expect the entire process to take about 4 to 6 hours. If you have prior experience with similar home improvement projects, you can easily finish it in 2 to 3 hours.
3. Why won’t my garage door close after connecting the opener? This is almost always an issue with the safety sensors. Check to ensure the sensor lenses are clean and perfectly aligned. If the LED lights are blinking, adjust the brackets until the lights glow solidly.
4. How often should I maintain my garage door opener? You should perform a basic maintenance check every six months. This includes lubricating the chain or screw drive, tightening any loose hardware, and testing the auto-reverse safety feature.
5. Do I need a special outlet for the garage door opener? No, a standard 120-volt, grounded electrical outlet is perfectly fine. However, ensure the outlet is easily accessible and not controlled by a wall switch, which could accidentally cut the power.
Conclusion
Learning how to connect garage door opener to garage door empowers you to take control of your home’s security and convenience. By following these detailed steps, you save money on professional labor and gain the satisfaction of a job well done. Your new setup will operate smoothly, quietly, and safely for years to come.
Leave a Reply