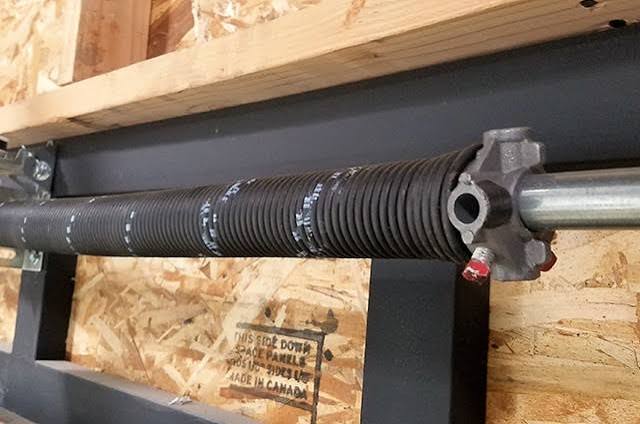
Replacing a broken garage door spring is one of the most daunting tasks for a homeowner. The sheer tension involved makes it dangerous, yet leaving it broken leaves your car trapped inside. If you are wondering how to change torsion springs on a garage door, you are in the right place. This guide prioritizes safety above all else, providing a clear, professional roadmap to help you complete this repair with confidence and precision.
⚠️ Critical Safety Warning: Read Before Proceeding
Before we discuss tools or steps, we must address the elephant in the room: Torsion springs are under extreme tension.
According to industry data, garage door springs can hold anywhere from 200 to 300 pounds of tension. If released incorrectly, they can cause severe injury, property damage, or even death.
- If you are unsure about any step, stop immediately.
- Never remove the winding bars while the spring is under tension.
- Wear safety glasses and heavy-duty gloves at all times.
This guide is for educational purposes. While many DIYers successfully replace these springs, hiring a licensed professional is always the safest option if you lack mechanical experience.
Why Do Torsion Springs Break?
Understanding why your spring failed can help you prevent future issues. Torsion springs are rated by “cycles,” where one cycle equals one opening and one closing of the door.
- Standard Springs: Typically rated for 10,000 cycles (approx. 7–10 years of average use).
- High-Cycle Springs: Rated for 25,000+ cycles, often made with better-quality steel.
Factors that accelerate breakage include:
- Lack of Lubrication: Friction generates heat and weakens the metal.
- Temperature Fluctuations: Extreme cold makes metal brittle; extreme heat expands it.
- Poor Installation: Incorrect winding puts uneven stress on the coil.
For more technical details on spring mechanics, you can refer to the general principles of torsion mechanics on Wikipedia.
Tools You Will Need
Gathering the right tools before starting is crucial. You do not want to be searching for a wrench while holding a winding bar under tension.
| Tool | Specification/Purpose |
|---|---|
| Winding Bars | Two solid steel bars (usually 1/2″ diameter, 18–24 inches long). Do not use screwdrivers. |
| Socket Set | To remove the center bearing plate bolts. |
| Vise Grips/Locking Pliers | To clamp the torsion tube and prevent it from spinning. |
| Stepladder | Sturdy enough to reach the header bracket comfortably. |
| Safety Gear | ANSI-rated safety glasses and leather work gloves. |
| Tape Measure | To measure wire size, length, and inside diameter. |
Step 1: Identify and Order the Correct Replacement
You cannot buy a “universal” torsion spring. You must match the specifications of your old spring exactly. Look for the painted color code on the old spring or measure the following:
- Wire Size: Measured in inches (e.g., 0.250″, 0.225″). Use a caliper for accuracy.
- Inside Diameter (ID): Usually 2″ or 2-1/8″.
- Length: Measured when the spring is relaxed (not stretched).
- Wind Direction:
- Left-Wound: Painted red (usually installed on the right side of the door when facing it from inside).
- Right-Wound: Painted black (usually installed on the left side).
Pro Tip: If one spring breaks, it is highly recommended to replace both. Since they were installed at the same time, the second spring is likely near the end of its life cycle as well.
Step 2: Secure the Garage Door
Safety begins with securing the load. The springs lift the weight of the door; if you release the springs while the door is unsupported, it will crash down.
- Close the garage door completely.
- Clamp vice grips onto the torsion tube (the horizontal shaft) just below the stationary cone (the non-moving part of the spring assembly) on both sides. This prevents the tube from rotating unexpectedly.
- Disconnect the garage door opener by pulling the emergency release cord.
- Verify the door is balanced and stays closed without assistance.
Step 3: Release Tension from the Old Spring
This is the most dangerous part of the process. Take your time.
- Insert a winding bar into the hole of the winding cone (the movable part with holes).
- Keep a firm grip on the bar. The spring will want to spin violently.
- Slowly let the spring unwind by moving the bar downward.
- Once the bar is horizontal, insert your second winding bar into the next available hole.
- Remove the first bar and repeat the process.
- Continue until all tension is released and the winding bars can be removed easily. The spring should feel loose.
Note: Always keep your body and face to the side of the winding bars, never directly in line with them. If a bar slips, it will fly out sideways, not toward you.
Step 4: Remove the Old Springs
With the tension gone, you can now disassemble the hardware.
- Loosen the set screws on the winding cone and the stationary cone. You may need to tap them gently with a hammer to break them loose.
- Unbolt the center bearing plate (the bracket holding the springs in the middle).
- Slide the torsion tube slightly to the side to create space.
- Slide the old spring off the tube.
- Repeat for the second spring if you are replacing both.
Step 5: Install the New Springs
Now, reverse the process to install the new units.
- Slide the new spring onto the torsion tube. Ensure the static wind (the tight coil end) faces the center bearing plate.
- Reattach the center bearing plate and bolt it securely to the wall header.
- Insert the stationary cone into the end of the spring and tighten the set screws firmly.
- Attach the winding cone to the other end of the spring. Do not tighten the set screws on the winding cone yet.
Step 6: Wind the New Springs
You must add tension back into the system to lift the door. This requires precise counting.
- Check the manufacturer’s specification for the number of quarter-turns required. A standard residential door usually requires 30–36 quarter-turns (7.5 to 9 full turns).
- Insert your two winding bars into the winding cone.
- Begin winding the spring by pushing the bar upward and around.
- Count every quarter-turn aloud. “One, two, three…”
- After every few turns, ensure the coils are nesting tightly together.
- Once you reach the required number of turns, hold the bar firmly.
- Tighten the set screws on the winding cone while maintaining tension.
- Slowly release the tension from the winding bars.
Repeat this process for the second spring. Ensure both springs have the exact same number of turns to maintain balance.
Step 7: Test and Lubricate
- Remove the vice grips from the torsion tube.
- Apply a specialized garage door lubricant (silicone-based or lithium grease) to the springs. Avoid WD-40 as it attracts dust.
- Manually lift the door halfway. It should stay in place. If it falls, the springs are under-wound. If it flies up, they are over-wound.
- Reconnect the garage door opener and test the automatic cycle.
FAQ: Common Questions About Torsion Springs
1. Can I replace only one torsion spring?
Technically, yes, but it is not recommended. Since both springs endured the same usage cycles, the remaining old spring is likely to fail soon. Replacing both ensures balanced lifting and saves you from doing the job twice in a short period.
2. How do I know if my spring is left-wound or right-wound?
Look at the color coding. Red usually indicates left-wound, and black indicates right-wound. Alternatively, look at the direction the coils wrap. If you curl your fingers in the direction of the coil, your thumb points to the wind direction.
3. Is it illegal to change garage door springs myself?
No, it is not illegal for homeowners to perform their own repairs in the US. However, some local jurisdictions may require permits for structural changes, though spring replacement rarely falls under this. Always check local HOA rules or insurance policies.
4. Why does my garage door slam shut after replacing springs?
This indicates the springs are under-wound. They do not have enough tension to counterbalance the weight of the door. You will need to add more quarter-turns to the winding cones. Conversely, if the door reverses when closing, the springs may be over-wound.
5. How long do torsion springs last?
Standard springs last about 10,000 cycles. For an average family using the door 3–4 times a day, this translates to roughly 7–10 years. High-cycle springs can last up to 20 years with proper maintenance.
Conclusion
Learning how to change torsion springs on a garage door empowers you to handle a critical home maintenance task efficiently. By following the steps outlined above—prioritizing safety, measuring accurately, and winding precisely—you can restore your garage door’s functionality without breaking the bank.
Remember, patience is your best tool. Rushing the winding process is the primary cause of accidents. If at any point you feel uncomfortable, do not hesitate to call a professional.
Did you find this guide helpful? Share this article with your neighbors or on social media to help others tackle their DIY projects safely. Let’s keep our communities safe and informed!
Leave a Reply