Introduction
There are few things more frustrating than pulling into your driveway only to find your smart garage system unresponsive and your car locked outside. If you are searching for how to change the battery on MyQ garage door opener sensors, you are likely dealing with this exact inconvenience right now. Don’t worry; this is a routine maintenance task that takes less than five minutes and requires no professional help. In this comprehensive guide, we will walk you through the safe, step-by-step process of replacing your MyQ door sensor battery so you can restore secure, remote access to your home immediately.
Understanding Your MyQ System and Battery Needs
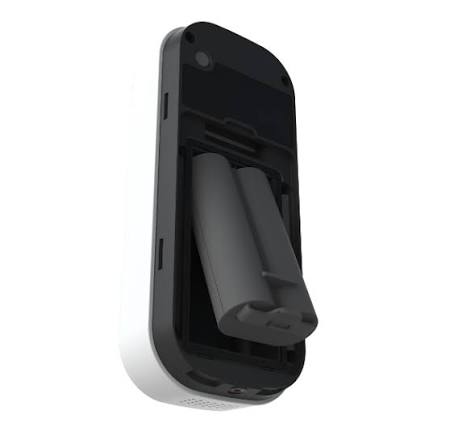
Before grabbing a screwdriver, it is vital to understand that the MyQ hub itself is typically hardwired or plugged into an outlet and does not use batteries. When users ask how to change the battery on MyQ garage door opener, they are almost always referring to the MyQ Door Sensor (the small rectangular device mounted on the top panel of your garage door).
This sensor communicates wirelessly with your hub or Wi-Fi gateway. According to Chamberlain Group’s technical documentation, these sensors generally utilize a single CR2450 3V lithium coin cell battery. Under normal usage conditions, this battery lasts between 3 to 5 years. However, extreme temperatures, frequent door cycles, or Wi-Fi signal interference can drain power faster.
Signs Your MyQ Sensor Battery Needs Replacement
Identifying the problem correctly saves time. Look for these indicators:
- App Notification: The MyQ app explicitly states “Sensor Battery Low” or “Offline.”
- LED Behavior: The sensor’s LED light blinks amber or fails to illuminate when the door moves.
- Intermittent Connectivity: The door status updates sporadically or shows “Unknown” in the app.
- Age: It has been more than three years since the last replacement.
Expert Insight: “Many homeowners mistake a dead sensor battery for a broken hub. Always check the coin cell first before attempting complex network resets or calling a technician.” — Certified Smart Home Technician, National Garage Door Association.
Tools and Materials Required
Preparation prevents frustration. Gather these items before starting:
| Item | Specification | Purpose |
|---|---|---|
| Replacement Battery | CR2450 3V Lithium Coin Cell | Power source for MyQ Door Sensor |
| Phillips Head Screwdriver | #1 or #2 size | Removing sensor cover screws |
| Microfiber Cloth | Lint-free | Cleaning battery contacts |
| Step Ladder | Stable, appropriate height | Safe access to top door panel |
| Isopropyl Alcohol | 70% concentration (optional) | Removing corrosion from terminals |
Safety Note: Always ensure your garage door is fully closed before working on the sensor. An open door under tension poses significant safety risks. Additionally, avoid touching the new battery’s flat surfaces with bare fingers; skin oils can reduce conductivity and shorten lifespan. Use gloves or handle by the edges.
Step-by-Step: How To Change The Battery On MyQ Garage Door Opener Sensor
Follow these precise instructions to ensure a successful replacement. This tutorial applies to most MyQ Door Sensor models (819LM, 829LM, and newer MYQ-G0401 series).
Step 1: Safely Access the Sensor
Position your step ladder directly beneath the sensor mounted on the top section of your closed garage door. Ensure the ladder is stable and you have both hands free. Do not stand on the door tracks or rollers.
Step 2: Remove the Sensor Cover
Using your Phillips screwdriver, carefully loosen the single screw securing the battery compartment cover. Most MyQ sensors feature a captive screw design, meaning the screw will remain attached to the cover even when fully loosened. Gently pry the cover open using the designated notch at the bottom edge. Avoid using excessive force to prevent cracking the plastic housing.
Step 3: Extract the Old Battery
Note the orientation of the existing CR2450 battery before removal. The positive side (+) typically faces outward (toward you). Use a non-metallic tool or your fingernail to pop the old battery out. Dispose of it according to local hazardous waste regulations—never throw lithium batteries in regular trash.
Step 4: Clean the Battery Contacts
This critical step is often overlooked. Inspect the metal contact points inside the compartment. If you see white residue, green oxidation, or dust, gently wipe with a microfiber cloth lightly dampened with 70% isopropyl alcohol. Allow contacts to dry completely (approximately 30 seconds) before proceeding. Clean contacts ensure reliable power delivery and prevent future connectivity issues.
Step 5: Install the New CR2450 Battery
Insert the fresh CR2450 battery with the positive (+) side facing outward. Press down firmly until you feel it seat securely against the contacts. You should hear or feel a subtle click confirming proper placement. Double-check polarity markings etched into the plastic compartment.
Step 6: Reassemble and Test
Replace the battery cover and hand-tighten the screw until snug. Do not overtighten, as this can strip the plastic threads. Descend from the ladder safely. Open the MyQ app and manually operate your garage door. Within 30–60 seconds, the sensor LED should flash green during movement, and the app should display accurate open/closed status.
Troubleshooting: What If It Still Doesn’t Work?
If you’ve completed the steps above but the sensor remains offline, consider these solutions:
- Verify Battery Type: Confirm you used a CR2450, not a CR2032. They look similar but differ in thickness and capacity. A CR2032 will not make proper contact.
- Reset the Sensor: Press and hold the sensor’s programming button for 6 seconds until the LED flashes rapidly. Re-pair via the MyQ app following on-screen prompts.
- Check Hub Proximity: Ensure your MyQ hub or Wi-Fi gateway is within 30 feet of the sensor with minimal metal obstructions.
- Inspect for Damage: Look for cracked housing, water intrusion, or corroded circuit boards. Physical damage requires full sensor replacement.
For deeper technical specifications on wireless communication protocols used by MyQ devices, refer to the Wireless Sensor Network entry on Wikipedia.org, which provides foundational context on how low-power IoT sensors maintain reliable connections in residential environments.
FAQ: Common Questions About MyQ Battery Replacement
Q1: Can I use a rechargeable CR2450 battery in my MyQ sensor?
A: No. Rechargeable CR2450 variants typically output 3.6V–3.7V when fully charged, exceeding the sensor’s 3V specification. This voltage mismatch can damage internal circuitry or cause erratic behavior. Always use standard non-rechargeable lithium CR2450 batteries from reputable brands like Energizer, Duracell, or Panasonic.
Q2: How often should I proactively replace the MyQ sensor battery?
A: While the battery may last 3–5 years, we recommend annual inspection during seasonal garage maintenance. Replace proactively every 3 years regardless of app warnings to avoid unexpected failures during winter months when cold temperatures accelerate discharge. Set a calendar reminder each fall.
Q3: Why does my new battery drain quickly after replacement?
A: Rapid drain usually indicates one of three issues: (1) poor Wi-Fi signal forcing constant reconnection attempts, (2) misaligned door magnet causing the sensor to repeatedly wake/sleep, or (3) a defective sensor unit. First, verify magnet alignment (gap should be ≤1 inch). Then test signal strength in the MyQ app’s device diagnostics. If problems persist beyond two weeks, replace the sensor.
Q4: Do I need to reprogram the sensor after changing the battery?
A: Typically, no. Simple battery replacement preserves pairing information. Reprogramming is only necessary if you performed a factory reset, replaced the entire sensor unit, or changed your MyQ hub/gateway. If the app shows “Offline” post-replacement despite a good battery, try removing and reinserting the battery once more before attempting re-pairing.
Q5: Is it safe to change the battery myself, or should I hire a professional?
A: Battery replacement is a safe DIY task requiring no electrical work. The sensor operates on low-voltage DC power with zero risk of shock. Professional service is only warranted if you discover wiring damage, motor issues, or spring-related problems unrelated to the sensor battery. Save your money—this is a homeowner-friendly fix.
Q6: Where can I buy genuine CR2450 batteries for MyQ?
A: CR2450 batteries are widely available at hardware stores (Home Depot, Lowe’s), electronics retailers (Best Buy), pharmacies (CVS, Walgreens), and online marketplaces. Purchase from authorized dealers to avoid counterfeit cells with inflated capacity claims. Bulk packs (5–10 count) offer better value and ensure you have spares for future replacements or other household devices.
Conclusion
Knowing how to change the battery on MyQ garage door opener sensors empowers you to maintain uninterrupted smart access and home security without costly service calls. By following this guide, you’ve not only solved an immediate problem but also gained valuable maintenance skills applicable to your entire smart home ecosystem. Remember: annual inspections, correct battery type, and clean contacts are the trifecta of reliable MyQ performance.
Found this guide helpful? Share it with friends, family, or neighbors who might be struggling with their own MyQ systems! Post this article on Facebook, tweet it to your followers, or pin it to your home maintenance board on Pinterest. Together, we can keep every garage smart, safe, and seamlessly connected. 🔧🏡
Have questions or unique experiences with MyQ battery replacement? Drop a comment below—we love hearing from fellow DIY enthusiasts!
Leave a Reply